Welcome to 1757
this set of documents is intended to be both a teaching platform as well as a resource for future generations to learn about how we do programming on this team.
If you want to know "how do I run robot code" just start with installation
Warning: When writing and testing out your code on this site, you may encounter issues with python depending on your browser. If any problems pop up just try reloading the site.
More to come!
General Resources
| Resource Name | Description |
|---|---|
| How we do game breakdowns | Mandatory watch for every 1757 student this is typically substituted with a more specific walkthrough throughout the season teaching game breakdown |
| FRC.sh | FRC docs quick reference |
| FRCZero | FRC Zero is a knowledge base for students, mentors, and parents of FIRST Robotics Competition teams. It is a single source of information for all things FIRST Robotics Competition. This includes information on the game, the rules, the robot, and the competition and much more. |
| TheBlueAlliance | The Blue Alliance is the best way to scout, watch, and relive the FIRST Robotics Competition. |
| Statbotics | Modernizing FRC Data Analytics, FRC match data analysis |
| Mechanism Encyclopedia | past subsystems/structures/gamepieces and solutions for when they were implemented, best for getting ideas on execution |
| ChiefDelphi | Home of OpenAlliance, FRC Discussion, and everything inbetween. Typically has a low signal to noise ratio, but contains a lot of good collective knowledge. |
| FIRST's own technical resources | might have some bits, mostly about specifics of "how do I..." |
| Competition, Manual, and QA system | will be updated as season progresses, where you can find the game manual |
| FRCManual.com | A better, fuzzy searchable instance of the manual |
| FIRSTUpdatesNow | RC youtube channel, does behind the bumpers, behind the glass, information videos, good for resources |
| JumpStart | Good "getting started" series |
| 1678's helpful video series | good set of videos by a good team, regarding a lot of different FIRST aspects |
Design-Specific resources
| Name | Description |
|---|---|
| FRCDesign.org | Teaching and learning platform for CAD that 1757 uses |
| How 1757 does multi-doc onshape projects | How we work with multiple documents to allow multiple collaborators on the same project at once |
| 971's spartan series | bunch of talks by a team who knows what they're talking about |
| 1678's fall workshop series | bunch of talks by a team who knows what they're talking about |
| Workshop: how to design simple, pt1 | By Karthik |
| Workshop: how to design simple, pt2 | by Adam Heard 254/973/a bunch |
| Workshop: how to design simple, pt3 | by Mike Corsetto of 1678 |
| Workshop: how to set good goals | Mike Corsetto 1678 |
| Workshop: how to analyze a game | Mike Corsetto of 1678 |
| "Modern" FRC Games, Strategy, and Design | by 2910 jack in the bot from milcreek, wa 2025 world champions |
| ReCalc | A set of really beneficial calculators, can figure out what gears you need to achieve a certain gear ratio, general timings of mechanisms based on their ratios, has motor profiles to be able to compare intrinsic values of |
Programming-specific resources
| Name | Description |
|---|---|
| Robotpy ReadTheDocs | Official documentation for everything related to RobotPy |
| RealPython's from-scratch python course | Extra python tutorials, in case this website is insufficient for you |
| 2021 T Shirt Cannon | Pneumatically controlled T Shirt cannon mounted onto a swerve drive chassis |
| 2022 Robot Code | Contains limelight vision system, pneumatic intake with rollers, turret, angle alignment system, swerve drive, and a climber |
| 2023 Robot Code | State-dependent lights, 3 jointed arm with inverse kinematics, simple state-driven intake, swerve drive |
| 2024 Robot Code | Complex intake state system, full field vision system, multi motor shooter with angle alignment, contains first use of profiled motion control on motors, elevator and climber mechanisms |
| 2025 Robot Code | Swerve, elevator, intake, full field vision system, auto alignment to piece, climber |
| Python day 1 video | By Luke, introductory python lesson |
| The Missing Semester of your CS Education | Linux tutorial series |
| Learning Python 4th edition | Complete supplemental python tutorial book |
| Programming session 1 | 2022 introductory programming lessons |
| PathPlanner | The system for automated paths we use |
| Limelight Vision | Limelight vision system's main page |
| PhotonVision | PhotonVision vision system for _pi systems |
| FRC Control system diagram | Explains each electrical component in a typical FRC robot |
| Basic WPIlib software stack | Not super relevant, we use a little bit of it though |
| FRC networking basics | How network systems work on a FRC robot |
| CTRE docs | Cross the Road Electronics documentation page |
| Introductory control theory course | Explains PIDF |
| Carbon NOW | Good looking code snippet generator |
| Cornell Python tutorial series | Fall 2020 python tutorials at Cornell university |
Discord Servers
| Server | Why? |
|---|---|
| Unofficial FRC Discord Server | lots of yap, stuff gets lost easily, but people discussing FRC |
| NEFRC Discord | New England specific FRC server, has good content and coordination between other teams |


Installing RobotPY
As a team we use python and robotpy
Linux for FRC Development
Linux plays a crucial role in FIRST Robotics Competition (FRC) development, serving as both the foundation for robot control systems and the preferred development environment for many teams. This section covers Linux fundamentals specifically tailored for FRC robotics programming.
Why Linux Matters in FRC
Linux is the underlying operating system behind RoboRIOs, the main control unit for FRC robots. Understanding Linux concepts helps you:
- Debug robot issues: SSH into the RoboRIO to diagnose problems
- Develop efficiently: Use powerful command-line tools for faster development
- Understand system behavior: Know how your robot code interacts with the OS
- Deploy code reliably: Understand the deployment process and troubleshoot issues
- Manage development environments: Set up consistent, reproducible development setups
Linux in the FRC Ecosystem
graph TD
    A[Development Machine] --> B[Robot Code]
    A --> C[Git Repository]
    A --> D[Build Tools]

    B --> E[RoboRIO]
    E --> F[Linux OS]
    F --> G[Python Runtime]
    F --> H[System Services]
    F --> I[Network Stack]

    C --> J[Version Control]
    C --> K[Collaboration]

    D --> L[RobotPy]
    D --> M[WPILib Tools]

    subgraph "RoboRIO Environment"
        E
        F
        G
        H
        I
    end

    subgraph "Development Tools"
        N[SSH]
        O[Git]
        P[Python]
        Q[Text Editors]
        R[Terminal]
    end

    A --> N
    A --> O
    A --> P
    A --> Q
    A --> R

    style E fill:#1976d2
    style F fill:#4caf50
    style A fill:#ff9800
Key Linux Concepts for FRC
File System Structure
Understanding the Linux file system helps when working with RoboRIO files:
/home/lvuser/- User home directory on RoboRIO/usr/local/frc/- FRC-specific files and libraries/etc/- System configuration files/var/log/- System and application logs
Processes and Services
- systemd: Service management system used on RoboRIO
- Process monitoring: Understanding how robot code runs as a service
- Resource management: CPU, memory, and I/O considerations
Networking
- Network interfaces: Ethernet, WiFi, USB connections
- Port forwarding: Accessing robot services from development machine
- SSH tunneling: Secure remote access to robot systems
Development Environment Setup
A proper Linux development environment for FRC includes:
- Terminal and Shell: Command-line interface for efficiency
- Git and Version Control: Code management and collaboration
- Python Environment: Virtual environments and package management
- SSH Tools: Remote access to robot systems
- Text Editors/IDEs: Code editing with FRC-specific features
What's Covered in This Section
- RoboRIO System Internals: Deep dive into RoboRIO's Linux environment
- Development Tools: Git, lazygit, bash scripting, and SSH workflows
- Python Development: Setting up Python environments for FRC development
- System Administration: Managing Linux systems for robotics
Quick Start Commands
Here are essential commands every FRC developer should know:
# Connect to RoboRIO via SSH
ssh [email protected]

# Check robot code status
sudo systemctl status robot

# View robot code logs
journalctl -u robot -f

# Deploy robot code (from development machine)
python robot.py deploy

# Check network connectivity
ping roborio-TEAM-frc.local
Learning Path
- Start with basics: Command line navigation and file operations
- Learn Git: Version control for team collaboration
- Master SSH: Remote access and troubleshooting
- Understand processes: How robot code runs on the RoboRIO
- Practice debugging: Using logs and system tools to solve problems
Whether you're new to Linux or looking to deepen your understanding for FRC development, this section provides practical knowledge you'll use throughout your robotics journey.
RoboRIO System Internals
The RoboRIO runs a specialized Linux distribution optimized for real-time robotics control. Understanding its internals helps you debug issues, optimize performance, and make the most of your robot's capabilities.
System Overview
The RoboRIO uses a NI Linux Real-Time operating system, which is based on:
- Kernel: Linux with real-time patches
- Architecture: ARM Cortex-A9 (ARMv7)
- Init System: systemd
- Package Manager: opkg (OpenWrt-based)
graph TD
    A[RoboRIO Hardware] --> B[NI Linux Real-Time]
    B --> C[systemd Init System]
    B --> D[FRC Runtime]
    B --> E[Network Services]

    C --> F[Robot Code Service]
    C --> G[FRC Services]
    C --> H[System Services]

    D --> I[Python Interpreter]
    D --> J[WPILib HAL]
    D --> K[FPGA Interface]

    E --> L[SSH Server]
    E --> M[FTP Server]
    E --> N[Web Interface]

    style B fill:#4caf50
    style D fill:#2196f3
    style F fill:#ff9800
File System Structure
Understanding the RoboRIO's file system is crucial for debugging and development:
Key Directories
/home/lvuser/           # User home directory (where your code runs)
├── py/                 # Python robot code deployment location
├── .cache/            # Application cache files
└── .config/           # User configuration files

/usr/local/frc/        # FRC-specific installations
├── JRE/               # Java Runtime Environment
├── bin/               # FRC utilities and tools
├── lib/               # FRC libraries
└── third-party/       # Third-party libraries

/var/local/natinst/    # National Instruments specific files
├── log/               # System logs
└── config/            # NI configuration

/etc/                  # System configuration files
├── natinst/           # NI-specific configuration
├── systemd/           # Service definitions
└── network/           # Network configuration

/opt/                  # Optional software packages
└── ...

/tmp/                  # Temporary files (cleared on reboot)
Important Files
/home/lvuser/robot.py- Main robot code entry point/etc/natinst/share/scs_imagemetadata.ini- System image information/var/log/messages- System log messages/etc/hostname- System hostname configuration
System Services
The RoboRIO uses systemd to manage services. Here are the key services for FRC:
Robot Code Service
Your robot code runs as a systemd service called robot:
# Check robot code status
sudo systemctl status robot

# Start robot code
sudo systemctl start robot

# Stop robot code
sudo systemctl stop robot

# Restart robot code
sudo systemctl restart robot

# Enable robot code to start on boot
sudo systemctl enable robot

# View robot code service definition
cat /lib/systemd/system/robot.service
FRC-Related Services
# FRC Driver Station communication
sudo systemctl status frcds

# Network communication services
sudo systemctl status netconsole-host
sudo systemctl status systemWebServer

# Time synchronization
sudo systemctl status ntp
SSH Access and Remote Management
SSH is your primary tool for accessing and managing the RoboRIO remotely.
Connecting to the RoboRIO
# Standard connection (replace TEAM with your team number)
ssh [email protected]

# Alternative IP addresses
ssh [email protected]        # Ethernet connection
ssh [email protected]       # USB connection

# With verbose output for debugging
ssh -v [email protected]
Default Credentials
- Username:
admin - Password: (empty - just press Enter)
SSH Key Setup
For secure, passwordless access, set up SSH keys:
# Generate SSH key pair (on development machine)
ssh-keygen -t rsa -b 4096 -C "[email protected]"

# Copy public key to RoboRIO
ssh-copy-id [email protected]

# Or manually copy the key
cat ~/.ssh/id_rsa.pub | ssh [email protected] "mkdir -p ~/.ssh && cat >> ~/.ssh/authorized_keys"
Useful SSH Commands
# File transfer with SCP
scp robot.py [email protected]:/home/lvuser/
scp [email protected]:/var/log/messages ./roborio-logs.txt

# Port forwarding for web interfaces
ssh -L 8080:localhost:80 [email protected]

# Run single commands remotely
ssh [email protected] "systemctl status robot"

# Interactive session with X11 forwarding
ssh -X [email protected]
Process Management
Understanding processes helps with debugging and performance monitoring:
Viewing Processes
# List all processes
ps aux

# Show process tree
pstree

# Real-time process monitoring
top
htop  # If available

# Find specific processes
ps aux | grep python
pgrep -f robot.py
Process Control
# Kill a specific process
kill <PID>
killall python3

# Force kill unresponsive process
kill -9 <PID>

# Send signals to processes
kill -USR1 <PID>  # Send user-defined signal
System Monitoring and Diagnostics
System Information
# System information
uname -a                    # Kernel and system info
cat /proc/version          # Detailed kernel version
cat /proc/cpuinfo          # CPU information
cat /proc/meminfo          # Memory information

# Disk usage
df -h                      # File system usage
du -h /home/lvuser/       # Directory size

# Network interfaces
ip addr show              # Network interface information
ip route show             # Routing table
Log Analysis
Logs are crucial for debugging robot issues:
# View robot code logs
journalctl -u robot        # All robot service logs
journalctl -u robot -f     # Follow robot logs in real-time
journalctl -u robot --since "1 hour ago"

# System logs
tail -f /var/log/messages  # Real-time system messages
dmesg                      # Kernel ring buffer
dmesg | tail               # Recent kernel messages

# Search logs for specific errors
grep -i error /var/log/messages
journalctl -u robot | grep -i exception
Performance Monitoring
# CPU and memory usage
top -p $(pgrep -f python)  # Monitor robot code specifically

# I/O statistics
iostat                     # If available

# Network statistics
netstat -i                 # Network interface statistics
ss -tuln                   # Socket statistics
Robot Code Deployment Process
Understanding how code gets deployed helps with troubleshooting:
Deployment Steps
- Build: Code is prepared on development machine
- Transfer: Files are copied to RoboRIO via SSH/SFTP
- Permissions: Execute permissions are set
- Service Restart: Robot service is restarted
# Manual deployment simulation
scp -r src/* [email protected]:/home/lvuser/py/
ssh [email protected] "sudo systemctl restart robot"
Deployment Locations
- Robot code:
/home/lvuser/py/ - Backup location:
/home/lvuser/py.bak/ - Service file:
/lib/systemd/system/robot.service
Troubleshooting Common Issues
Robot Code Won't Start
# Check service status
sudo systemctl status robot

# View detailed logs
journalctl -u robot -n 50

# Check file permissions
ls -la /home/lvuser/py/robot.py

# Ensure file is executable
chmod +x /home/lvuser/py/robot.py
Network Connectivity Issues
# Test network connectivity
ping 8.8.8.8               # Internet connectivity
ping 10.TE.AM.1            # Router connectivity

# Check network configuration
ip addr show
ip route show

# Restart network services
sudo systemctl restart networking
Performance Issues
# Check system load
uptime
cat /proc/loadavg

# Monitor resource usage
top
iostat 1 5

# Check for memory leaks
cat /proc/meminfo | grep -i available
Disk Space Issues
# Check disk usage
df -h

# Find large files
du -h /home/lvuser/ | sort -h

# Clean temporary files
sudo rm -rf /tmp/*
sudo journalctl --vacuum-time=7d  # Keep only 7 days of logs
Advanced System Configuration
Custom Services
You can create custom systemd services for additional functionality:
# Example: /lib/systemd/system/custom-logger.service
[Unit]
Description=Custom Robot Logger
After=robot.service

[Service]
Type=simple
User=lvuser
ExecStart=/home/lvuser/custom_logger.py
Restart=always
RestartSec=5

[Install]
WantedBy=multi-user.target
Network Configuration
The RoboRIO's network setup can be customized:
# View network configuration
cat /etc/systemd/network/

# Modify network settings (be careful!)
sudo vi /etc/systemd/network/10-eth0.network
Best Practices
- Regular Backups: Keep backups of working configurations
- Log Monitoring: Regularly check logs for warnings
- Resource Monitoring: Monitor CPU and memory usage during competition
- Network Health: Ensure stable network connections
- Service Management: Use systemd properly for service control
Security Considerations
- Change default passwords: Set strong passwords for admin account
- SSH Key Authentication: Use SSH keys instead of passwords
- Network Segmentation: Isolate robot network from other systems
- Regular Updates: Keep system packages updated when possible
- Access Control: Limit who has SSH access to the robot
Understanding these RoboRIO internals will make you a more effective FRC developer, capable of diagnosing and solving complex robot issues quickly and efficiently.
Development Tools on Linux for FRC
This page covers core development tools used in a Linux environment for FRC: Git, lazygit, Bash, and SSH. It focuses on practical workflows you’ll use daily when building and deploying robot code.
Git: Version Control for Teams
Git helps you collaborate, review changes, and maintain a clean history.
Essential Setup
# Set your identity (one-time)
git config --global user.name "Your Name"
git config --global user.email "[email protected]"

# Recommended: colored, helpful output
git config --global color.ui auto
git config --global init.defaultBranch main

# Optional: better logging alias
git config --global alias.lg "log --oneline --graph --decorate --all"
Daily Workflow
# Clone the repository
git clone https://github.com/1757WestwoodRobotics/prog-docs

# Create a new feature branch
git checkout -b feature/robotpy-logging

# Stage and commit changes
git add src/tools/linux/*.md
git commit -m "docs(linux): add RoboRIO internals page"

# Rebase with latest main
git fetch origin
git rebase origin/main

# Push your branch
git push -u origin feature/robotpy-logging
Reviewing Changes
# Inspect staged changes
git diff --staged

# See recent history
git lg
lazygit: TUI for Git
lazygit is a terminal UI that accelerates common Git tasks.
Installation (examples)
# Arch Linux
sudo pacman -S lazygit

# Debian/Ubuntu
sudo apt install lazygit
Usage
lazygit
- Stage/unstage files, commit, rebase, resolve conflicts interactively
- Quickly view diffs and logs without memorizing commands
Bash: Your Command-Line Companion
Bash lets you automate tasks and work efficiently.
Basics You’ll Use Often
# Navigate
pwd; ls -la; cd src/tools/linux

# Search in repository
grep -R "roborio" -n src

# Create directories & files
mkdir -p src/tools/linux
printf "# New Page\n" > src/tools/linux/new-page.md

# Permissions
chmod +x scripts/deploy.sh
Helpful Shortcuts
# Use aliases in ~/.bashrc or ~/.zshrc
alias gs='git status'
alias gl='git lg'
alias ll='ls -alF'
SSH: Secure Remote Access
SSH connects you to the RoboRIO and other Linux machines.
Common RoboRIO Hosts
- mDNS:
roborio-TEAM-frc.local - USB:
172.22.11.2 - Ethernet:
10.TE.AM.2
Useful Commands
# Open a shell on the RoboRIO
ssh [email protected]

# Copy files
scp ./robot.py [email protected]:/home/lvuser/

# Forward a local port to remote
ssh -L 8080:localhost:80 [email protected]

# Run a remote command
ssh [email protected] "systemctl status robot"
SSH Keys (recommended)
ssh-keygen -t ed25519 -C "[email protected]"
ssh-copy-id [email protected]
Tips for Team Collaboration
- Commit small, logical changes with clear messages
- Use branches for features and fixes
- Pull or rebase frequently to avoid large conflicts
- Use code reviews (PRs) to maintain quality
These tools form the backbone of an efficient Linux-based FRC workflow.
Python Development Environment on Linux for FRC
Setting up an efficient Python development environment on Linux is crucial for FRC robotics programming. This guide covers the essential tools, configurations, and workflows specific to RobotPy development.
Python Environment Management
Managing Python environments properly ensures consistent, reproducible builds across team members and prevents dependency conflicts.
System Python vs Virtual Environments
graph TD
    A[System Python] --> B[Global Packages]
    A --> C[System Tools]

    D[Virtual Environment] --> E[Project Packages]
    D --> F[Isolated Dependencies]
    D --> G[Team Consistency]

    H[FRC Project] --> D
    H --> I[RobotPy]
    H --> J[Third-party Libraries]

    style D fill:#4caf50
    style H fill:#2196f3
    style A fill:#ff9800
Best Practice: Always use virtual environments for FRC projects. pipenv is the recommended tool for managing virtual environments and dependencies, as it simplifies the workflow and ensures consistency.
Using Pipenv
pipenv is a tool that automatically creates and manages a virtualenv for your projects, as well as adds/removes packages from your Pipfile as you install/uninstall packages.
First, install pipenv:
# Using pip
pip install --user pipenv

# Or using your system's package manager (Debian/Ubuntu)
sudo apt install pipenv
To create a new project environment:
# Navigate to your robot code directory
cd ~/frc-robot-2024

# Create a Pipfile and install dependencies (if any)
# You can specify a Python version
pipenv install --python 3.11

# Activate the virtual environment
pipenv shell

# Verify activation (should show virtual env path)
which python
To install packages:
# Install a package and add it to Pipfile
pipenv install robotpy[all]

# Install a development-only dependency
pipenv install --dev pytest
Managing Dependencies with Pipfile
pipenv uses Pipfile and Pipfile.lock to manage dependencies. The Pipfile is where you declare your project's dependencies, while Pipfile.lock ensures deterministic builds by locking down the exact versions of the dependencies.
Here is an example Pipfile for an FRC project:
[packages]
robotpy = {extras = ["all"], version = "*"}
robotpy-pathplannerlib = "*"

[dev-packages]
pytest = "*"
black = "*"
flake8 = "*"
mypy = "*"

[requires]
python_version = "3.11"
Development Tools and IDE Setup
Text Editors and IDEs
VS Code Setup
Install extensions for Python and FRC development:
{
    "recommendations": [
        "ms-python.python",
        "ms-python.black-formatter",
    ]
}
VS Code's Python extension will automatically detect and use the pipenv environment.
VS Code settings for FRC projects (.vscode/settings.json):
{
    "python.formatting.provider": "black",
    "files.exclude": {
        "**/__pycache__": true,
        "**/.pytest_cache": true
    }
}
Vim/Neovim Setup
For terminal-based development, configure Python language server:
" Using vim-plug
Plug 'neovim/nvim-lspconfig'
Plug 'hrsh7th/nvim-cmp'
Plug 'hrsh7th/cmp-nvim-lsp'
Plug 'psf/black'

" LSP configuration
lua << EOF
require'lspconfig'.pyright.setup{}
EOF
Code Quality Tools
Install code quality tools as development dependencies:
pipenv install --dev black flake8 mypy
Black (Code Formatting)
# Format all Python files
pipenv run black src/

# Check formatting without changes
pipenv run black --check src/
Configuration in pyproject.toml:
[tool.black]
line-length = 88
target-version = ['py311']
include = '\.pyi?

extend-exclude = '''
/(
  # Exclude auto-generated files
  | build
  | dist
)/
'''
Flake8 (Linting)
# Lint all files
pipenv run flake8 src/

# Configuration file: .flake8
[flake8]
max-line-length = 88
extend-ignore = E203, W503
exclude = .git,__pycache__,build,dist
MyPy (Type Checking)
# Type check code
pipenv run mypy src/

# Configuration in mypy.ini
[mypy]
python_version = 3.11
warn_return_any = True
warn_unused_configs = True
disallow_untyped_defs = True

[mypy-robotpy.*]
ignore_missing_imports = True
FRC-Specific Python Setup
RobotPy Installation
# Install RobotPy with all components
pipenv install robotpy[all]

# Download and install RoboRIO packages
pipenv run python -m robotpy_installer download-python

# Install specific components only
pipenv install robotpy robotpy-wpilib robotpy-commands-v2
Project Structure
Recommended directory structure for FRC Python projects:
frc-robot-2024/
├── robot.py                 # Main robot entry point
├── constants.py             # Robot constants
├── Pipfile                  # Python dependencies
├── Pipfile.lock             # Pinned dependency versions
├── pyproject.toml           # Project configuration
├── .gitignore               # Git ignore patterns
├── src/                     # Source code
│   ├── __init__.py
│   ├── subsystems/          # Robot subsystems
│   ├── commands/            # Robot commands
│   └── utils/               # Utility functions
├── tests/                   # Unit tests
│   ├── __init__.py
│   └── test_robot.py
└── scripts/                 # Deployment and utility scripts
    └── deploy.sh
Environment Variables
pipenv automatically manages environment variables within the virtual environment. For project-specific variables, you can create a .env file in your project root.
# .env file
ROBOTPY_TEAM_NUMBER=1757
ROBOTPY_ROBOT_HOST="roborio-1757-frc.local"
pipenv will automatically load this file.
For convenience, you can add aliases to your ~/.bashrc or ~/.zshrc:
# FRC-specific aliases
alias deploy='pipenv run python robot.py deploy'
alias sim='pipenv run python robot.py sim'
alias test-robot='pipenv run pytest tests/'
Testing and Debugging
Unit Testing with pytest
# tests/test_drivetrain.py
import pytest
from src.subsystems.drivetrain import Drivetrain

class TestDrivetrain:
    def setup_method(self):
        self.drivetrain = Drivetrain()

    def test_initialization(self):
        assert self.drivetrain is not None

    def test_tank_drive(self):
        # Test tank drive functionality
        self.drivetrain.tank_drive(0.5, -0.5)
        # Add assertions for expected behavior
Run tests:
# Run all tests
pipenv run pytest

# Run with coverage
pipenv run pytest --cov=src

# Run specific test file
pipenv run pytest tests/test_drivetrain.py -v
Debugging Techniques
Using Python Debugger (pdb)
import pdb

def autonomous(self):
    pdb.set_trace()  # Breakpoint
    # Your code here
Remote Debugging on RoboRIO
Install debugpy as a dev dependency:
pipenv install --dev debugpy
# For remote debugging (use carefully)
import debugpy

debugpy.listen(5678)
debugpy.wait_for_client()  # Optional: wait for debugger
Performance Optimization
Profiling Robot Code
import cProfile
import pstats

def profile_robot_code():
    pr = cProfile.Profile()
    pr.enable()

    # Your robot code here

    pr.disable()
    stats = pstats.Stats(pr)
    stats.sort_stats('cumulative')
    stats.print_stats(10)  # Top 10 functions
Memory Management
import gc
import psutil
import os

def monitor_memory():
    process = psutil.Process(os.getpid())
    memory_info = process.memory_info()
    print(f"RSS: {memory_info.rss / 1024 / 1024:.2f} MB")
    print(f"VMS: {memory_info.vms / 1024 / 1024:.2f} MB")

    # Force garbage collection
    gc.collect()
Deployment Automation
Deployment Script
Create scripts/deploy.sh:
#!/bin/bash

set -e  # Exit on any error

echo "Running tests..."
pipenv run pytest tests/ -v

echo "Checking code quality..."
pipenv run black --check src/
pipenv run flake8 src/

echo "Deploying to robot..."
pipenv run python robot.py deploy

echo "Deployment complete!"
Make executable:
chmod +x scripts/deploy.sh
Git Hooks for Quality
Create .git/hooks/pre-commit:
#!/bin/bash

# Run code formatting
pipenv run black src/ tests/

# Run linting
pipenv run flake8 src/ tests/

# Run type checking
pipenv run mypy src/

# Run tests
pipenv run pytest tests/

if [ $? -ne 0 ]; then
    echo "Pre-commit checks failed!"
    exit 1
fi
Team Collaboration Best Practices
Environment Consistency
- Document Python version: Use
.python-versionfile or specify inPipfile. - Pin dependencies:
Pipfile.lockhandles this automatically. CommitPipfile.lockto your repository. - Share configurations: Include editor configs in repository.
- Automate setup: Provide setup scripts for new team members.
Setup Script for New Members
Create setup.sh:
#!/bin/bash

echo "Setting up FRC development environment..."

# Check for pipenv
if ! command -v pipenv &> /dev/null
then
    echo "pipenv could not be found. Please install it first."
    echo "Run: pip install --user pipenv"
    exit
fi

# Install dependencies from Pipfile.lock
pipenv install --dev

# Install RobotPy for robot
pipenv run python -m robotpy_installer download-python

echo "Setup complete! Run 'pipenv shell' to activate."
Troubleshooting Common Issues
Import Errors
# Verify virtual environment python
pipenv run which python

# Check dependency graph
pipenv graph

# Reinstall packages
pipenv install --reinstall robotpy
Deployment Issues
# Check robot connectivity
ping roborio-1757-frc.local

# Verify robotpy installation on robot
pipenv run python -m robotpy_installer list

# Manual deployment
pipenv run python -m robotpy_installer install-python
pipenv run python robot.py deploy --builtin
Performance Issues
# Monitor robot resources via SSH
ssh [email protected] "top -n 1"

# Check for memory leaks
ssh [email protected] "cat /proc/meminfo"
This comprehensive Python development setup ensures efficient, consistent, and maintainable FRC robot code development on Linux systems.
System Administration for FRC Linux Systems
System administration skills are essential for maintaining reliable FRC development environments and troubleshooting robot systems. This page covers practical Linux administration focused on FRC scenarios.
User and Permission Management
Understanding Linux users and permissions is crucial for both development machines and RoboRIO management.
User Management Basics
# View current user
whoami
id

# List all users
cat /etc/passwd | cut -d: -f1

# Add user to group (useful for development)
sudo usermod -aG dialout $USER  # For serial port access
sudo usermod -aG docker $USER   # For Docker access

# Check group membership
groups
groups username
File Permissions
# View permissions
ls -la

# Change permissions
chmod +x script.sh          # Make executable
chmod 644 file.txt          # Read/write for owner, read for others
chmod 755 directory/        # Standard directory permissions

# Change ownership
sudo chown user:group file.txt
sudo chown -R user:group directory/

# Special permissions for team sharing
chmod g+s shared_directory  # Set group ID bit
Sudo Configuration
For team development machines, configure sudo properly:
# Edit sudoers file (ALWAYS use visudo)
sudo visudo

# Allow users in frc group to run robot deployment without password
%frc ALL=(ALL) NOPASSWD: /usr/bin/systemctl restart robot

# Allow specific commands without password
username ALL=(ALL) NOPASSWD: /bin/systemctl restart robot, /bin/journalctl
Network Administration
Network configuration is critical for robot connectivity and development workflows.
Network Interface Configuration
# View network interfaces
ip addr show
ip link show

# Bring interface up/down
sudo ip link set eth0 up
sudo ip link set eth0 down

# Configure static IP (temporary)
sudo ip addr add 10.17.57.100/24 dev eth0
sudo ip route add default via 10.17.57.1

# View routing table
ip route show
NetworkManager (Modern Linux)
# List connections
nmcli connection show

# Connect to WiFi
nmcli device wifi connect "SSID" password "password"

# Create connection profile for robot network
nmcli connection add type ethernet con-name "robot-eth" ifname eth0 \
  ip4.addresses 10.17.57.100/24 ip4.gateway 10.17.57.1 \
  ip4.dns 8.8.8.8 ip4.method manual

# Activate connection
nmcli connection up "robot-eth"
Persistent Network Configuration
systemd-networkd (RoboRIO-style)
# /etc/systemd/network/10-robot-eth.network
[Match]
Name=eth0

[Network]
Address=10.17.57.100/24
Gateway=10.17.57.1
DNS=8.8.8.8
Traditional /etc/network/interfaces (Debian/Ubuntu)
# /etc/network/interfaces
auto eth0
iface eth0 inet static
    address 10.17.57.100
    netmask 255.255.255.0
    gateway 10.17.57.1
    dns-nameservers 8.8.8.8
Service Management with systemd
systemd is the modern init system used on most Linux distributions, including the RoboRIO.
Basic Service Commands
# Service status and control
sudo systemctl status robot
sudo systemctl start robot
sudo systemctl stop robot
sudo systemctl restart robot
sudo systemctl reload robot

# Enable/disable services
sudo systemctl enable robot    # Start on boot
sudo systemctl disable robot   # Don't start on boot

# List all services
systemctl list-units --type=service
systemctl list-units --failed
Creating Custom Services
Create a service file for custom robot utilities:
# /etc/systemd/system/robot-logger.service
[Unit]
Description=Robot Data Logger
After=network.target
Wants=network.target

[Service]
Type=simple
User=lvuser
Group=lvuser
WorkingDirectory=/home/lvuser
ExecStart=/home/lvuser/logger/robot_logger.py
Restart=always
RestartSec=5
StandardOutput=journal
StandardError=journal

[Install]
WantedBy=multi-user.target
Manage the custom service:
# Reload systemd configuration
sudo systemctl daemon-reload

# Enable and start service
sudo systemctl enable robot-logger
sudo systemctl start robot-logger

# Check logs
journalctl -u robot-logger -f
Process and Resource Management
Monitor and manage system resources effectively.
Process Monitoring
# Real-time process monitoring
top
htop    # Enhanced version

# Process tree
pstree
ps aux --forest

# Find processes by name
pgrep python
pkill -f robot.py

# Monitor specific process
top -p $(pgrep -f robot.py)
Resource Monitoring
# System load and uptime
uptime
cat /proc/loadavg

# Memory usage
free -h
cat /proc/meminfo

# Disk usage
df -h
du -h /home/lvuser | sort -h

# I/O statistics (if iostat available)
iostat -x 1 5
Setting Resource Limits
Control resource usage for critical processes:
# Limit CPU usage (nice values)
nice -n 10 python robot.py     # Lower priority
renice -n 5 -p <PID>          # Change priority

# Memory limits with systemd
# In service file:
[Service]
MemoryLimit=512M
CPUShares=1024
Log Management
Proper log management is essential for debugging and monitoring.
journalctl (systemd logs)
# View all logs
journalctl

# Follow logs in real-time
journalctl -f

# Service-specific logs
journalctl -u robot
journalctl -u robot -f --since "1 hour ago"

# Filter by priority
journalctl -p err          # Error messages only
journalctl -p warning      # Warning and above

# Boot logs
journalctl -b             # Current boot
journalctl -b -1          # Previous boot
Traditional Log Files
# Common log locations
tail -f /var/log/messages    # System messages
tail -f /var/log/syslog      # System log (Debian/Ubuntu)
tail -f /var/log/dmesg       # Kernel messages

# Application logs
tail -f /var/log/robot.log   # Custom application logs
Log Rotation and Cleanup
# Configure journald limits
sudo vi /etc/systemd/journald.conf

# SystemMaxUse=100M
# SystemMaxFileSize=10M
# MaxRetentionSec=7d

# Manual cleanup
sudo journalctl --vacuum-time=7d      # Keep 7 days
sudo journalctl --vacuum-size=100M    # Keep 100MB

# Traditional log rotation (logrotate)
sudo vi /etc/logrotate.d/robot

/var/log/robot.log {
    daily
    rotate 7
    compress
    delaycompress
    missingok
    create 644 lvuser lvuser
}
Package Management
Keep systems updated and manage software packages.
APT (Debian/Ubuntu)
# Update package lists
sudo apt update

# Upgrade packages
sudo apt upgrade
sudo apt full-upgrade

# Install packages
sudo apt install git python3-pip lazygit

# Remove packages
sudo apt remove package-name
sudo apt purge package-name    # Remove config files too

# Search packages
apt search robotpy
apt show python3-pip
YUM/DNF (RHEL/Fedora)
# Update system
sudo dnf update

# Install packages
sudo dnf install git python3-pip

# Search and info
dnf search robotpy
dnf info python3-pip
Pacman (Arch Linux)
# Update system
sudo pacman -Syu

# Install packages
sudo pacman -S git python-pip lazygit

# Search packages
pacman -Ss robotpy
Security and Hardening
Basic security practices for FRC development systems.
SSH Security
# Generate strong SSH keys
ssh-keygen -t ed25519 -C "[email protected]"

# Configure SSH client
vi ~/.ssh/config

Host roborio-*
    User admin
    IdentityFile ~/.ssh/id_ed25519
    StrictHostKeyChecking no
    UserKnownHostsFile /dev/null

# SSH server hardening (on development machines)
sudo vi /etc/ssh/sshd_config

# Disable password authentication
PasswordAuthentication no
PubkeyAuthentication yes

# Change default port
Port 2222
Firewall Configuration
# UFW (Uncomplicated Firewall) - Ubuntu
sudo ufw enable
sudo ufw default deny incoming
sudo ufw allow ssh
sudo ufw allow from 10.17.57.0/24  # Allow robot network

# iptables (traditional)
sudo iptables -L              # List rules
sudo iptables-save            # View current rules
File System Security
# Set secure permissions on sensitive files
chmod 600 ~/.ssh/id_rsa
chmod 644 ~/.ssh/id_rsa.pub
chmod 700 ~/.ssh

# Find files with incorrect permissions
find /home/user -type f -perm /o+w    # World-writable files
find /home/user -type f -perm /g+w    # Group-writable files
Backup and Recovery
Protect important data and configurations.
Configuration Backups
# Backup important configuration files
sudo tar -czf /backup/system-configs-$(date +%Y%m%d).tar.gz \
    /etc/ssh/ \
    /etc/systemd/system/ \
    /etc/network/ \
    /home/lvuser/.ssh/

# Robot code backup
tar -czf robot-backup-$(date +%Y%m%d).tar.gz \
    robot.py constants.py src/ requirements.txt
Git-based Configuration Management
# Version control system configurations
cd /etc
sudo git init
sudo git add ssh/ systemd/system/ network/
sudo git commit -m "Initial system configuration"

# Track changes
sudo git diff
sudo git add -A
sudo git commit -m "Updated SSH configuration"
Automation and Scripting
Automate common administration tasks.
System Monitoring Script
#!/bin/bash
# monitor-robot.sh

LOG_FILE="/var/log/robot-monitor.log"

log_message() {
    echo "[$(date '+%Y-%m-%d %H:%M:%S')] $1" | tee -a "$LOG_FILE"
}

# Check robot connectivity
if ping -c 1 roborio-1757-frc.local &> /dev/null; then
    log_message "Robot is reachable"
else
    log_message "WARNING: Robot is not reachable"
fi

# Check disk space
DISK_USAGE=$(df /home | tail -1 | awk '{print $5}' | sed 's/%//')
if [ "$DISK_USAGE" -gt 80 ]; then
    log_message "WARNING: Disk usage is ${DISK_USAGE}%"
fi

# Check system load
LOAD=$(uptime | awk '{print $NF}')
log_message "System load: $LOAD"
Automated Deployment Script
#!/bin/bash
# deploy-robot.sh

set -e

ROBOT_HOST="roborio-1757-frc.local"
ROBOT_USER="admin"
ROBOT_PATH="/home/lvuser"

echo "Starting deployment to $ROBOT_HOST..."

# Pre-deployment checks
if ! ping -c 1 "$ROBOT_HOST" &> /dev/null; then
    echo "ERROR: Cannot reach $ROBOT_HOST"
    exit 1
fi

# Deploy code
echo "Copying robot code..."
scp -r src/ robot.py constants.py requirements.txt \
    "$ROBOT_USER@$ROBOT_HOST:$ROBOT_PATH/"

# Install dependencies and restart
echo "Installing dependencies and restarting robot service..."
ssh "$ROBOT_USER@$ROBOT_HOST" << 'EOF'
cd /home/lvuser
pip3 install -r requirements.txt
sudo systemctl restart robot
EOF

echo "Deployment complete!"
Troubleshooting Common Issues
Boot Issues
# Check boot logs
journalctl -b
dmesg | less

# Check failed services
systemctl --failed

# Rescue mode (if system won't boot properly)
# Boot with systemd.unit=rescue.target
Network Issues
# Diagnose network connectivity
ip addr show
ip route show
ping 8.8.8.8
nslookup google.com

# Reset network configuration
sudo systemctl restart networking
sudo systemctl restart NetworkManager
Performance Issues
# Check system resources
top
iotop    # I/O monitoring
netstat -i    # Network interface statistics

# Check for high CPU processes
ps aux | sort -nr -k 3 | head -10

# Check for high memory processes
ps aux | sort -nr -k 4 | head -10
This system administration knowledge provides the foundation for maintaining reliable, secure, and efficient Linux systems in FRC environments. Regular practice with these tools and techniques will make you an effective system administrator for your team's robotics infrastructure.
Python

Python! The programming language of choice for 1757. You can download python at https://python.org however I highly suggest not, instead using a package manager. More instructions can be found in installation section
Below is a REPL you can mess with
# This is an editable document
print("Hello world!")
The next few sections are tutorials if you need to learn python
Absolutely every single section in this python area is editable, please feel free to mess with every example!!!
Welcome to Python!
This brief subsection is intended to teach some of the basics of python assuming you already have some basic understanding of programming as a concept.
This is based off of LearnXinYMinute's article on python
Basic basic super basic console IO
if we want to talk to the world, we can use print in order to put output. By default, nothing will print out with bare words
print("Hello World!")
1+1 # does not get printed
print(1+1) # does print out 2
If we want to take input from the user, we can use the input keyword
print("What is your name?")
name = input()
print(f"Hello, {name}") # you will learn about every part of this later
Comments
# Single line comments start with a number symbol.

""" Multiline strings can be written
    using three "s, and are often used
    as documentation.
"""

# Comments are pieces of writing that don't get executed

print("I will be printed!")
# print("I'm commented out! I won't be printed!")
Values and Expressions
Here is some basic Python terminology regarding data in the language.
Values
In Python, we represent data using values. These are encodings that Python recgonizes as representing some type of data. Here are some examples of different values in python:
5, 3.7, 'a', 'Hello World!, True, [1,2,3,4]
Expressions
We can chain values together with operators (functions that can be performed on values) to create expressions. Here are a few examples:
1 + 1 # evaluates to 2

2 - 3 + 7 + (8 // 2) # evaluates to 10

4 ** 3 # evaluates to 256

True or False # evaluates to True

True and False # evaluates to False

not True # evaluates to False

'Hello' + ' ' + 'World!' # evaluates to 'Hello World!'

'Hello' # evaluates to 'Hello'
When given an expression, Python will evaluate it (i.e. perform operatorations according to their order/precdence) into a value. An expression that evaluates to itself is what is known as a literal.
5 # evaluates to 5. This expression *literally* means exactly what is written: 5

'robot' # evaluates to 'robot'. Again, this expression is literally what it means

2 + 2 # evaluates to 4. This is NOT a literal as it isn't *literally* what is written.

Variables
We have already seen in the previous sections that we can print out values and expressions of values that are evaluated by Python. However, it is often necceasry to remember a given value beyond the scope of a singular print statement or line of code. This is what motivates the need for a variable, which stores elements in computer memory.
You can think of a variable as a "storage box" that has some kind of "datatype" assigned to them. Each of these boxes has a value associated with it.
Here is how you assign a variable, or fill that "box." This is known as an assignment statement, or an initialization statement if this is the first time you are introducing a variable.
a = 1
lets break it down character by charater:
a: the variable name=: this keyword is how we assign to variables. Most notably, is that it is explicitly assignment. You will learn about==in the next section, conditionals, but it always sets the left side equal to the right side, never the other way1the value of which we are assigning the variableato. For now, we will assgin a to be an integer, or typeint(a nonfractional number). We will go over the different datatypes that can be taken on in the next section.
note that python doesn't care about the spacing for assignment statements, so all examples below yield equivelent results
a=1
a =1
a= 1
a = 1
a          =                    1
a=                       1
Unlike other languages, python will dynamically infer the datatype (i.e. you don't have to predeclare a type like in Java or C/C++) for a given variable. Ever since python 3.6 you can also explicitly mark the type, but at runtime it will ignore these markers. For programming best practices it is recommended that you assign types in the following manner:
a: int = 1
this will tell your IDE (a place where you edit code, such as VS Code) that it should expect the type of a to be an int or integer. Despite explicitly being told, Python will not explicitly throw any error if you set a variable to a different type at runtime
a: int = 1  # set the variable a to be an int with value 1
print(a)    # => 1
a = "hi"    # change the value and of `a` at runtime
print(a)    # => hi
It is good code practice to have types be static as it helps significantly with the debugging process
As mentioned before, the equals sign is explicitly assignment
a = 2      # create variable a with value 2
a = a + 1  # lets set a to 1 + itself
print(a)   # => 3
for most basic arithmetic operations +, -, * and /, we can do the following substitution:
a = 5
a = a + 2
a = a - 2
a = a * 5
a = a / 2.5
is the same as
a = 5
a += 2
a -= 2
a *= 5
a /= 2.5
it even works for the modulo (%) operation!
a = 49
b = 49
print(a,b)  # => 49 49
a %= 5
b %= 5
print(a,b)  # => 4 4
We can assign multiple variables at once
a, b = 1, 2 # multi assignment
print(a)    # => 1
print(b)    # => 2

# now lets swap the variables!
a, b = b, a
print(a) # => 2
print(b) # => 1
Datatypes
Python has a couple of primitive datatypes, or general structures, that you can use. A datatype or type is a set of values AND the operations that can be called upon them. The function of operators (i.e. +, =, -) may change depending on the type or may not be defined.
There are two categories of types:
- "Immutable" types: Types whose internal data cannot be changed. Includes int, bool, floats, strings, and tuples.
- "Mutable" types: Type whose internal data can be changed. Inclues lists, dictionaries, and sets.
The built-in type() function returns the type of a given input.
w = True
x = 5
y = 5.0
z = [5]

print(type(w)) # => <class 'bool'>
print(type(x)) # => <class 'int'>
print(type(y)) # => <class 'float'>
print(type(z)) # => <class 'list'>
Integer
integers are any non-decimal number essentially. Examples include
3 # is the number 3
We can do math on integers
# Math is what you would expect
print(1 + 1)   # => 2
print(8 - 1)   # => 7
print(10 * 2)  # => 20
print(35 / 5)  # => 7.0
note that last answer, 7.0, not as 7, thats our next datatype, Float or floating point number.
If you want to do specifically integer division, that is done with //
# Floor division rounds towards negative infinity
print(5 // 3)       # => 1
print(-5 // 3)      # => -2
print(5.0 // 3.0)   # => 1.0  # works on floats too
print(-5.0 // 3.0)  # => -2.0
Float
Floating point numbers, or floats, in python is anything that has a decimal. Most of the time, types will "upgrade" to float if doing anything where that data is important
print(1.1 + 2.2)   # => 3.3
print(10.0 / 3)    # => 3.33333333333
print(10 / 3.0)    # => 3.33333333333    note: float division will always return a float
print(10 / 3)      # => 3.33333333333    regardless of what types were used
print(6.6 * 5.4)   # => 35.64
Advanced Math
# Modulo operation, aka remainder
print(7 % 3)   # => 1
# i % j have the same sign as j, unlike C
print(-7 % 3)  # => 2

# Exponentiation (x**y, x to the yth power)
print(2**3)  # => 8

# Enforce precedence with parentheses
print(1 + 3 * 2)    # => 7
print((1 + 3) * 2)  # => 8
Boolean
Its literally, True or False, note the capitalization in python has a capital first letter, unlike other languages
Booleans are really important in cs, once we get to conditionals this becomes more apparent
# negate with not
print(not True)   # => False
print(not False)  # => True
Woah if a boolean is not one thing, its the other thing!!!
# Boolean Operators
# Note "and" and "or" are case-sensitive
print(True and False)  # => False
print(False or True)   # => True
Coming from other languages, || is or and && is and, it reads more like english
# True and False are actually 1 and 0 but with different keywords, you can do really cursed things with this info
print(True + True)  # => 2
print(True * 8)     # => 8
print(False - 5)    # => -5
We'll get into comparison operations in a second, but abusing the True is 1 and False is 0 principle we can do some more funny things
# Comparison operators look at the numerical value of True and False
print(0 == False)   # => True
print(2 > True)     # => True
print(2 == True)    # => False
print(-5 != False)  # => True
Strings
Strings are a sequence of alphanumeric and ascii characters.
# Strings are created with " or '
print("This is a string.")
print('This is also a string.')
# Strings can be added too
print("Hello " + "world!")  # => "Hello world!"
# String literals (but not variables) can be concatenated without using '+'
print("Hello " "world!")    # => "Hello world!"
We can find the length of a string with the len keyword
print(len("This is a string")) # => 16
Once we talk more about variables the following becomes really useful
# Since Python 3.6, you can use f-strings or formatted string literals.
name = "Reiko"
print(f"She said her name is {name}.")  # => "She said her name is Reiko"
# Any valid Python expression inside these braces is returned to the string.
name = "Reiko"
print(f"{name} is {len(name)} characters long.")  # => "Reiko is 5 characters long."
if we want to include the literal character " in a string, we can use the escape character \ like the following
print("these are \"quotes\" and are cool!")
here is a list of different characters that would need to be escaped, try them out
\'single quote, if you are using'to quote\\the backslash character\nnew line\rcarriage return\ttab\bbackspace\fform feed
print("edit me and try some of the escape characters!")
Methods of strings
We can call a couple functions on things of string type
# str.index(n) returns the index of the first found substring `n` in a string,
# raises a ValueError if index does not exist. (We will talk more exceptions in a later section).
str = 'robor'
print(str.index('ro')) # => 0
print(str[0])       # => r

print(str.index('bor')) # => 2
print(str[2])       # => b
# str.isalnum() returns 'True' if characters in the string are alphanumeric
# (i.e. is a number of letter) and there is at least one character.
str1 = 'robor123'
str2 = '""'
str3 = '' # strings can have no characters! (this is an empty string)

print(str1.isalnum()) # => True
print(str2.isalnum()) # => False
print(str3.isalnum()) # => False
# str.upper() returns returns a copy of the string with all the cased characters converted to uppercase.
str1 = 'ww1757'
print(str1.upper())) # => 'WW1757'
print(str1) # => 'ww1757'
# note the original string is unaffected as str.upper() returns a copy!
# str.lower() returns returns a copy of the string with all the cased characters converted to lowercase.
str1 = 'WestWood1757'
print(str1.lower())) # => 'westwood1757'
print(str1) # => 'WestWood1757'
# note the original string is unaffected as str.lower() returns a copy!
Python has powerful string manipulation methods already built into the language. You should take advantadge of these where possible. For an exhaustive list, check out the official Python docs.
After this, try out Challenge 1!
Lists
Lists are just collections of other datatypes. They most literally list things out.
a = [1,2,3,4]  # creating a list of 4 elements
print(a)       # => [1,2,3,4]
just like with strings, we can get the length of lists
a = [1,2,3,4]
print(len(a)) # => 4
lists aren't limited to any given type of object, nor do they need to contain only one type of object (but most times they really should!)
a_list = ["Lettuce", "Tomatoes", "Pickles", 5]
print(a_list)
to get any given value of a list, we index that list
In python, list indicies are 0 starting. This means to access the first element in a list, we use list_name[0]
coolList = ["First", "Second", "Third", "Fourth"]

print(coolList[0]) # => "First"
print(coolList[2]) # => "Third"
print(coolList[1]) # => "Second"
this may seem confusing at first, but has some neat properties that make our lives in most cases easier.
slices
We can also take slices of lists, or sublists within the same list. Taking a slice creates a new list.
The syntax for taking a slice is list[first:last] where it takes inclusively the first index, but up to the last index.
coolList = ["First", "Second", "Third", "Fourth"]
print(coolList[1:3]) # => ["Second", "Third"]
print(coolList[0:2]) # => ["First", "Second"]
print(coolList[0:1]) # => ["First"]
# remember! Its up to but not including the last!
we can also take splices from a given index onwards, or from a given index up until, by not specifying the first or last index
a = [1,2,3,4,5,6,7,8,9,10]

print(a[1:]) # [2,3,4,5,6,7,8,9,10]
print(a[:7]) # [1,2,3,4,5,6]

print(a[:])  # [1,2,3,4,5,6,7,8,9,10]
#this is valid! Its actually the fastest way to copy the elements

print(a[10:]) # []
#calling out of bound indices will return an empty list!
by using a negative index, we can actually take the last elements from lists
a = [1,2,3,4,5]
print(a[-1]) # => 5
print(a[0:-1]) # => [1,2,3,4]
# using negative, we can take some fun parts of lists
print(a[-2:2]) # [] there are no elements between 4 and 2, in that order
strings as lists
Strings are actually just lists of characters!
stringy = "Stringy McStringFace"
print(stringy[0:7]) # => Stringy
Hence why we can run operations like len on them
Changing step
Complete indexing is actually done with li[start:end:step] We can step and iterate through the list
a = [1,2,3,4,5,6,7,8]
print(a[::2])   # => [1,3,5,7]
print(a[1::2])  # => [2,4,6,8]
print(a[1:5:2]) # => [2,4]

# we can reverse a list with a negative iteration
print(a[::-1])  # => [8,7,6,5,4,3,2,1]
Methods of lists
We can call a couple of things on list objects
# li.index(n) returns the index of the first found element in a list
li = [0,2,4,6,8]
print(li.index(0)) # => 0
print(li[0])       # => 0

print(li.index[2]) # => 1
print(li[1])       # => 2
We can also add things onto a list with the append keyword
li = [0,2,4,6,8]
print(li)       # => [0,2,4,6,8]
li.append(10)   # Adds on the element "10" to the end
print(li)       # => [0,2,4,6,8,10]
If we want to put elements in a specific location, we can use the insert keyword, its usage is li.insert(index, value)
we can remove elements with the del keyword
We can also remove the first instance of an element with the remove method, usage of li.remove(index)
li = [1,3,4]
print(li)      # => [1,3,4]
li.insert(1,2) # inserts that element
print(li)      # => [1,2,3,4]

del li[3]
print(li)      # => [1,2,3]

li.remove(2)
print(li)      # => [1,3]
We can add lists onto other lists.
li      = [1,2,3]
otherLi = [4,5,6]
print(li)           # => [1,2,3]
print(otherLi)      # => [4,5,6]
print(li + otherLi) # => [1,2,3,4,5,6]
# note that it doesn't modify either of the lists (because a new list is created!)
print(li)           # => [1,2,3]
print(otherLi)      # => [4,5,6]
if we do want to modify the lists, we can use the extend method to take the elements of one list and put it into the other
li = [1,2,3]
li2 = [4,5,6]
print(li)  # => [1,2,3]
print(li2) # => [4,5,6]

li.extend(li2)
print(li)  # => [1,2,3,4,5,6]
as we've explored earlier, the len function can get us the length of a list
a = ["tomato", "potato", "o"]
print(len(a)) # => 3
Python has powerful list manipulation methods that are built into the language. To find an exhaustive list of python list methods, check out the official Python Docs.
Element checking
We can use the in keyword to figure out if a given element is in a list
a = [1,2,3,4]
print(1 in a) # => True the value of `1` is in the list `a`
print(5 in a) # => False
print(0 in a) # => False
List =
So far we've seen that the assignment statement = copies the contents of one variable into the other. This is true for ints, strings, bools, and floats.
However, variables for lists store an address of where we can find the actual list in computer memory. We say the variable "points" to the list as opposed to "storing" the list. The = statement copies the address as opposed to copying the list's contents. See the following diagram:
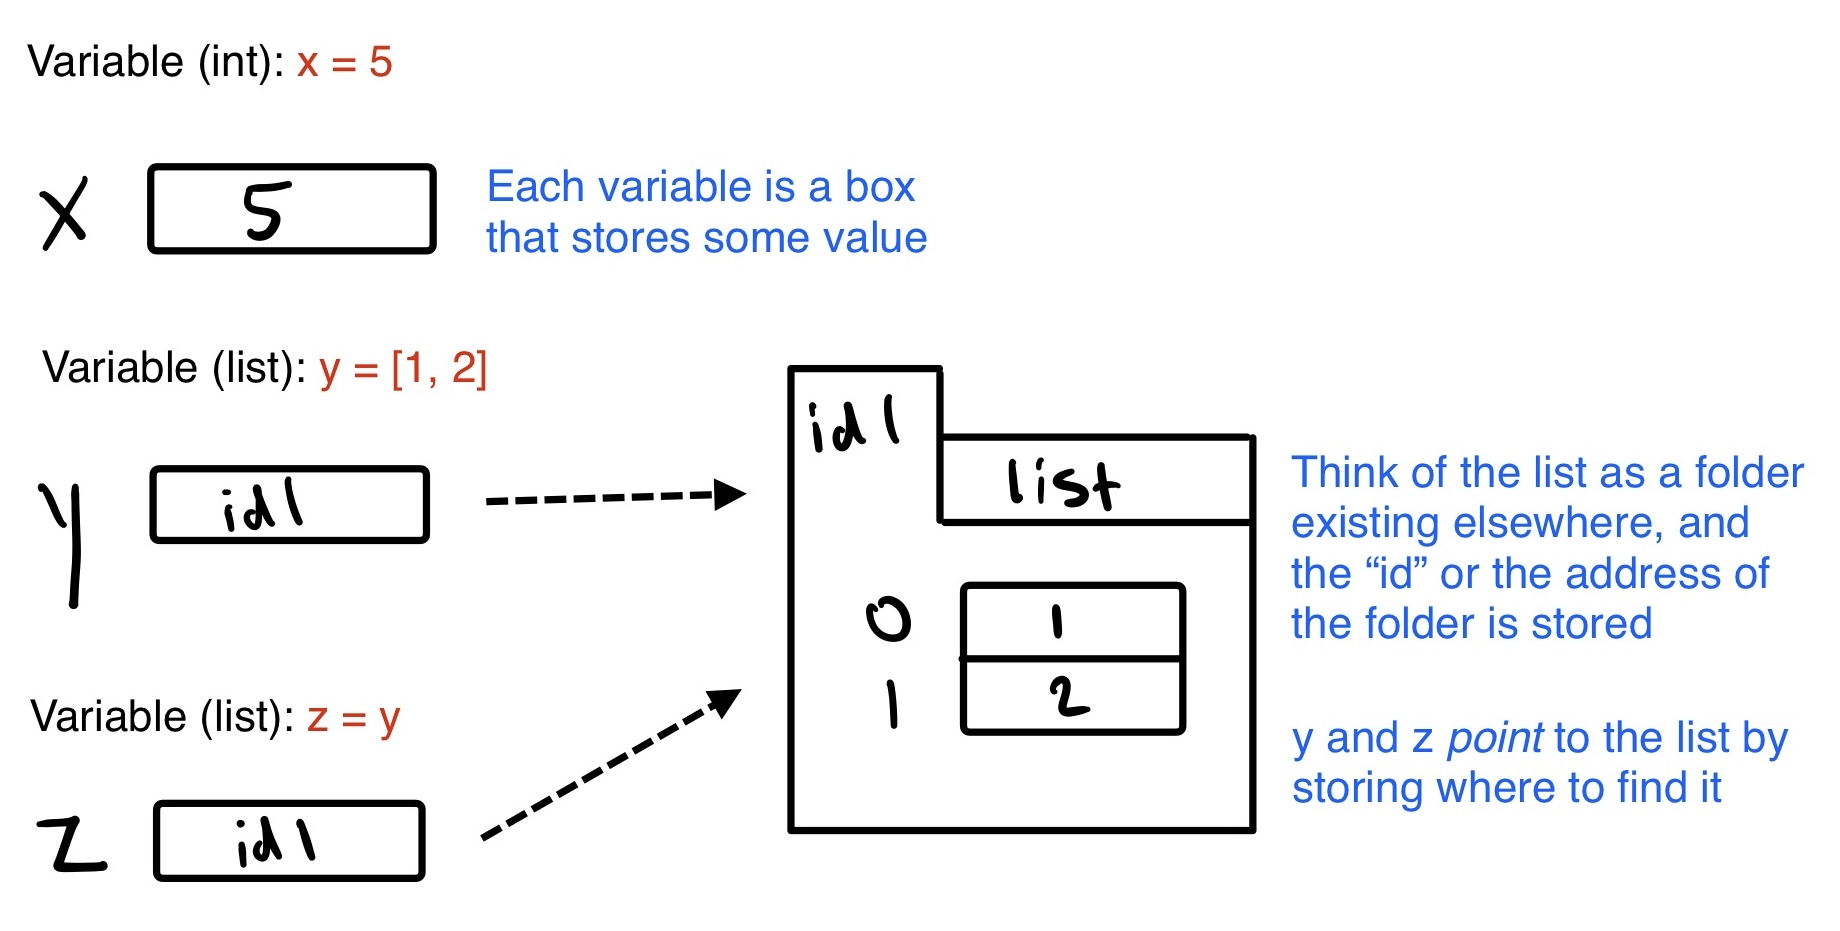
The following example illustrates the consequences of this, being that modifying a variable that points to a list means we see the modification from any variable that points to it.
a = [1,2,3,4] # a POINTS to this list, which is stored in memory
b = [5,6,7,8] # b POINTS to this list, which is stored in memory
print(a) # => [1,2,3,4]
print(b) # => [5,6,7,8]

a = b # a now POINTS to what b POINTS to

print(a) # => [5,6,7,8]
print(b) # => [5,6,7,8]

b.append(9) # modifying b

print(a) # => [5,6,7,8,9]
print(b) # => [5,6,7,8,9]

b.append(10) # modifying a again

print(a) # => [5,6,7,8,9,10]
print(b) # => [5,6,7,8,9,10]

# As both variables point to the same list in memory,
# modifying one modifies both
If we wanted to copy values, but maintain the independance of the lists so that modifying one does not modify the other, we would need to manually iterate through each list. This can be done cleanly with loops, which we will discuss in the loops section. Note that == checks if two lists have the same values and length, whereas a new keyword is checks if two variables point to the same list. This is dicsussed more in conditionals below.
At this point, try out challenge 2!
Conditionals
Comparison
Lets first begin by being able to check objects, there are a couple of ways to do this
#Equality is ==
print(1 == 1)  # => True
print(2 == 1)  # => False
# Inequality is !=
print(1 != 1)  # => False
print(2 != 1)  # => True
# More comparisons
print(1 < 10)  # => True
print(1 > 10)  # => False
print(2 <= 2)  # => True
print(2 >= 2)  # => True
# Seeing whether a value is in a range
print(1 < 2 and 2 < 3)  # => True
print(2 < 3 and 3 < 2)  # => False
# Chaining makes this look nicer
print(1 < 2 < 3)  # => True
print(2 < 3 < 2)  # => False
We can run this on variables as well
a = 5
print(a == 5) # => True
print(a < 3)  # => False
print(2 < a)  # => True
since everything on both the right and left side are treated as independent expressions,
(is vs. ==) is checks if two variables refer to the same object, but == checks
if the objects pointed to have the same values.
a = [1, 2, 3, 4]  # Point a at a new list, [1, 2, 3, 4]
b = a             # Point b at what a is pointing to
print(b is a)     # => True, a and b refer to the same object
print(b == a)     # => True, a's and b's objects are equal
b = [1, 2, 3, 4]  # Point b at a new list, [1, 2, 3, 4]
print(b is a)     # => False, a and b do not refer to the same object
print(b == a)     # => True, a's and b's objects are equal
the "If" statement
We can have code that changes behavior based on conditions being met, to put it simply, whether there is a True or a False value present
Try out the following example
# Let's just make a variable
some_var = 5

# Here is an if statement. Indentation is significant in Python!
# Convention is to use four spaces, not tabs.
# This prints "some_var is smaller than 10"
if some_var > 10:
    print("some_var is totally bigger than 10.")
elif some_var < 10:    # This elif clause is optional.
    print("some_var is smaller than 10.")
else:                  # This is optional too.
    print("some_var is indeed 10.")
Inside this there are three distinct blocks, an if block, an elif and an else
You can read the above code with the following in english:
if the value "some var" is greater than ten, then print "..."
otherwise,  if the value of "some var" is less than 10, then print "..."
otherwise, print "...."
heres another example that python executes code from top down in ifs
some_var = 5
if some_var < 10:
	print("I am less than 10")
elif some_var < 20: # despite this statement being true, the below does not run
	print("I am also less than 20")
else:
	print("I shouldn't run")
print("I am outside of the if statement, I will print")
the elif and else statements are completely optional in a conditional, the following are examples showing that you can have an infinite number of elifs, but a maximum of 1 else
# example using a singular `if` and nothing more
print("Give a number")
user_number = int(input())
# we use int() to turn the string result of input into a number

if user_number < 10:
	print("I am less than 10!")

print("I will always print!")
# example using multiple `elif`s but no `else`
print("Give a number")
user_number = int(input())

if user_number < 10:
	print("I am less than 10!")
elif user_number < 20:
	print("I am less than 20, but more than 10!")
elif user_number < 30:
	print("in between 20 and 30!")

print("I will always print!")
# example showing that the if takes only a boolean
if True:
	print("I will always print!")
else:
	print("I will never print")
# example showing a False will never run
if False:
	print("I will never print!")
else:
	print("I will always print")
At this point try out challenge 3!
Loops
For loop
There are instances in which we do not want to have long messy unreadable code that can result from wanting to repeat an action.
# this is bad!
print("hi")
print("hi")
print("hi")
print("hi")
print("hi")
print("hi")
so instead, we have ways of repeating code over and over again, we can use a loop.
for i in range(6):
	print("hi")
typically we want something to change a little bit in each part of the loop. the i in this for loop is specifying the name of a variable, so we can use it in the loop
for i in range(5):
	print(i) # should print 0, 1, 2, 3, 4 all on seperate lines
just like in conditional statements, loops are indent sensitive, the following should produce an error
for i in range(6):
print("hi") # indentation error!!!
Lets break down each part of the for loop
forthe keyword telling python we want to create a loop that iterates a fixed number of timesiwe are defining a variable with nameito run through this loopinjust another part of the syntax in aforlooprange(6)creates an iterator that goes from 0 through 5 (6 is exclusive). We will talk about the difference between an iterator and a list in a future chapter.- For the purposes of a loop, all lists are iterables, but not all iterables are lists. You can't call
range(6)[0]like you can[1,2,3,4][0]If you wish to treat any iterable as a list, just wrap it in alistfunction like so:
- For the purposes of a loop, all lists are iterables, but not all iterables are lists. You can't call
a = range(6)
print(a)      # => range(0,6)
print(list(a)) # => [0,1,2,3,4,5]
since lists are iterables, we can also do the following:
a = ["sheep", "dog", "cat", "mouse"]
for i in a:
	print(f"{i} is an animal")
note that while convention says that loop variables should be i, j, k, l, there is no reason that they can't be anything else
for cool_var in range(7):
	print(f"This works! {cool_var}")
sometimes, we may need to keep track of the index of some iterable. We can take advantage of len() from before to help us solve these problems:
a = ["sheep", "dog", "cat", "mouse"]
# what if we wanted only the even indices?
for i in range(len(a)):
    if i % 2 == 0: # check if even
        print(a[i])
While Loops
In control flow, we may want to have something run continuously until a certain condition is met. The basic syntax of a while loop is the following:
while condition:
	action
Just like with for loops and if statements, indentation matters for python to correctly parse it
Here is an example while loop
user = ""
while user != "q":
	print("I will keep printing until you enter 'q'")
	user = input()
When possible, you should use for loops as opposed to while loops as Python is more optimized for the former. In cases however in which you need to check a certain condition (above) or are modifying the list/string/iterable that you are attempting to iterate through, you must use a while loop.
Breaking loops
Some times we want to break out of a loop conditionally, we can use the break keyword to exit a loop halfway
for i in range(5):
	print(i)
	if i == 2:
		break # prevents us from printing 3 or 4
# this code should print 0, 1, 2 on seperate lines
rewriting the example from the while loop section to instead use a break
while True: # while true will loop forever!!
	print("I will keep printing until you enter 'q'")
	if input() == "q":
		break
heres perhaps a more practical example
password = "super secure"
for i in reversed(range(3)):
	if password == input():
		print("Correct!")
		break
	else:
		print("incorrect!")
		print(f"You have {i} tries left for your password")
in this instance, since break is called, the else statement is actually optional, because when python hits break it will immediately cease the loop and not let it clean up
using this knowledge we can rewrite it as the following
password = "super secure"
for i in reversed(range(3)):
	if password == input():
		print("Correct!")
		break
	print("incorrect!") # note no else statement needed
	print(f"You have {i} tries left for your password")
continue
we can also use the continue statement in order to skip execution of anything after the statement if reached
for i in range(5):
	print(f"I will be reached: {i}")
	continue # will stop execution of everything after, but continue the loop
	print("I will never be reached")
for i in range(20):
	print(i)
	if i % 2 == 0: # simple check if the number is even
		print("I'm even")
		continue
	print("I'm an odd number!")
After this, try out Challenge 4
Advanced Datatypes
The following are more advanced types of data that have more specific characteristics.
Tuple
List a list, but immutable This means that once a tuple is created, you cannot change the values of tuples.
tup = (1,2,3) # tuples are made with () instead of []
print(tup[0]) # => 1
tup = (1,2,3)
tup[0] = 3 # Raises a TypeError
Tuples of length one must be made with a comma
print(type((1))  )  # => <class 'int'>
print(type((1,)) )  # => <class 'tuple'>
print(type(())   )  # => <class 'tuple'>
You can do most of the list operations on tuples as well
tup = (1,2,3)
print(len(tup))         # => 3
print(tup + (4, 5, 6))  # => (1, 2, 3, 4, 5, 6)
print(tup[:2])          # => (1, 2)
print(2 in tup)         # => True
# You can unpack tuples (or lists) into variables
a, b, c = (1, 2, 3)  # a is now 1, b is now 2 and c is now 3

# You can also do extended unpacking
a, *b, c = (1, 2, 3, 4)  # a is now 1, b is now [2, 3] and c is now 4

# Tuples are created by default if you leave out the parentheses
d, e, f = 4, 5, 6  # tuple 4, 5, 6 is unpacked into variables d, e and f

# respectively such that d = 4, e = 5 and f = 6
# Now look how easy it is to swap two values
e, d = d, e  # d is now 5 and e is now 4
So why would you want to use a tuple?
To put it shortly, tuples are really good when you are using static typing, as they have specified length and types of each parameter that doesn't change, which means that
Dictionaries
TODO: CLEANUP
# Dictionaries store mappings from keys to values
empty_dict = {}
# Here is a prefilled dictionary
filled_dict = {"one": 1, "two": 2, "three": 3}
print(filled_dict)
Note: keys for dictionaries have to be immutable types. This is to ensure that the key can be converted to a constant hash value for quick look-ups.
Immutable types include
ints,floats,strings,tuples.
invalid_dict = {[1,2,3]: "123"}  # => Yield a TypeError: unhashable type: 'list'
valid_dict = {(1,2,3):[1,2,3]}   # Values can be of any type, however.
filled_dict = {"one": 1, "two": 2, "three": 3}
# Look up values with []
print(filled_dict["one"])  # => 1
Get all keys as an iterable with keys(). We need to wrap the call in list()
to turn it into a list. We'll talk about those later.
Note: for Python versions <3.7, dictionary key ordering is not guaranteed. Your results might not match the example below exactly. However, as of Python 3.7, dictionary items maintain the order at which they are inserted into the dictionary.
filled_dict = {"one": 1, "two": 2, "three": 3}
print(list(filled_dict.keys()))  # => ["three", "two", "one"] in Python <3.7
                                 # => ["one", "two", "three"] in Python 3.7+
Get all values as an iterable with values(). Once again we need to wrap it
in list() to get it out of the iterable.
Note: Same as above regarding key ordering.
filled_dict = {"one": 1, "two": 2, "three": 3}
print(list(filled_dict.values()))  # => [3, 2, 1]  in Python <3.7
                                   # => [1, 2, 3] in Python 3.7+
Check for existence of keys in a dictionary with in
filled_dict = {"one": 1, "two": 2, "three": 3}
print("one" in filled_dict)  # => True
print(1 in filled_dict)      # => False
Looking up a non-existing key is a KeyError
filled_dict = {"one": 1, "two": 2, "three": 3}
print(filled_dict["four"])  # KeyError
Use get() method to avoid the KeyError
filled_dict = {"one": 1, "two": 2, "three": 3}
print(filled_dict.get("one"))      # => 1
print(filled_dict.get("four"))     # => None

# The get method supports a default argument when the value is missing
print(filled_dict.get("one", 4))   # => 1
print(filled_dict.get("four", 4))  # => 4
setdefault() inserts into a dictionary only if the given key isn't present
filled_dict = {"one": 1, "two": 2, "three": 3}

filled_dict.setdefault("five", 5)  # filled_dict["five"] is set to 5
print(filled_dict["five"])

filled_dict.setdefault("five", 6)  # filled_dict["five"] is still 5
print(filled_dict["five"])
Adding to a dictionary
filled_dict = {"one": 1, "two": 2, "three": 3, "five": 5}
print(filled_dict)

filled_dict.update({"four":4})  # => {"one": 1, "two": 2, "three": 3, "four": 4}
print(filled_dict)

filled_dict["four"] = 4         # another way to add to dict
print(filled_dict)
filled_dict = {"one": 1, "two": 2, "three": 3}

# Remove keys from a dictionary with del
del filled_dict["one"]  # Removes the key "one" from filled dict
print(filled_dict)

# From Python 3.5 you can also use the additional unpacking options
print({"a": 1, **{"b": 2}})  # => {'a': 1, 'b': 2}
print({"a": 1, **{"a": 2}})  # => {'a': 2}
Set
TODO: write more than just learnxinyminutes
# Sets store ... well sets
empty_set = set()
# Initialize a set with a bunch of values.
some_set = {1, 1, 2, 2, 3, 4}  # some_set is now {1, 2, 3, 4}
print(some_set) # {1,2,3,4}
# Similar to keys of a dictionary, elements of a set have to be immutable.
invalid_set = {[1], 1}  # => Raises a TypeError: unhashable type: 'list'
valid_set = {(1,), 1}
# Add one more item to the set
filled_set = {1,2,3,4}
filled_set.add(5)  # filled_set is now {1, 2, 3, 4, 5}
print(filled_set)
# Sets do not have duplicate elements
filled_set.add(5)  # it remains as before {1, 2, 3, 4, 5}
print(filled_set)
filled_set = {1,2,3,4,5}
# Do set intersection with &
other_set = {3, 4, 5, 6}
print(filled_set & other_set)  # => {3, 4, 5}
filled_set = {1, 2, 3, 4, 5}
other_set = {3, 4, 5, 6}
# Do set union with |
print(filled_set | other_set)  # => {1, 2, 3, 4, 5, 6}
# Do set difference with -
print({1, 2, 3, 4} - {2, 3, 5})  # => {1, 4}
# Do set symmetric difference with ^
print({1, 2, 3, 4} ^ {2, 3, 5})  # => {1, 4, 5}
# Check if set on the left is a superset of set on the right
print({1, 2} >= {1, 2, 3})  # => False
# Check if set on the left is a subset of set on the right
print({1, 2} <= {1, 2, 3})  # => True
some_set = {1, 2, 3, 4}
filled_set = some_set
# Check for existence in a set with in
print(2 in filled_set)   # => True
print(10 in filled_set)  # => False

# Make a one layer deep copy
print(filled_set = some_set.copy())  # filled_set is {1, 2, 3, 4, 5}
print(filled_set is some_set)        # => False
Iterators, and list comprehension
TODO: cleanup
# We can use list comprehensions for nice maps and filters
# List comprehension stores the output as a list (which itself may be nested).
print([i + 10 for i in [1, 2, 3]])            # => [11, 12, 13]
print([x for x in [3, 4, 5, 6, 7] if x > 5])  # => [6, 7]

# You can construct set and dict comprehensions as well.
print({x for x in "abcddeef" if x not in "abc"})  # => {'d', 'e', 'f'}
print({x: x**2 for x in range(5)})                # => {0: 0, 1: 1, 2: 4, 3: 9, 4: 16}
we can use the reversed function to take a given iterable and reverse it
print(list(range(5)))           # => [4,3,2,1,0]
print(list(reversed(range(5)))) # => [4,3,2,1,0]
Exception handling
We've already been introduced to the idea of exceptions in previous lessons, lets formalize them a little more
In programming, its typical that we have systems that may have certain ways they break. For instance, you may be trying to parse data from a user as an integer, but they didn't enter it in a way we can parse, in such instances we have encountered an error and instead of terminating the program would want to continue to function through it.
lets look an an example program that we can modify to use exceptions
shopping = ["Bananas", "Tomatoes", "Potatoes", "Carrots"]
print(f"Your current shopping list is {shopping}\nWhich one would you like to query")

index = int(input())   # This can error, they don't enter an int
print(shopping[index]) # This can error, the index they selected doesn't exist
We can use a try/catch block in order to handle different exceptions. The syntax is as follows:
try:
	# code that will error
except ExceptionType as exception_var:
	# what do to if it fails
except AnotherException:
	# what to do if that is encountered
else:
	# what to do if no errors are encountered
finally:
	# what to do after the end of everything, no matter what
here's an example in action
try:
    # Use "raise" to raise an error
    raise IndexError("This is an index error")
except IndexError as e:
    pass                 # we can use the `pass` statement to have indentation with no action
except (TypeError, NameError):
    pass                 # Multiple exceptions can be processed jointly.
else:                    # Optional clause to the try/except block. Must follow
                         # all except blocks.
    print("All good!")   # Runs only if the code in try raises no exceptions
finally:                 # Execute under all circumstances
    print("We can clean up resources here")
lets rewrite our first example that won't error out
shopping = ["Bananas", "Tomatoes", "Potatoes", "Carrots"]
print(f"Your current shopping list is {shopping}\nWhich one would you like to query")

validInput = False
while not validInput: # we want to keep retrying
	try:
		index = int(input())
		print(shopping[index])
		validInput = True
	except ValueError: # an invalid int cast results in a ValueError
		print("Could not parse your input")
	except IndexError: # an invalid indexing results in an IndexError
		print("Invalid index, please try again")
If we don't care about the specific error and want to just catch all errors, we can use the class that both inherit from (we'll learn about what that means), Exception
shopping = ["Bananas", "Tomatoes", "Potatoes", "Carrots"]
print(f"Your current shopping list is {shopping}\nWhich one would you like to query")

validInput = False
while not validInput: # we want to keep retrying
	try:
		index = int(input())
		print(shopping[index])
		validInput = True
	except Exception as e: # we're taking the exception object returned here
		print(f"The following error occured: {e}\nPlease try again")
Basic file IO
Since we're running in a browser python environment, the following tutorial will not have anything that's runnable, if you want to try any of these examples for yourself, you can with your own computer environment
# Instead of try/finally to cleanup resources you can use a with statement
with open("myfile.txt") as f: # opens a new file to read
    for line in f: # f is an iterable
        print(line)

# Writing to a file
contents = {"aa": 12, "bb": 21}
with open("myfile1.txt", "w") as file: # notice we use the "w" flag to specify writing
    file.write(str(contents))        # writes a string to a file

import json # we'll look at module imports later
with open("myfile2.txt", "w") as file:
    file.write(json.dumps(contents))  # writes an object to a file

# Reading from a file
with open("myfile1.txt") as file:
    contents = file.read()           # reads a string from a file
print(contents)
# print: {"aa": 12, "bb": 21}

with open("myfile2.txt", "r") as file:
    contents = json.load(file)       # reads a json object from a file
print(contents)
# print: {"aa": 12, "bb": 21}
Functions
Functions are the same as they were in math. They take some input and return some output.
There are two types of functions:
- "Pure" functions: they take input and then return output, they have no side effects
- "Impure" functions: they can take input, but also change the variables passed to input
Lets look at function syntax in python:
# we use the `def` keyword to specify and create functions
def add(x,y):
    print("x is {} and y is {}".format(x, y)) # .format is another way of doing f-strings
    return x + y  # Return values with a return statement

print(add(5,6)) # note that this both runs the function and prints its result
lets break down each part of the statement:
deftells python that we want to create a new functionaddis the name of this function we are creatingxandyare arguments in this function- arguments are things the function can take as input and work with. They are their own variables that get passed from whatever calls the function
returntells python to stop executing code, and instead return the following value to whatever called the function
when we do add(5, 6) python will take 5 and assign it to x and then 6 and assign it to y
# we can also call functions with keyword arguments
def add(x, y):
    print("x is {} and y is {}".format(x, y))
    return x + y

result = add(y=6, x=5) # keyword arguments can arrive in any order
print(result)
functions can also include no arguments
def say_hi():
	print("Hi!")

say_hi()
Returning multiple values (with tuple assignments)
def swap(x, y):
return y, x # Return multiple values as a tuple without the parenthesis.
# (Note: parenthesis have been excluded but can be included)
x = 1
y = 2
x, y = swap(x, y) # => x = 2, y = 1
# (x, y) = swap(x,y) # Again the use of parenthesis is optional.
print(x,y)
After this, try out Challenge 5
Variable Scope
Variables have a different given "scope" that they are valid in. Each function has their own scope. Python scopes things explicitly different in functions. Within conditionals and loops it has access to the parent scope.
x = 5
def set_x(num):
x = num # this x here is not the same as global var x
print(x)
print(x) # => 5
set_x(43) # prints 43, set in local scope
print(x) # => still 5
If we want to control a variable in the global scope, we can use the global keyword
Note: please refrain from doing this. On 1757 we typically reject code with the global keyword
x = 5
def set_global_x(num):
# global indicates that particular var lives in the global scope
global x
print(x) # => 5
x = num # global var x is now set to 6
print(x) # => 6
print(x)
set_global_x(43)
print(x) # retains its scope
Advanced functions
args
You can define functions that take a variable number of positional arguments, it will take it as a tuple, since you cannot modify the arguments you are passed
def varargs(*args): # note the *
return args
result = varargs(1, 2, 3) # => (1, 2, 3)
print(result)
kwargs
You can define functions that take a variable number of keyword arguments, as well
def keyword_args(**kwargs): # note the **
return kwargs
# Let's call it to see what happens
result = keyword_args(big="foot", loch="ness") # => {"big": "foot", "loch": "ness"}
print(result)
You can do both at once, if you like
def all_the_args(*args, **kwargs):
print(args)
print(kwargs)
"""
all_the_args(1, 2, a=3, b=4) prints:
(1, 2)
{"a": 3, "b": 4}
"""
all_the_args(1, 2, a=3, b=4)
When calling functions, you can do the opposite of args / kwargs, using * to expand tuples and ** to expand dictionaries
def all_the_args(*args, **kwargs):
print(args)
print(kwargs)
args = (1, 2, 3, 4)
kwargs = {"a": 3, "b": 4}
all_the_args(*args) # equivalent: all_the_args(1, 2, 3, 4)
all_the_args(**kwargs) # equivalent: all_the_args(a=3, b=4)
all_the_args(*args, **kwargs) # equivalent: all_the_args(1, 2, 3, 4, a=3, b=4)
first class functions
Python has first class functions. What this means is that we can actually create functions that return other functions
def create_adder(x):
def adder(y): # we are making a function, inside of a function!
return x + y # this will "take" the x variable from the scope above it
return adder
add_10 = create_adder(10)
print(add_10(3)) # => 13
The act of "taking" a variable from an existing scope is called a closure function
nonlocal
we can use the nonlocal keyword to work with variables in nested scope which shouldn't be declared in the inner functions
def create_avg():
total = 0
count = 0
def avg(n):
nonlocal total, count
total += n
count += 1
return total/count
return avg
avg = create_avg()
print(avg(3)) # => 3.0
print(avg(5)) # (3+5)/2 => 4.0
print(avg(7)) # (8+7)/3 => 5.0
anonymous functions
In python we can also create what are called anonymous functions. These are functions that have no name, but can be called. To make these we use the lambda keyword
Lambda functions will always return whatever is after them. They are good for short functions but once you get to longer operations, it is best to declare a standard function
res = (lambda x: x > 2)(3) # => True
print(res)
res = (lambda x, y: x ** 2 + y ** 2)(2, 1) # => 5
print(res)
despite being anonymous functions, we can assign them to variables
greater_two = lambda x: x > 2
print(greater_two(3)) # => True
Anonymous functions may seem useless, but have good properties relating to higher order actions.
Basic functional programming
# there are built-in higher order functions like `map`
add_10 = lambda x: x + 10
comp = list(map(add_10, [1,2,3])) # apply a function to every value of an iterable
print(comp) # => [11, 12, 13]
# the `max` function takes the greater of 2 variables
res = list(map(max, [1,2,3], [4,2,1]))
print(res) # => [4, 2, 3]
since we can pass the anonymous functions directly in, we can replace one of the above examples with a single line!
print(list(map((lambda x: x+10), [1,2,3]))) # => [11, 12, 13]
filter can take a list and trim it down based on a conditional function that takes each element and returns a boolean
res = list(filter(lambda x: x > 5, [3, 4, 5, 6, 7])) # => [6, 7]
print(res) # 3,4 and 5 are not > 5
After this, try out Challenge 6
Classes
Classes are higher order data structures in which we can define our own methods and variables on. Think about this as creating your own datatypes that do not come with base Python.
Lets look at a basic class example:
# We use the "class" statement to create a class
class Human:
# A class attribute. It is shared by all instances of this class
species = "H. sapiens"
# Basic initializer, this is called when this class is instantiated.
# Note that the double leading and trailing underscores denote objects
# or attributes that are used by Python but that live in user-controlled
# namespaces. Methods(or objects or attributes) like: __init__, __str__,
# __repr__ etc. are called special methods (or sometimes called dunder
# methods). You should not invent such names on your own.
def __init__(self, name):
# Assign the argument to the instance's name attribute
self.name = name
# Initialize property
self._age = 0 # the leading underscore indicates the "age" property is
# intended to be used internally
# do not rely on this to be enforced: it's a hint to other devs
# An instance method. All methods take "self" as the first argument
def say(self, msg):
print("{name}: {message}".format(name=self.name, message=msg))
# Another instance method
def sing(self):
return "yo... yo... microphone check... one two... one two..."
bob = Human("Bob") # we can create classes by calling them like functions
# on initialization, classes call their __init__ method
# as a template for how to "build" the class
bob.say("hi!") # just like we've done on other classes, we can call methods
bob.sing() # these are called instance methods, since they run on
# the instance of the class
In the next couple of sub lessons we will look at each of these parts in more depth.
Methods vs functions
To put it simply, methods are functions that run on classes. For instance methods (which is what this section is covering) they call upon the instance of the class. In the next section we'll learn about what that means
class Bird:
def __init__(self, call: str) -> None: # I am specifying that call should be of type string, and that __init__ should return nothing, or type None
print(f"Setting up bird with call {call}")
self.call = call
def tweet(self) -> None:
print(self.call)
def getCall(self) -> str: # specifying it should return a string
return self.call
the self keyword
What does instance really mean?
When python goes to create the Human class in the first class example, it allocates a new generic object that all classes inherit from. This defines some basic behavior by default, but now we don't have the Human class we are working with, we have this new object to work on. That is what self represents in each method
class Brain:
iq: int
def __init__(self, iq: int) -> None:
self.iq = iq
def compareIq(self, other) -> None:
print(f"Comparing to {other}")
return self.iq - other.iq
class Human:
name: str # we can specify what type we expect instance variables to be
def __init__(self, name, iq): # type decorators are optional, but encouraged
self.name = name # note that `self.name` and `name` are two diffirent objects
self.brain = Brain(iq) # you can have instance variables of other classes
def say(self, msg):
print("{name}: {message}".format(name=self.name, message=msg))
def sing(self):
return "yo... yo... microphone check... one two... one two..."
def smarterThan(self, other) -> bool:
return self.brain.compareIq(other.brain) > 0
def changeName(self, name):
self.name = name
bob = Human("Bob", 100)
bob.say("hi!")
bob.sing()
bob.changeName("Billy")
bob.say("I go by Billy now")
james = Human("James", 150)
james.say("Hi Billy")
print(james.smarterThan(bob)) # => True
Classmethods
Lets say we want to have a given method that will be shared among all instances. These methods are called classmethods, the are called with the class as the first argument instead of an instance of the class.
Lets look at an example
class Human:
# this class attribute is shared by all instances of the class
species = "H. sapiens"
def __init__(self, name):
self.name = name
def say(self, msg):
print(f"{self.name}: {msg}")
@classmethod # this is called a decorator, it decorates a function or method
def get_species(cls):
return cls.species
i = Human(name="Ian") # just like with functions, you can have positional arguments for the __init__
i.say("Hi") # Ian: hi
j = Human("Joel")
j.say("Hi") # Joey: hi
i.say(i.get_species()) # Ian: H. sapiens
j.say(j.get_species()) # Joel: H. sapiens
# change the shared attribute for all classes
Human.species = "H. neanderthalensis"
i.say(i.get_species()) # Ian: H. neanderthalensis
j.say(j.get_species()) # Joel: H. neanderthalensis
Static Methods
Static methods are methods that are part of a class but do not have access to the instance (self) or the
class (cls) as their first argument. They are defined using the @staticmethod decorator.
Think of them as regular functions that are namespaced within the class. They are used for utility functions that are related to the class, but don't need to operate on an instance of it.
Example
Let's say we have a Calculator class. We can define a static method to add two numbers. This add method
doesn't need to know about any specific calculator instance.
class Calculator:
def __init__(self, brand):
self.brand = brand
# This is an instance method, it needs self
def get_brand(self):
return self.brand
@staticmethod
def add(x, y):
# This is a static method, it does not receive self or cls
return x + y
# You can call the static method directly on the class
result = Calculator.add(5, 3)
print(f"The result is: {result}") # => The result is: 8
# You can also call it on an instance, but it doesn't use the instance at all
my_calc = Calculator("Casio")
result2 = my_calc.add(10, 20)
print(f"The result is: {result2}") # => The result is: 30
Classmethod vs. Staticmethod
- A
@classmethodreceives the class (cls) as the first argument. It can be used to work with the class itself, like creating instances from a different kind of input. - A
@staticmethoddoes not receive any special first argument. It's essentially a function placed inside the class for organizational purposes.
The @property Decorator
Python has a built-in @property decorator that allows you to define methods that can be accessed like
attributes. This is useful for creating "getter" methods that don't require parentheses to be called. It's a
more "Pythonic" way to handle getting and setting attributes, especially when you want to add logic to these
actions.
Let's look at an example where we want to control access to an _age attribute.
class Human:
def __init__(self, name, age):
self.name = name
# We use a leading underscore to indicate this is a "private" attribute
self._age = age
@property
def age(self):
# This is our "getter" method for the age
print("Getting age...")
return self._age
# Create an instance
person = Human("Alice", 30)
# Access the age property just like an attribute
print(person.age)
#Output:
Getting age...
30
Setters
The @property decorator also allows us to define a "setter" method. This lets us add validation or other logic whenever an attribute's value is changed.
class Human:
def __init__(self, name, age):
self.name = name
self._age = age
@property
def age(self):
return self._age
# The setter decorator is named after the property
@age.setter
def age(self, new_age):
print("Setting age...")
if new_age > 0:
self._age = new_age
else:
print("Age must be positive!")
person = Human("Bob", 25)
# Use the setter by assigning a new value
person.age = 26 # => Setting age...
print(person.age) # => 26
person.age = -5 # => Setting age...
# => Age must be positive!
print(person.age) # => 26 (the age was not changed)
Using properties allows you to start with simple public attributes and then add getters and setters later without changing the way the attribute is accessed from outside the class.
Inheritance
Inheritance is a way to form new classes using classes that have already been defined. The new class is called a derived class (or child class), and the one from which it inherits is called the base class (or parent class). This allows us to reuse code and create a class hierarchy.
Let's create a Student class that inherits from our Human class.
class Human:
def __init__(self, name, age):
self.name = name
self.age = age
def say(self, msg):
print(f"{self.name}: {msg}")
#To inherit, we pass the base class as an argument to the new class
class Student(Human):
def __init__(self, name, age, student_id):
# Use super() to call the __init__ method of the parent class (Human)
super().__init__(name, age)
self.student_id = student_id # Add a new attribute for the Student class
#We can also add new methods
def study(self, subject):
print(f"{self.name} is studying {subject}.")
#Create an instance of the Student class
student_jane = Student("Jane", 20, "12345")
# student_jane can use methods from the Human class
student_jane.say("Hello!") # => Jane: Hello!
# And it can use its own methods
student_jane.study("Computer Science") # => Jane is studying Computer Science.
print(f"Student ID: {student_jane.student_id}") # => Student ID: 12345
### Overriding Methods
# You can also override methods from the parent class to provide a specific implementation for the child class.
class Student(Human):
def __init__(self, name, age, student_id):
super().__init__(name, age)
self.student_id = student_id
# Override the say method from the Human class
def say(self, msg):
print(f"Student {self.name} says: {msg}")
student_john = Student("John", 22, "67890")
student_john.say("I have an exam tomorrow.") # => Student John says: I have an exam tomorrow.
Modules and Imports
As your programs get larger, it's good practice to split your code into multiple files. In Python, each file is considered a "module". You can use the import statement to use functions, classes, and variables from one module in another.
Basic Import
Let's say you have a file named my_math.py:
# my_math.py
def add(a, b):
return a + b
PI = 3.14159
You can import this module in another file, like main.py, to use its contents.
# main.py
import my_math
result = my_math.add(5, 3)
print(result) # => 8
print(my_math.PI) # => 3.14159
Specific Imports
You can also import specific functions or variables from a module using the from keyword.
from my_math import add, PI
result = add(10, 20)
print(result) # => 30
print(PI) # => 3.14159
You can also use * to import everything, but this is generally discouraged as it can lead to naming conflicts.
from my_math import *
Aliasing
You can rename a module or an imported function using the as keyword. This is useful for shortening long names or avoiding conflicts.
import my_math as mm
from my_math import add as addition
result = mm.add(2, 2)
print(result) # => 4
result2 = addition(1, 1)
print(result2) # => 2
The if __name__ == "__main__" block
Sometimes you want to have code in a file that runs only when that file is executed directly, not when it's imported as a module. You can do this by placing that code inside an if __name__ == "__main__" block.
When you run a Python file directly, Python sets the special variable __name__ for that file to "__main__". When the file is imported, __name__ is set to the module's name (the filename).
# my_math.py
def add(a, b):
return a + b
# This code will only run when my_math.py is executed directly
if __name__ == "__main__":
print("Running my_math.py as a script!")
print(add(10, 5))
If you run python my_math.py, it will print:
Running my_math.py as a script!
15
If you import it from main.py, that block will not run.
pip
PipEnv
Challenges
These are recommended to be taken alongside the tutorial
Challenge 1
This challenge is intended to be taken after Datatypes
- Create a program that allows the user to enter a number, and then outputs triple that number
- Create a program that allows the user to enter a word/phrase, and then outputs the lengths of that word/phrase

Solution
- Create a program that allows the user to enter a number, and then outputs triple that number
number = int(input())
print(3 * number)
- Create a program that allows the user to enter a word/phrase, and then outputs the lengths of that word/phrase
phrase = input()
print(len(phrase))
Challenge 2
Intended to be completed after lists
- Create a program that allows the user to enter a word/phrase, and outputs the first letter of that word/phrase
- Create a list with one string of your choice in it
- Then prompt the user to enter a number, and add that number to the list. Then add the result of multiplying your number by 2 to the list. Then print the list
- Ex.
[“Apple”, 10, 20] [“Mousepad”, 13, 26]
- Ex.
Solution
- Create a program that allows the user to enter a word/phrase, and outputs the first letter of that word/phrase
word = input()
print(word[0])
- Create a list with one string of your choice in it
- Then prompt the user to enter a number, and add that number to the list. Then add the result of multiplying your number by 2 to the list. Then print the list
- Ex.
[“Apple”, 10, 20] [“Mousepad”, 13, 26]
- Ex.
list = ["Cargo"]
number = int(input()) # change this
list.append(number)
list.append(2 * number)
print(list)
Challenge 3
intended to be completed after Conditionals
- Create a program that allows the user to enter a number. If the number is between 10 and 20, output “Congratulations” and if not, output “That’s too bad”
- Create a program that asks the user for a number, and prints 5 different messages depending on the number
- Create a program that asks the user for their name. Have at least 3 different output messages depending on what the name is
Solution
- Create a program that allows the user to enter a number. If the number is between 10 and 20, output “Congratulations” and if not, output “That’s too bad”
number = int(input())
if number > 10 and number < 20:
print("Congratulations")
else:
print("That's too bad")
- Create a program that asks the user for a number, and prints 5 different messages depending on the number
# this is just an example solution, yours may differ
number = int(input())
if number < 13:
print("Small")
elif number < 16:
print("smallish")
elif number < 18:
print("old kiddo")
elif number < 21:
print("approaching unc status")
else:
print("Achievement unlocked: unc status")
- Create a program that asks the user for their name. Have at least 3 different output messages depending on what the name is
# this is just an example solution, yours may differ
print("What is your name?")
name = input()
if name == "Landon Bayer":
print("ur a pretty cool guy")
elif name == "Luke Maxwell":
print("Ur cool... i guess")
else:
print("No idea who you are, try again")
Challenge 4
While loops
- Create a program that allows the user to continuously enter a word, prints the last letter of the word, and the program only ends once they type the word “end”
- Create a program that allows the user to enter a number. Then, a segment of code containing a print statement is repeated their number amount of times, using a while loop
For Loops
- Create a program that allows the user to enter a word, and prints each vowel in the world
- Then alter the program to print how many vowels are in the word
Solution
While loops
- Create a program that allows the user to continuously enter a word, prints the last letter of the word, and the program only ends once they type the word “end”
while True:
print("Enter a word")
word = input()
print(word[-1])
if word == "end":
break
- Create a program that allows the user to enter a number. Then, a segment of code containing a print statement is repeated their number amount of times, using a while loop
print("Enter a number!")
user_number = int(input())
while user_number > 0:
print("Hello!")
user_number -= 1
For Loops
- Create a program that allows the user to enter a word, and prints each vowel in the world
print("Enter a word:")
word = input()
for character in word:
if character in ["a", "e", "i", "o", "u"]:
print(character)
alt solution
print("Enter a word:")
word = input()
for character in word:
if character == "a" or character == "e" or character == "i" or character == "o" or character == "u":
print(character)
- Then alter the program to print how many vowels are in the word
print("Enter a word:")
word = input()
vowel_count = 0
for character in word:
if character in ["a", "e", "i", "o", "u"]:
vowel_count += 1
print(f"Total vowel count: {vowel_count}")
alt solution
print("Enter a word:")
word = input()
vowel_count = 0
for character in word:
if character == "a" or character == "e" or character == "i" or character == "o" or character == "u":
vowel_count += 1
print(f"Total vowel count: {vowel_count}")
Challenge 5
Basic challenges
- Create a function that takes in a number as a parameter, and returns double the number
- Test the function by asking the user for a number, running that number through the function, then printing the result
- Create a function that takes in two numbers and returns the sum of those two numbers
- Test the function by asking the user for two numbers, running those numbers through the function, then printing the result
More advanced
- Create a function titled vowelCount that takes in a word as a parameter, then returns how many vowels are in that word
- Test that function by allowing the user to enter a word, passing that word into the vowelCount function, then
Solution
Basic challenges
- Create a function that takes in a number as a parameter, and returns double the number
- Test the function by asking the user for a number, running that number through the function, then printing the result
def double_num(num):
return 2 * num
# testing the function
print("Enter a number")
user_number = int(input())
result = double_num(user_number)
print(result)
- Create a function that takes in two numbers and returns the sum of those two numbers
- Test the function by asking the user for two numbers, running those numbers through the function, then printing the result
def add_numbers(x,y):
return x + y
print("enter a number")
x = int(input())
print("enter another number")
y = int(input())
print(add_numbers(x,y))
More advanced
- Create a function titled vowelCount that takes in a word as a parameter, then returns how many vowels are in that word
- Test that function by allowing the user to enter a word, passing that word into the vowelCount function, then
def vowelCount(word):
vowel_count = 0
for character in word:
if character in "aeiou":
vowel_count += 1
return vowel_count
print("Enter a word")
user_word = input()
print(f"The total number of vowels is {vowelCount(user_word)}")
Challenge 6
this is a big jump from the previous challenges, take your time with it
You are working on a database system for controller input and have been asked to make a series of variable queries to the system. Being the smart programmer you are, you decide to write a script that will interpret the data and return what is relevant.
controlScheme is a list of dictionaries which each have the following schema
{
"id": int, // the controller id of the control
"button": int, // the button id of the control
"descripton": str // a description of what the control is for
}
A schema is just a way of saying what you can expect the data to be
Problem 1
Using higher order functions list map and filter, create a function called getDesc that takes a controlScheme and returns all of its descriptions in a list. You are given sample dataset below , but are encouraged to expand and try other customized datasets.
controlScheme1 = [
{"id": 2, "button": 1, "description": "fire"},
{"id": 2, "button": 2, "description": "intake"},
{"id": 1, "button": 4, "description": "climb"},
{"id": 3, "button": 2, "description": "fudge up"},
{"id": 3, "button": 3, "description": "fudge down"}
]
controlScheme2 = [
{"id": 0, "button": 1, "description": "up"},
{"id": 0, "button": 2, "description": "left"},
{"id": 0, "button": 3, "description": "down"},
{"id": 0, "button": 4, "description": "right"},
{"id": 1, "button": 1, "description": "jump"},
{"id": 1, "button": 2, "description": "shoot"},
{"id": 1, "button": 3, "description": "duck"},
{"id": 1, "button": 4, "description": "run"}
]
def getDesc(controls) -> list[str]:
pass
Problem 2
Like above, except expand on to return a set of ids. Note that a set enforces that there are no duplicates to the id. Also write a function that returns a sorted list of all the buttons. If there are duplicate buttons, keep them.
For sorting a list, you can mutably sort a list with li.sort() example below:
li = [2, 1, 3, 4, 0]
li.sort()
print(li) # [0, 1, 2, 3, 4]
use the following starter for the problem:
controlScheme1 = [
{"id": 2, "button": 1, "description": "fire"},
{"id": 2, "button": 2, "description": "intake"},
{"id": 1, "button": 4, "description": "climb"},
{"id": 3, "button": 2, "description": "fudge up"},
{"id": 3, "button": 3, "description": "fudge down"},
]
controlScheme2 = [
{"id": 0, "button": 1, "description": "up"},
{"id": 0, "button": 2, "description": "left"},
{"id": 0, "button": 3, "description": "down"},
{"id": 0, "button": 4, "description": "right"},
{"id": 1, "button": 1, "description": "jump"},
{"id": 1, "button": 2, "description": "shoot"},
{"id": 1, "button": 3, "description": "duck"},
{"id": 1, "button": 4, "description": "run"}
]
def getIds(controls) -> set[int]:
pass
def getButtons(controls) -> list[int]:
pass
Problem 3
implement a moving weighted moving average generator function. The function has type signature: (terms: float) => ((term: float) => float)
This means that the function should take as input a number of terms to average at most, and then that returned function should take an argument to add to the moving average, and return the moving average.
def movingGenerator(terms: float):
def average(term: float):
pass
return average
avg5 = movingGenerator(5)
print(avg5(1)) # => 1
print(avg5(3)) # => 2
for i in range(7):
print(avg5(i)) # should print out 1.33, 1.25, 1.4, 1.8, 2.0, 3.0, 4.0
Solution
Problem 1
Using higher order functions list map and filter, create a function called getDesc that takes a controlScheme and returns all of its descriptions in a list. You are given sample dataset below , but are encouraged to expand and try other customized datasets.
controlScheme1 = [
{"id": 2, "button": 1, "description": "fire"},
{"id": 2, "button": 2, "description": "intake"},
{"id": 1, "button": 4, "description": "climb"},
{"id": 3, "button": 2, "description": "fudge up"},
{"id": 3, "button": 3, "description": "fudge down"},
]
controlScheme2 = [
{"id": 0, "button": 1, "description": "up"},
{"id": 0, "button": 2, "description": "left"},
{"id": 0, "button": 3, "description": "down"},
{"id": 0, "button": 4, "description": "right"},
{"id": 1, "button": 1, "description": "jump"},
{"id": 1, "button": 2, "description": "shoot"},
{"id": 1, "button": 3, "description": "duck"},
{"id": 1, "button": 4, "description": "run"}
]
def getDesc(controls) -> list[str]:
return list(map((lambda x: x["description"]), controls))
print(getDesc(controlScheme1)) # test and prove it works
print(getDesc(controlScheme2))
Problem 2
Like above, except expand on to return a set of ids. Note that a set enforces that there are no duplicates to the id. Also write a function that returns a sorted list of all the buttons. If there are duplicate buttons, keep them.
controlScheme1 = [
{"id": 2, "button": 1, "description": "fire"},
{"id": 2, "button": 2, "description": "intake"},
{"id": 1, "button": 4, "description": "climb"},
{"id": 3, "button": 2, "description": "fudge up"},
{"id": 3, "button": 3, "description": "fudge down"},
]
controlScheme2 = [
{"id": 0, "button": 1, "description": "up"},
{"id": 0, "button": 2, "description": "left"},
{"id": 0, "button": 3, "description": "down"},
{"id": 0, "button": 4, "description": "right"},
{"id": 1, "button": 1, "description": "jump"},
{"id": 1, "button": 2, "description": "shoot"},
{"id": 1, "button": 3, "description": "duck"},
{"id": 1, "button": 4, "description": "run"}
]
def getIds(controls) -> set[int]:
return set(map((lambda x: x["id"]), controls))
def getButtons(controls) -> list[int]:
mapping_function = lambda x: x["button"]
result_list = list(map(mapping_function, controls))
result_list.sort()
return result_list
print(getIds(controlScheme1)) # testing
print(getIds(controlScheme2)) # testing
print(getButtons(controlScheme1))
print(getButtons(controlScheme2))
Problem 3
implement a moving weighted moving average generator function. The function has type signature: (terms: float) => ((term: float) => float)
This means that the function should take as input a number of terms to average at most, and then that returned function should take an argument to add to the moving average, and return the moving average.
def movingGenerator(terms: float):
moving_list = []
def average(term: float):
nonlocal moving_list
moving_list.append(term)
if len(moving_list) > terms:
moving_list.remove(0)
total = 0
for i in moving_list:
total += i
return total / len(moving_list)
return average
avg5 = movingGenerator(5)
print(avg5(1)) # => 1
print(avg5(3)) # => 2
for i in range(7):
print(avg5(i)) # should print out 1.33, 1.25, 1.4, 1.8, 2.0, 3.0, 4.0
using collections.deque which is a datastructure that is beyond the scope of this course we can actually simplify this problem
from collections import deque # we'll learn about module imports later
def movingGenerator(terms: float):
moving_list = deque(maxlen=terms)
def average(term: float):
nonlocal moving_list
moving_list.append(term)
total = 0
for i in moving_list:
total += i
return total / len(moving_list)
return average
avg5 = movingGenerator(5)
print(avg5(1)) # => 1
print(avg5(3)) # => 2
for i in range(7):
print(avg5(i)) # should print out 1.33, 1.25, 1.4, 1.8, 2.0, 3.0, 4.0
Challenge 7
This challenge is intended to be taken after the classes section.
Problem 1: The Dog Class
- Create a class called
Dog. - The
__init__method should takenameandbreedas arguments. - Create an instance method called
barkthat prints "Woof!". - Create an instance of your
Dogclass and call thebarkmethod.
Problem 2: The Car Class
- Create a class called
Car. - The
__init__method should takemake,model, andyear. - Use the
@propertydecorator to create adescriptionproperty that returns a string like "2023 Honda Civic". - Create an instance of the
Carand print itsdescription.
Problem 3: Inheritance
- Create a
Personclass withnameandageattributes. - Create a
Studentclass that inherits fromPerson. - The
Studentclass should have an additionalstudent_idattribute. - Create an instance of
Studentand print out their name, age, and student ID.
Solution
Problem 1: The Dog Class
class Dog:
def __init__(self, name, breed):
self.name = name
self.breed = breed
def bark(self):
print("Woof!")
# Create an instance
my_dog = Dog("Fido", "Golden Retriever")
my_dog.bark()
Problem 2: The Car Class
class Car:
def __init__(self, make, model, year):
self.make = make
self.model = model
self.year = year
@property
def description(self):
return f"{self.year} {self.make} {self.model}"
# Create an instance
my_car = Car("Honda", "Civic", 2023)
print(my_car.description)
Problem 3: Inheritance
class Person:
def __init__(self, name, age):
self.name = name
self.age = age
class Student(Person):
def __init__(self, name, age, student_id):
super().__init__(name, age)
self.student_id = student_id
# Create an instance
student = Student("Alice", 20, "s12345")
print(f"Name: {student.name}, Age: {student.age}, ID: {student.student_id}")
Challenge 8
This challenge is intended to be taken after the modules section.
Problem 1: Custom Module
- Create a new file called
greetings.py. - In
greetings.py, define a function calledsay_hello(name)that returns a string "Hello, {name}!". - In the editor below, import the
greetingsmodule and use thesay_hellofunction to greet a user.
# Assume greetings.py exists
# Your code here
Problem 2: Using the math module
- Ask the user to enter the radius of a circle.
- Use the
mathmodule to get the value of PI and to calculate the area of the circle (Area = π * r^2). - Print the calculated area.
Problem 3: Number Guessing Game
- Use the
randommodule to generate a random integer between 1 and 100. - Create a loop that asks the user to guess the number.
- After each guess, tell the user if their guess was too high or too low.
- The loop should end when the user guesses the correct number.
Solution
Problem 1: Custom Module
# greetings.py
def say_hello(name):
return f"Hello, {name}!"
# main.py (or the editor)
import greetings
user_name = input("What is your name? ")
message = greetings.say_hello(user_name)
print(message)
Problem 2: Using the math module
import math
radius_str = input("Enter the radius of the circle: ")
radius = float(radius_str)
area = math.pi * (radius ** 2)
print(f"The area of the circle is: {area}")
Problem 3: Number Guessing Game
import random
secret_number = random.randint(1, 100)
while True:
guess_str = input("Guess a number between 1 and 100: ")
guess = int(guess_str)
if guess < secret_number:
print("Too low!")
elif guess > secret_number:
print("Too high!")
else:
print("You got it! The number was", secret_number)
break
RobotPy
RobotPy is a set of Python modules that allows for the development of robot code for the FIRST Robotics Competition (FRC) in Python. It provides a powerful and easy-to-use framework for controlling the robot's hardware and implementing complex autonomous and teleoperated behaviors.
Architecture Overview
graph TD
A[Robot.py] --> B[RobotContainer]
B --> C[Subsystems]
B --> D[Commands]
B --> E[Controller Bindings]
C --> C1[Drivetrain]
C --> C2[Intake]
C --> C3[Shooter]
C --> C4[Elevator]
D --> D1[Default Commands]
D --> D2[Autonomous Sequences]
D --> D3[Command Groups]
C1 --> H1[Motor Controllers]
C1 --> H2[Encoders]
C1 --> H3[Gyro]
subgraph Telemetry
T1[NetworkTables]
T2[AdvantageScope]
T3[Elastic]
end
C --> T1
D --> T1
Key concepts covered in this section:
- Command-Based Programming: organizing behaviors via composable commands
- Subsystems: hardware abstraction with periodic updates and state
- Controllers: PID, Bang-Bang, Ramsete, profiled controllers
- Path Following: PathPlanner integration and trajectory tracking
- Telemetry and Logging: AdvantageScope, Elastic dashboards
See also:
This project uses pipenv for dependency management and black/prettier for formatting. See the Tools section.
For comprehensive reference, visit the official RobotPy docs: https://robotpy.readthedocs.io/
Robot File Structure
Team 1757's RobotPy projects follow a structured architecture based on the Command-Based programming paradigm. Here's the file structure from our 2026-Rebuilt repository:
2026-Rebuilt/
├── robot.py # Main robot class (MentorBot)
├── robotcontainer.py # Central configuration and initialization
├── operatorinterface.py # Controller mappings and input handling
├── physics.py # Robot physics simulation
├── constants/ # Organized constants by subsystem
│ ├── __init__.py
│ ├── drive.py # Drivetrain physical constants
│ ├── oi.py # Operator interface constants
│ ├── motors.py # Motor and encoder constants
│ ├── vision.py # Vision system constants
│ ├── auto.py # Autonomous constants
│ └── ...
├── subsystems/ # Hardware abstraction layers
│ ├── drive/
│ │ ├── drivesubsystem.py # Main drivetrain subsystem
│ │ └── swervemodule.py # Individual swerve module
│ ├── vision/
│ │ └── visionsubsystem.py # Vision processing
│ └── loggingsubsystem.py # Data logging
├── commands/ # Robot behaviors and actions
│ ├── drive/ # Drive-related commands
│ │ ├── absoluterelativedrive.py
│ │ ├── fieldrelativedrive.py
│ │ └── ...
│ ├── drivedistance.py # Autonomous drive command
│ └── defensestate.py # Defensive positioning
├── util/ # Utility functions and helpers
│ ├── simtalon.py # Simulation motor wrapper
│ ├── controltype.py # Controller abstraction
│ └── ...
├── deploy/ # PathPlanner paths and configs
│ └── pathplanner/
└── tests/ # Unit tests
Key Architecture Components
robot.py - Entry Point
class MentorBot(commands2.TimedCommandRobot):
def robotInit(self):
self.container = RobotContainer()
def getAutonomousCommand(self):
return self.container.getAutonomousCommand()
robotcontainer.py - Central Hub
- Instantiates all subsystems
- Sets up default commands
- Configures button bindings
- Manages autonomous chooser
- Initializes logging and telemetry
operatorinterface.py - Input Abstraction
class OperatorInterface:
class Drive:
reset_gyro = ControlButton(0, 16)
defense_state = ControlButton(2, 24)
class ChassisControls:
class Translation:
y = SignSquare(Invert(Deadband(ControlAxis(0, 1)(), kDeadband)))
constants/ - Modular Organization
Unlike a single constants.py file, Team 1757 organizes constants by functional area:
drive.py: Physical robot dimensions, motor IDs, PID gains, swerve module positionsoi.py: Controller deadbands and input thresholdsmotors.py: Encoder pulse counts and motor specificationsvision.py: Camera configurations and pipeline settings
Development Patterns
Subsystem Design
- Each subsystem inherits from
commands2.SubsystemBase - Hardware initialization in
__init__() - State updates in
periodic() - High-level methods for command interface
Command Structure
- Commands inherit from
commands2.Command - Organized by functional area (drive/, auto/, etc.)
- Clear lifecycle methods:
initialize(),execute(),isFinished(),end()
Simulation Support
physics.pyfor robot physics simulationutil/simtalon.pywraps motor controllers for sim/real compatibility- Comprehensive simulation testing capabilities
Best Practices from 2026-Rebuilt
- Modular Constants: Organize constants by subsystem for maintainability
- Controller Abstraction:
OperatorInterfaceprovides clean input handling - Simulation First: Built-in simulation support from day one
- Comprehensive Logging: Dedicated logging subsystem for data analysis
- PathPlanner Integration: Modern path planning with deploy directory structure
For the complete codebase, see our 2026-Rebuilt repository.
Constants Organization
Team 1757 uses a modular approach to constants organization, with separate files for each functional area rather than a single constants.py file. This approach improves maintainability and reduces merge conflicts in large codebases.
Modular Constants Structure
graph TD
A[constants/] --> B[__init__.py]
A --> C[drive.py]
A --> D[oi.py]
A --> E[motors.py]
A --> F[vision.py]
A --> G[auto.py]
A --> H[field.py]
A --> I[trajectory.py]
C --> C1[Physical Dimensions]
C --> C2[Motor IDs]
C --> C3[PID Gains]
C --> C4[Swerve Positions]
D --> D1[Controller Deadbands]
D --> D2[Button Mappings]
E --> E1[Encoder CPR Values]
E --> E2[Motor Specifications]
style A fill:#e1f5fe
style C fill:#e8f5e8
style D fill:#fff3e0
Example: Drive Constants (constants/drive.py)
import math
from phoenix6.configs.talon_fx_configs import CurrentLimitsConfigs
from wpimath.geometry import Translation2d
from wpimath.system.plant import DCMotor
from .math import kMetersPerInch, kRadiansPerRevolution
# Physical Robot Parameters
kRobotWidth = 28 * kMetersPerInch
kRobotLength = 26 * kMetersPerInch
# Swerve Module Positions
kSwerveModuleCenterToRobotCenterWidth = 10.375 * kMetersPerInch
kSwerveModuleCenterToRobotCenterLength = 9.375 * kMetersPerInch
kFrontLeftWheelPosition = Translation2d(
kSwerveModuleCenterToRobotCenterLength,
kSwerveModuleCenterToRobotCenterWidth,
)
# Wheel and Gearing
kWheelDiameter = 4 * kMetersPerInch
kWheelRadius = kWheelDiameter / 2
kWheelCircumference = kWheelRadius * 2 * math.pi
kDriveGearingRatio = (50 / 14) * (16 / 28) * (45 / 15)
kSteerGearingRatio = 150 / 7
# Velocity and Acceleration Limits
kMaxMotorAngularVelocity = DCMotor.krakenX60().freeSpeed
kMaxWheelAngularVelocity = kMaxMotorAngularVelocity / kDriveGearingRatio
kMaxWheelLinearVelocity = kWheelDistancePerRadian * kMaxWheelAngularVelocity
# Motor Configuration
kCANivoreName = "canivore"
kFrontLeftDriveMotorId = 10
kFrontLeftSteerMotorId = 11
# ... more motor IDs
kDriveCurrentLimit = (
CurrentLimitsConfigs()
.with_stator_current_limit(35)
.with_stator_current_limit_enable(True)
.with_supply_current_limit(35)
.with_supply_current_limit_enable(True)
)
# Control Gains
kDrivePGain = 0.001
kDriveIGain = 0.0
kDriveDGain = 0.0
kDriveVGain = 0.01 # Feedforward
kSteerPGain = 2
kSteerIGain = 0.0
kSteerDGain = 0
# Encoder Offsets (from calibration procedure)
kFrontLeftAbsoluteEncoderOffset = 0.417969
kFrontRightAbsoluteEncoderOffset = -0.055176
# ... more offsets
# Speed Multipliers
kNormalSpeedMultiplier = 0.50
kTurboSpeedMultiplier = 0.95
Example: Operator Interface Constants (constants/oi.py)
# Operator Interface Constants
kXboxJoystickDeadband = 0.1
kKeyboardJoystickDeadband = 0.0
kXboxTriggerActivationThreshold = 0.5
Example: Motor Constants (constants/motors.py)
from .math import kRadiansPerRevolution
# Encoder specifications
kCANcoderPulsesPerRevolution = 4096
kCANcoderPulsesPerRadian = kCANcoderPulsesPerRevolution / kRadiansPerRevolution
kTalonEncoderPulsesPerRevolution = 2048
kTalonEncoderPulsesPerRadian = kTalonEncoderPulsesPerRevolution / kRadiansPerRevolution
Constants Package Initialization (constants/__init__.py)
"""
The constants module is a convenience place for teams to hold robot-wide
numerical or boolean constants. Don't use this for any other purpose!
Physical constants must have their units specified
Default units:
Length: meters
Angle: radians
Axes Convention (right hand rule):
Translation:
+X: forward
+Y: left
+Z: up
Rotation:
+rotate around Z: counterclockwise looking from the top, 0 aligned with +X
"""
kRobotUpdatePeriod = 1 / 50 # 50 Hz control loop
Usage in Code
# Import specific constants
from constants.drive import (
kFrontLeftDriveMotorId,
kDriveGearingRatio,
kMaxWheelLinearVelocity,
kCANivoreName
)
from constants.oi import kXboxJoystickDeadband
class DriveSubsystem(commands2.SubsystemBase):
def __init__(self):
super().__init__()
# Use imported constants
self.frontLeftDrive = ctre.TalonFX(kFrontLeftDriveMotorId, kCANivoreName)
self.maxSpeed = kMaxWheelLinearVelocity
Benefits of Modular Organization
Maintainability
- Related constants grouped together
- Easier to find specific values
- Reduced merge conflicts
- Clear ownership of different areas
Documentation
- Units clearly specified for each constant
- Comments explain calibration procedures
- Physical meaning of each value
Collaboration
- Multiple team members can work on different constant files
- Mechanical team updates physical constants
- Programming team updates control gains
- Vision team updates camera parameters
Validation
- Easier to validate related constants together
- Unit consistency checking within functional areas
- Clear dependencies between constants
Best Practices
- Use descriptive names:
kFrontLeftAbsoluteEncoderOffsetvsFL_OFFSET - Include units: Document units in comments or variable names
- Group related constants: Keep subsystem constants together
- Use Python constants convention: ALL_CAPS for true constants
- Calculate derived values: Show relationships between constants
- Document calibration: Explain how measured values were obtained
Subsystems
A subsystem is a Python class that represents a specific part of the robot, such as the drivetrain, intake, or shooter. Subsystems are responsible for controlling the hardware associated with that part of the robot and for providing a high-level interface for other parts of the code to interact with it.
By encapsulating the hardware control and logic for each part of the robot in a separate subsystem, you can make your code more organized, modular, and easier to maintain.
Team 1757 Subsystem Architecture
Team 1757 uses a modular subsystem design with clear separation of concerns. Each subsystem inherits from commands2.Subsystem and follows consistent patterns for hardware abstraction and state management.
graph TD
A[DriveSubsystem] --> B[Swerve Modules]
A --> C[Pigeon2 IMU]
A --> D[Pose Estimator]
A --> E[Odometry]
B --> F[CTRESwerveModule]
F --> G[Drive Motor TalonFX]
F --> H[Steer Motor TalonFX]
F --> I[CANcoder]
D --> J[Vision Integration]
D --> K[Odometry Fusion]
style A fill:#1976d2
style F fill:#4caf50
Example: Swerve Drive Subsystem
Team 1757's drive subsystem demonstrates modern FRC robotics patterns including swerve drive, pose estimation, and NetworkTables logging.
from enum import Enum, auto
from commands2 import Subsystem
from phoenix6.hardware.pigeon2 import Pigeon2
from wpimath.geometry import Pose2d, Rotation2d, Translation2d
from wpimath.kinematics import (
ChassisSpeeds,
SwerveDrive4Kinematics,
SwerveDrive4Odometry,
)
from ntcore import NetworkTableInstance
from subsystems.drive.ctreswervemodule import CTRESwerveModule
from subsystems.drive.robotposeestimator import RobotPoseEstimator
from constants.drive import (
kFrontLeftWheelPosition,
kFrontRightWheelPosition,
kBackLeftWheelPosition,
kBackRightWheelPosition,
kPigeonCANId,
kCANivoreName,
# Module configurations...
)
class DriveSubsystem(Subsystem):
class CoordinateMode(Enum):
RobotRelative = auto()
FieldRelative = auto()
def __init__(self) -> None:
Subsystem.__init__(self)
self.setName(__class__.__name__)
# Initialize four swerve modules
self.frontLeftModule = CTRESwerveModule("front_left", ...)
self.frontRightModule = CTRESwerveModule("front_right", ...)
self.backLeftModule = CTRESwerveModule("back_left", ...)
self.backRightModule = CTRESwerveModule("back_right", ...)
self.modules = (
self.frontLeftModule,
self.frontRightModule,
self.backLeftModule,
self.backRightModule,
)
# Swerve kinematics for coordinate transformations
self.kinematics = SwerveDrive4Kinematics(
kFrontLeftWheelPosition,
kFrontRightWheelPosition,
kBackLeftWheelPosition,
kBackRightWheelPosition,
)
# Pigeon2 IMU for heading measurement
self.gyro = Pigeon2(kPigeonCANId, kCANivoreName)
# Pose estimator fuses odometry with vision data
self.estimator = RobotPoseEstimator(
self.kinematics,
self.getRotation(),
self.getModulePositions(),
Pose2d(),
(0.05, 0.05, 0.087), # Standard deviations [x, y, heading]
)
# Basic odometry for comparison/fallback
self.odometry = SwerveDrive4Odometry(
self.kinematics,
self.getRotation(),
self.getModulePositions(),
Pose2d(),
)
# NetworkTables publishers for logging and visualization
self.setupNetworkTables()
def setupNetworkTables(self):
nt = NetworkTableInstance.getDefault()
self.robotPosePublisher = nt.getStructTopic(
"/robot/pose", Pose2d
).publish()
self.swerveStatePublisher = nt.getStructArrayTopic(
"/swerve/actual_states", SwerveModuleState
).publish()
def defenseState(self):
"""Lock wheels in X pattern for defense"""
self.frontLeftModule.setSwerveAngleTarget(Rotation2d.fromDegrees(45))
self.frontRightModule.setSwerveAngleTarget(Rotation2d.fromDegrees(-45))
self.backLeftModule.setSwerveAngleTarget(Rotation2d.fromDegrees(135))
self.backRightModule.setSwerveAngleTarget(Rotation2d.fromDegrees(-135))
for module in self.modules:
module.setWheelLinearVelocityTarget(0)
def getModulePositions(self):
return (
self.frontLeftModule.getPosition(),
self.frontRightModule.getPosition(),
self.backLeftModule.getPosition(),
self.backRightModule.getPosition(),
)
def getModuleStates(self):
return (
self.frontLeftModule.getState(),
self.frontRightModule.getState(),
self.backLeftModule.getState(),
self.backRightModule.getState(),
)
def getRotation(self) -> Rotation2d:
return Rotation2d.fromDegrees(self.gyro.get_yaw().value)
def getPose(self) -> Pose2d:
"""Get current robot pose from pose estimator"""
return self.estimator.estimatedPose
def arcadeDriveWithSpeeds(
self, chassisSpeeds: ChassisSpeeds, coordinateMode: CoordinateMode
) -> None:
"""Drive with chassis speeds in robot or field-relative coordinates"""
if coordinateMode == self.CoordinateMode.FieldRelative:
robotSpeeds = ChassisSpeeds.fromFieldRelativeSpeeds(
chassisSpeeds.vx,
chassisSpeeds.vy,
chassisSpeeds.omega,
self.getRotation(),
)
else:
robotSpeeds = chassisSpeeds
# Convert to module states and apply
moduleStates = self.kinematics.toSwerveModuleStates(robotSpeeds)
self.applyStates(moduleStates)
def applyStates(self, moduleStates):
"""Apply swerve module states with velocity saturation"""
frontLeft, frontRight, backLeft, backRight = \
SwerveDrive4Kinematics.desaturateWheelSpeeds(
moduleStates, kMaxWheelLinearVelocity
)
self.frontLeftModule.applyState(frontLeft)
self.frontRightModule.applyState(frontRight)
self.backLeftModule.applyState(backLeft)
self.backRightModule.applyState(backRight)
def resetDriveAtPosition(self, pose: Pose2d):
"""Reset odometry and pose estimator to given position"""
self.odometry.resetPosition(
self.getRotation(),
self.getModulePositions(),
pose,
)
self.estimator.resetPosition(
self.getRotation(),
self.getModulePositions(),
pose,
)
def periodic(self):
"""Called every robot loop - update odometry and logging"""
# Update odometry with current sensor readings
self.odometry.update(self.getRotation(), self.getModulePositions())
# Update pose estimator (handles vision fusion internally)
self.estimator.addOdometryMeasurement(
self.getModulePositions(),
self.getRotation(),
Timer.getFPGATimestamp()
)
# Publish data to NetworkTables
self.robotPosePublisher.set(self.getPose())
self.swerveStatePublisher.set(list(self.getModuleStates()))
Key Patterns in Team 1757 Subsystems
1. Modular Hardware Abstraction
- Swerve modules encapsulate drive/steer motor control
- Clear interfaces between hardware and control logic
- Consistent naming conventions and parameter organization
2. Coordinate System Management
- Explicit robot-relative vs field-relative coordinate modes
- Alliance-aware transformations for consistent driver experience
- Proper handling of rotation and translation coupling
3. State Management
- Defensive states for robot stability
- Pose estimation with sensor fusion
- Odometry reset and calibration procedures
4. Logging and Visualization
- NetworkTables integration for real-time data
- AdvantageScope compatibility for debugging
- Structured data publishing for analysis
5. Robust Periodic Methods
- Consistent sensor reading and state updates
- Proper timing considerations for control loops
- Error handling and graceful degradation
Commands
A command is a Python class that represents a specific action that the robot can perform. The command-based framework is built around the interaction between user input (joysticks), commands, and subsystems.
graph TD
subgraph Robot
A[RobotContainer]
B(Subsystem)
C(Command)
D[Joystick]
end
D -->|Input| A;
A --|Schedules|--> C;
C --|Requires & Acts On|--> B;
Commands are typically scheduled by the CommandScheduler and are executed in a series of steps, known as the command lifecycle.
Command Lifecycle
graph TD
Start --> A(initialize());
A --> B{isFinished?};
B --|No|--> C(execute());
C --> B;
B --|Yes|--> D(end(interrupted=false));
subgraph Interruption
B --> E(end(interrupted=true));
C --> E;
end
initialize(): Called once when the command is first scheduled.execute(): Called repeatedly while the command is running.isFinished(): Called after each call toexecute()to determine if the command has finished.end(): Called once when the command finishes or is interrupted.
By breaking down the robot's behaviors into a set of commands, you can make your code more modular, reusable, and easier to understand.
Example: Team 1757 Drive Command
Team 1757's drive command demonstrates advanced swerve drive control with alliance awareness, automatic defense state, and field-relative driving with rotation PID control.
from math import atan2, pi
import typing
from commands2 import Command
from wpilib import DriverStation
from wpimath.controller import PIDController
from wpimath.geometry import Rotation2d
from subsystems.drive.drivesubsystem import DriveSubsystem
from util.angleoptimize import optimizeAngle
from constants.trajectory import kRotationPGain, kRotationIGain, kRotationDGain
class AbsoluteRelativeDrive(Command):
def __init__(
self,
drive: DriveSubsystem,
forward: typing.Callable[[], float],
sideways: typing.Callable[[], float],
rotationX: typing.Callable[[], float],
rotationY: typing.Callable[[], float],
) -> None:
Command.__init__(self)
self.setName(__class__.__name__)
self.drive = drive
self.forward = forward
self.sideways = sideways
# PID controller for rotation to target heading
self.rotationPid = PIDController(kRotationPGain, kRotationIGain, kRotationDGain)
self.rotationY = rotationY
self.rotationX = rotationX
self.addRequirements(self.drive)
def rotation(self) -> float:
"""Calculate rotation speed to reach target heading from right joystick"""
# Use atan2 to get target angle from joystick vector
targetRotation = atan2(self.rotationX(), self.rotationY())
# If no rotation input, maintain current heading
if self.rotationX() == 0 and self.rotationY() == 0:
return 0
# Alliance-aware rotation - red alliance flips 180 degrees
if DriverStation.getAlliance() == DriverStation.Alliance.kRed:
targetRotation += pi
# Optimize angle to avoid unnecessary rotation
optimizedDirection = optimizeAngle(
self.drive.getRotation(), Rotation2d(targetRotation)
).radians()
# Use PID to smoothly rotate to target
return self.rotationPid.calculate(
self.drive.getRotation().radians(), optimizedDirection
)
def execute(self) -> None:
rotation = self.rotation()
# Enter defense state when no input (within deadband)
if (
abs(self.forward()) < 0.01
and abs(self.sideways()) < 0.01
and abs(rotation) < 0.01
):
self.drive.defenseState()
else:
# Alliance-aware field-relative driving
if DriverStation.getAlliance() == DriverStation.Alliance.kRed:
self.drive.arcadeDriveWithFactors(
-self.forward(),
-self.sideways(),
rotation,
DriveSubsystem.CoordinateMode.FieldRelative,
)
else:
self.drive.arcadeDriveWithFactors(
self.forward(),
self.sideways(),
rotation,
DriveSubsystem.CoordinateMode.FieldRelative,
)
Example: Distance-Based Drive Command
Team 1757 uses robot-relative driving for precise autonomous movements like driving a specific distance.
from commands2 import Command
from wpimath.geometry import Pose2d, Translation2d
from subsystems.drive.drivesubsystem import DriveSubsystem
from constants.drive import kWheelCircumference
from enum import Enum, auto
class DriveDistance(Command):
class Axis(Enum):
X = auto()
Y = auto()
def __init__(self, distance: float, speed: float, axis: Axis, drive: DriveSubsystem):
Command.__init__(self)
self.distance = distance
self.speed = speed
self.axis = axis
self.drive = drive
self.startPose = None
self.addRequirements(drive)
def initialize(self):
"""Record starting position for distance measurement"""
self.startPose = self.drive.getPose()
def execute(self):
"""Drive at constant speed in specified direction"""
if self.axis == DriveDistance.Axis.X:
# Forward/backward movement
self.drive.arcadeDriveWithFactors(
self.speed,
0,
0,
DriveSubsystem.CoordinateMode.RobotRelative
)
else:
# Left/right movement
self.drive.arcadeDriveWithFactors(
0,
self.speed,
0,
DriveSubsystem.CoordinateMode.RobotRelative
)
def isFinished(self) -> bool:
"""Check if we've traveled the target distance"""
currentPose = self.drive.getPose()
displacement = currentPose.translation() - self.startPose.translation()
if self.axis == DriveDistance.Axis.X:
return abs(displacement.X()) >= abs(self.distance)
else:
return abs(displacement.Y()) >= abs(self.distance)
def end(self, interrupted: bool):
"""Stop the robot"""
self.drive.arcadeDriveWithFactors(0, 0, 0, DriveSubsystem.CoordinateMode.RobotRelative)
Example: Defense State Command
A command that locks the swerve modules in an X-pattern for defensive stability.
from commands2 import Command
from subsystems.drive.drivesubsystem import DriveSubsystem
class DefenseState(Command):
def __init__(self, drive: DriveSubsystem):
Command.__init__(self)
self.drive = drive
self.addRequirements(drive)
def execute(self):
"""Lock wheels in X pattern"""
self.drive.defenseState()
def isFinished(self) -> bool:
"""Run until interrupted"""
return False
def end(self, interrupted: bool):
"""Return to normal driving when command ends"""
pass # Default drive command will take over
Example: Team 1757 Autonomous Command Group
Team 1757 uses command groups for autonomous routines, combining drive commands with subsystem actions.
import commands2
from commands.resetdrive import ResetDrive
from commands.drivedistance import DriveDistance
from wpimath.geometry import Pose2d
from constants.drive import kWheelCircumference
class SimpleAuto(commands2.SequentialCommandGroup):
def __init__(self, drive):
super().__init__(
# Reset odometry to known starting position
ResetDrive(drive, Pose2d(0, 0, 0)),
# Drive forward 4 wheel circumferences at 20% speed
DriveDistance(
-4 * kWheelCircumference,
0.2,
DriveDistance.Axis.X,
drive,
),
)
self.setName("SimpleAuto")
Team 1757 Command Integration Patterns
RobotContainer Command Binding
Team 1757 uses a centralized approach to command binding in RobotContainer:
class RobotContainer:
def __init__(self):
# Initialize subsystems
self.drive = DriveSubsystem()
# Set default commands
self.drive.setDefaultCommand(
AbsoluteRelativeDrive(
self.drive,
lambda: OperatorInterface.Drive.ChassisControls.Translation.y() * kTurboSpeedMultiplier,
lambda: OperatorInterface.Drive.ChassisControls.Translation.x() * kTurboSpeedMultiplier,
OperatorInterface.Drive.ChassisControls.Rotation.x,
OperatorInterface.Drive.ChassisControls.Rotation.y,
)
)
self.configureButtonBindings()
def configureButtonBindings(self):
# Angle alignment while driving
OperatorInterface.Drive.align_angle().whileTrue(
AngleAlignDrive(
self.drive,
lambda: OperatorInterface.Drive.ChassisControls.Translation.y() * kNormalSpeedMultiplier,
lambda: OperatorInterface.Drive.ChassisControls.Translation.x() * kNormalSpeedMultiplier,
).repeatedly()
)
# Reset gyro/odometry
OperatorInterface.Drive.reset_gyro().onTrue(
ResetDrive(self.drive, Pose2d(0, 0, 0))
)
# Manual defense state
OperatorInterface.Drive.defense_state().whileTrue(
DefenseState(self.drive)
)
Command Design Principles
- Functional Inputs: Commands accept lambda functions for live value sampling
- Alliance Awareness: Commands adapt behavior based on alliance color
- State Management: Commands handle transitions between robot states (normal, defense, etc.)
- Requirements: Commands properly declare subsystem requirements
- Lifecycle Management: Commands implement proper initialization, execution, and cleanup
Autonomous Integration
Team 1757 integrates PathPlanner for complex autonomous routines while maintaining simple commands for basic movements:
# PathPlanner autonomous
autoPaths = PathPlannerAuto("YourAutoPath")
# Simple autonomous fallback
simpleAuto = commands2.SequentialCommandGroup(
ResetDrive(self.drive),
DriveDistance(-2.0, 0.3, DriveDistance.Axis.X, self.drive),
)
# Chooser allows switching between auto modes
self.chooser.setDefaultOption("Simple Auto", simpleAuto)
self.chooser.addOption("Complex Auto", autoPaths)
From Controller to Action
Team 1757 standardizes controller input handling through operatorinterface.py and binds those inputs to commands in robotcontainer.py. The default drive command uses processed joystick axes (with deadband, inversion, and shaping) and supports field-relative driving with alliance-aware rotation.
Input Processing Pipeline
flowchart LR
A[Raw Joystick Axes] --> B[Deadband]
B --> C[Invert]
C --> D[SignSquare/Nonlinear Shaping]
D --> E[Callable Accessors]
E --> F[Commands]
OperatorInterface (OI)
class OperatorInterface:
class Drive:
class ChassisControls:
class Translation:
y = SignSquare(Invert(Deadband(ControlAxis(0, 1)(), kXboxJoystickDeadband)))
x = SignSquare(Invert(Deadband(ControlAxis(0, 0)(), kXboxJoystickDeadband)))
class Rotation:
y = Invert(Deadband(ControlAxis(1, 1)(), kXboxJoystickDeadband))
x = Invert(Deadband(ControlAxis(1, 0)(), kXboxJoystickDeadband))
Default Drive Command
self.drive.setDefaultCommand(
AbsoluteRelativeDrive(
self.drive,
lambda: OperatorInterface.Drive.ChassisControls.Translation.y() * kTurboSpeedMultiplier,
lambda: OperatorInterface.Drive.ChassisControls.Translation.x() * kTurboSpeedMultiplier,
OperatorInterface.Drive.ChassisControls.Rotation.x,
OperatorInterface.Drive.ChassisControls.Rotation.y,
)
)
- Field-relative chassis control using alliance-aware orientation
- Rotation target determined by right-stick vector using
atan2(x, y) - Rotation PID tracks driver-indicated heading
- Defense state when inputs are within deadband
Button/Trigger Bindings
def configureButtonBindings(self):
OperatorInterface.Drive.align_angle().whileTrue(
AngleAlignDrive(
self.drive,
lambda: OperatorInterface.Drive.ChassisControls.Translation.y() * kNormalSpeedMultiplier,
lambda: OperatorInterface.Drive.ChassisControls.Translation.x() * kNormalSpeedMultiplier,
).repeatedly()
)
OperatorInterface.Drive.reset_gyro().onTrue(ResetDrive(self.drive, Pose2d(0, 0, 0)))
OperatorInterface.Drive.defense_state().whileTrue(DefenseState(self.drive))
Driving Modes
- FieldRelative: Translation relative to the field, rotation follows driver stick heading
- RobotRelative: Translation in robot coordinates (used in DriveDistance)
- DefenseState: Locks modules to X pattern when idle for stability
Best Practices
- Centralize input processing in
OperatorInterface - Use lambdas for live sampling of controller values
- Apply deadbands and shaping consistently
- Keep drive command alliance-aware for intuitive control
NetworkTables
NetworkTables is a key-value store that is used for communication between the robot and other computers, such as the driver station or a co-processor. It is a simple and easy-to-use way to send and receive data, and it is used extensively in FRC for a variety of purposes, such as:
- Sending data from the robot to the driver station for display.
- Sending commands from the driver station to the robot.
- Sending data from a co-processor to the robot for processing.
- Logging structured data for analysis and debugging.
- Real-time visualization in tools like AdvantageScope.
Data is organized in tables, and can be structured using sub-tables.
Team 1757 NetworkTables Architecture
Team 1757 uses a structured approach to NetworkTables that supports both real-time monitoring and post-match analysis. The architecture emphasizes type safety, organized data hierarchy, and AdvantageScope compatibility.
graph TD
A[Robot Code] --> B[NetworkTables]
B --> C[AdvantageScope]
B --> D[SmartDashboard]
B --> E[DataLogManager]
A --> F[Subsystem Publishers]
F --> G[Pose Data]
F --> H[Swerve States]
F --> I[Motor Data]
F --> J[Vision Data]
style B fill:#1976d2
style C fill:#4caf50
Example: Basic Read/Write
This shows writing a value from the robot and reading it back.
from networktables import NetworkTables
# Initialize NetworkTables (on the robot, this is often done for you)
NetworkTables.initialize()
# Get the default table, which is "SmartDashboard"
# table = NetworkTables.getTable("SmartDashboard")
# It's good practice to put your data in a sub-table
robot_status_table = NetworkTables.getTable("RobotStatus")
# Write a value to the table
robot_status_table.putNumber("batteryVoltage", 12.5)
# Read a value from the table, providing a default value
voltage = robot_status_table.getNumber("batteryVoltage", 0)
Example: Listening for Changes
You can also listen for changes to values, which is useful for dashboards or co-processors that need to react to robot state changes.
This example would run on a co-processor or dashboard computer.
from networktables import NetworkTables
# Initialize NetworkTables, connecting to the robot
NetworkTables.initialize(server='roborio-1757-frc.local')
dashboard_table = NetworkTables.getTable("SmartDashboard")
arm_table = dashboard_table.getSubTable("Arm")
def arm_setpoint_changed(table, key, value, isNew):
if key == "setpoint":
print(f"Arm setpoint changed to: {value}")
# In a real application, you might use this to update a display
# Add a listener to the "setpoint" key in the "Arm" table
arm_table.addEntryListener(arm_setpoint_changed, key="setpoint")
# The robot code would write to this entry to change the setpoint
# arm_table.putNumber("setpoint", 90)
# Keep the script running to listen for changes
import time
while True:
time.sleep(1)
Team 1757 Structured Logging Patterns
Swerve Drive State Logging
Team 1757 uses structured NetworkTables topics for logging complex data types like swerve module states:
from ntcore import NetworkTableInstance
from wpimath.kinematics import SwerveModuleState
from wpimath.geometry import Pose2d
from constants.logging import kSwerveActualStatesKey, kSwerveExpectedStatesKey
class DriveSubsystem(Subsystem):
def __init__(self):
# ... other initialization ...
# Create structured topic publishers for AdvantageScope
nt = NetworkTableInstance.getDefault()
self.swerveStatePublisher = nt.getStructArrayTopic(
kSwerveActualStatesKey, SwerveModuleState
).publish()
self.swerveStateExpectedPublisher = nt.getStructArrayTopic(
kSwerveExpectedStatesKey, SwerveModuleState
).publish()
self.robotPosePublisher = nt.getStructTopic(
"/robot/pose", Pose2d
).publish()
def periodic(self):
"""Log data every robot loop"""
# Publish actual swerve module states
actualStates = [
self.frontLeftModule.getState(),
self.frontRightModule.getState(),
self.backLeftModule.getState(),
self.backRightModule.getState(),
]
self.swerveStatePublisher.set(actualStates)
# Publish robot pose
self.robotPosePublisher.set(self.getPose())
def applyStates(self, moduleStates):
"""Log expected states when applying new commands"""
frontLeft, frontRight, backLeft, backRight = \
SwerveDrive4Kinematics.desaturateWheelSpeeds(
moduleStates, kMaxWheelLinearVelocity
)
# Log what we're commanding the modules to do
self.swerveStateExpectedPublisher.set(
[frontLeft, frontRight, backLeft, backRight]
)
# Apply the states to hardware
self.frontLeftModule.applyState(frontLeft)
# ... apply to other modules
Constants-Based Key Organization
Team 1757 centralizes NetworkTables keys in constants for maintainability:
# constants/logging.py
from util.keyorganization import OptionalValueKeys
kSwerveActualStatesKey = "/swerve/actual_states"
kSwerveExpectedStatesKey = "/swerve/expected_states"
kRobotPoseArrayKeys = OptionalValueKeys(
"/robot/pose",
"/robot/pose_valid"
)
kDriveVelocityKeys = "/drive/chassis_speeds"
Multi-Value Key Organization
For related data that needs validity flags, Team 1757 uses structured key organization:
# util/keyorganization.py
class OptionalValueKeys:
def __init__(self, valueKey: str, validKey: str):
self.valueKey = valueKey
self.validKey = validKey
# Usage in subsystem
class DriveSubsystem(Subsystem):
def __init__(self):
nt = NetworkTableInstance.getDefault()
self.robotPosePublisher = nt.getStructTopic(
kRobotPoseArrayKeys.valueKey, Pose2d
).publish()
self.robotPoseValidPublisher = nt.getBooleanTopic(
kRobotPoseArrayKeys.validKey
).publish()
# Mark pose as valid by default
self.robotPoseValidPublisher.set(True)
def periodic(self):
pose = self.getPose()
# Only publish if pose is reasonable
if self.isPoseValid(pose):
self.robotPosePublisher.set(pose)
self.robotPoseValidPublisher.set(True)
else:
self.robotPoseValidPublisher.set(False)
Data Logging Integration
Team 1757 integrates NetworkTables with WPILib's data logging system:
# robotcontainer.py
import wpilib
class RobotContainer:
def __init__(self):
# ... subsystem initialization ...
# Start data logging to USB drive/file system
wpilib.DataLogManager.start()
# Log NetworkTables data automatically
wpilib.DataLogManager.logNetworkTables(True)
# Start driver station logging
wpilib.DriverStation.startDataLog(wpilib.DataLogManager.getLog())
# Suppress joystick warnings in logs
wpilib.DriverStation.silenceJoystickConnectionWarning(True)
AdvantageScope Compatibility
Team 1757's logging is designed for AdvantageScope visualization:
# Structured arrays for module states
swerveStates = [SwerveModuleState(), ...] # Array of 4 states
self.swerveStatePublisher.set(swerveStates)
# Pose data with timestamps
pose = Pose2d(x, y, rotation)
self.robotPosePublisher.set(pose)
# Chassis speeds for velocity visualization
chassisSpeed = ChassisSpeeds(vx, vy, omega)
self.driveVelocityPublisher.set(chassisSpeed)
Vision Integration Logging
For vision-based pose estimation, Team 1757 logs both odometry and vision data:
class VisionSubsystem(Subsystem):
def __init__(self):
nt = NetworkTableInstance.getDefault()
self.visionPosePublisher = nt.getStructTopic(
"/vision/robot_pose", Pose2d
).publish()
self.visionValidPublisher = nt.getBooleanTopic(
"/vision/pose_valid"
).publish()
def periodic(self):
result = self.camera.getLatestResult()
if result.hasTargets():
pose = result.getBestTarget().getBestCameraToTarget()
self.visionPosePublisher.set(pose)
self.visionValidPublisher.set(True)
else:
self.visionValidPublisher.set(False)
Key Benefits of Team 1757's Approach
- Type Safety: Using struct topics prevents data corruption and provides better tooling support
- Organized Hierarchy: Clear naming conventions make data easy to find in logs
- Tool Integration: Direct compatibility with AdvantageScope for analysis
- Validity Tracking: Separate flags indicate when data is reliable
- Performance: Efficient binary serialization for complex data types
- Maintainability: Constants-based organization makes refactoring easier
For more information, see the RobotPy NetworkTables documentation: https://robotpy.readthedocs.io/en/stable/networktables/networktables.html
AdvantageScope
AdvantageScope is a data visualization tool that can be used to view data from the robot in real-time. It is a powerful tool for debugging and tuning the robot, and it can be used to view a wide variety of data, such as:
- Sensor readings
- Motor outputs
- PID controller state
- Autonomous path data
AdvantageScope works by reading log files generated by the robot code. WPILib's DataLog class provides an easy way to create these log files (.wpilog).
For more information, see the AdvantageScope documentation: https://github.com/Mechanical-Advantage/AdvantageScope/blob/main/docs/README.md
Example: Logging Subsystem State
Here is an example of a shooter subsystem that logs its velocity, setpoint, and motor output. This data can then be graphed in AdvantageScope to tune the PID controller.
import commands2
import wpilib
import wpimath.controller
import wpimath.log
from util.simtalon import Talon # Assuming a simulated Talon for example
class Shooter(commands2.SubsystemBase):
def __init__(self):
super().__init__()
self.motor = Talon(3)
self.encoder = wpilib.Encoder(2, 3)
self.controller = wpimath.controller.PIDController(0.1, 0, 0)
# Start data logging by creating a DataLog object.
# This will create a .wpilog file in a USB stick if connected, or in /home/lvuser
self.data_log = wpilib.DataLogManager.getLog()
# Create log entries for the setpoint, measurement, and output
self.setpoint_log = wpimath.log.DoubleLogEntry(self.data_log, "/shooter/setpoint")
self.measurement_log = wpimath.log.DoubleLogEntry(self.data_log, "/shooter/velocity")
self.output_log = wpimath.log.DoubleLogEntry(self.data_log, "/shooter/output")
def set_velocity(self, velocity):
output = self.controller.calculate(self.encoder.getRate(), velocity)
self.motor.set(output)
# Log the data at each timestamp
self.setpoint_log.append(velocity)
self.measurement_log.append(self.encoder.getRate())
self.output_log.append(output)
def stop(self):
self.motor.set(0)
Elastic
Elastic is a powerful open-source search and analytics engine that can be used for a variety of purposes, including logging and data analysis. In FRC, Elastic can be used to:
- Log data from the robot for later analysis.
- Create dashboards to visualize the robot's performance.
- Identify trends and patterns in the robot's data.
Using Elastic for FRC is an advanced topic and requires setting up an ElasticSearch server to receive data. Data can be sent from the robot to the server via HTTP requests.
For more information, see the Elastic documentation: https://www.elastic.co/guide/index.html
Conceptual Example: Logging to Elastic
This example shows how you could create a logger class that sends data to an Elastic server. This requires the requests library to be installed on the robot (pip install requests).
import requests
import json
import datetime
class ElasticLogger:
def __init__(self, elastic_url, index_name):
self.elastic_url = elastic_url
self.index_name = index_name
def log(self, message, level="info"):
timestamp = datetime.datetime.utcnow().isoformat()
document = {
"message": message,
"level": level,
"@timestamp": timestamp,
}
try:
response = requests.post(
f"{self.elastic_url}/{self.index_name}/_doc",
headers={"Content-Type": "application/json"},
data=json.dumps(document),
timeout=0.5 # Use a short timeout to avoid blocking robot code
)
response.raise_for_status()
except requests.exceptions.RequestException as e:
print(f"Error logging to Elastic: {e}")
# Example usage in a robot:
# In robotInit():
# self.logger = ElasticLogger("http://your-elastic-server:9200", "robot-logs")
# self.logger.log("Robot initialized")
# In autonomousInit():
# self.logger.log("Autonomous enabled")
Kalman filter
A Kalman filter is a powerful tool for state estimation. It is a recursive filter that is able to estimate the state of a system, even in the presence of noise and uncertainty. In FRC, Kalman filters can be used for a variety of purposes, such as:
- Estimating the robot's position and orientation.
- Filtering noisy sensor data.
- Fusing data from multiple sensors.
WPILib provides a LinearSystem class and a KalmanFilter class that work together.
Example: Estimating Velocity from Position
Let's say we have a motor with an encoder that measures position, but we also want to know its velocity. We can use a Kalman filter to estimate both position and velocity.
This is a conceptual example. In a real robot, you would use a plant model that matches your system (e.g., from SysId).
import wpimath.system
import wpimath.system.plant
import wpimath.kinematics
import numpy as np
# Let's model a simple system: a motor with position and velocity states.
# x = [position, velocity]'
# We can only measure position. We want to estimate both position and velocity.
# System matrices (for a 50Hz loop, dt=0.02s)
# These describe how the state changes over time.
A = np.array([[1, 0.02], [0, 1]]) # State transition matrix
B = np.array([[0], [0.02]]) # Input matrix (how input affects state)
C = np.array([[1, 0]]) # Measurement matrix (we only measure position)
D = np.array([[0]]) # Feedthrough matrix
system = wpimath.system.LinearSystem_2_1_1(A, B, C, D)
# Kalman filter
# We need to provide standard deviations for process noise and measurement noise.
# These represent how much we trust our model and our sensor, and need to be tuned.
process_noise_std_dev = 0.1
measurement_noise_std_dev = 0.01
kalman_filter = wpimath.kinematics.KalmanFilter_2_1_1(
system,
[process_noise_std_dev, process_noise_std_dev], # State standard deviations
[measurement_noise_std_dev], # Measurement standard deviations
0.02 # dt
)
# In the robot loop:
# Get motor voltage (u) and measured position (y)
voltage = 5.0 # example input
u = np.array([voltage])
measured_position = 1.2 # example measurement
y = np.array([measured_position])
# Predict the next state based on the model and input
kalman_filter.predict(u, 0.02)
# Correct the state estimate with the new measurement
kalman_filter.correct(u, y)
# Get the estimated state (position and velocity)
estimated_position = kalman_filter.getX(0)
estimated_velocity = kalman_filter.getX(1)
For more information, see the RobotPy Kalman filter documentation: https://robotpy.readthedocs.io/en/stable/wpilib/wpilib.kinematics.KalmanFilter.html
PathPlanner
PathPlanner is a powerful tool used to create, visualize, and execute autonomous paths for FRC robots. Team 1757 uses PathPlanner extensively for complex autonomous routines and integrates it with their swerve drive control system.
Team 1757 PathPlanner Architecture
Team 1757 uses the latest PathPlanner version with AutoBuilder integration for simplified autonomous routines. The system combines pre-planned paths with dynamically generated waypoints and alliance-aware positioning.
graph TD
A[PathPlanner Desktop App] -->|Export| B[path files in deploy directory]
B -->|Loaded by| C[Robot Code]
C -->|AutoBuilder| D[PathPlannerAuto]
D -->|Commands| E[Autonomous Command Groups]
F[RobotContainer] -->|configures| G[Chooser]
G -->|selects| E
H[Named Commands] -->|registered with| D
I[DriveSubsystem] -->|provides| J[Holonomic Controller]
J -->|follows| E
style A fill:#1976d2
style D fill:#4caf50
graph TD
A[PathPlanner GUI] -->|Generates| B(Path File *.path);
B -->|Loaded by| C[Robot Code];
C --> D(Ramsete/Swerve Controller);
subgraph Robot Loop
D -->|Calculates| E{Motor Outputs};
E --> F[Drivetrain];
F -->|Moves Robot| G(Odometry);
G -->|Current Pose| D;
end
To use PathPlanner with RobotPy, you need to install the pathplannerlib library:
pip install pathplannerlib
Team 1757 AutoBuilder Configuration
Team 1757 configures PathPlanner's AutoBuilder in the drive subsystem for seamless path following:
from pathplannerlib.auto import AutoBuilder
from pathplannerlib.controller import PPHolonomicDriveController
from pathplannerlib.path import RobotConfig
from wpilib import DriverStation
from constants.trajectory import (
kPathFollowingTranslationConstantsAuto,
kPathFollowingRotationConstants,
)
class DriveSubsystem(Subsystem):
def __init__(self):
# ... other initialization ...
# Load robot configuration from GUI settings
self.config = RobotConfig.fromGUISettings()
# Configure AutoBuilder with Team 1757's drive methods
AutoBuilder.configure(
self.getPose, # Function to get current pose
self.resetDriveAtPosition, # Function to reset pose
self.getRobotRelativeSpeeds, # Function to get current speeds
self.drivePathPlanned, # Function to drive with speeds
PPHolonomicDriveController( # Path following controller
kPathFollowingTranslationConstantsAuto, # Translation PID
kPathFollowingRotationConstants, # Rotation PID
),
self.config, # Robot configuration
# Alliance color supplier for path mirroring
lambda: DriverStation.getAlliance() == DriverStation.Alliance.kRed,
self, # Drive subsystem reference
)
def drivePathPlanned(self, chassisSpeeds: ChassisSpeeds, _feedForward):
"""Drive method called by PathPlanner"""
return self.arcadeDriveWithSpeeds(
chassisSpeeds,
DriveSubsystem.CoordinateMode.RobotRelative
)
Team 1757 Autonomous Command Setup
In RobotContainer, Team 1757 dynamically loads all PathPlanner autonomous files:
import os
from commands2.waitcommand import WaitCommand
from pathplannerlib.auto import PathPlannerAuto, NamedCommands
import wpilib
class RobotContainer:
def __init__(self):
# ... subsystem initialization ...
# Register named commands for PathPlanner events
NamedCommands.registerCommand("exampleWait", WaitCommand(2))
# NamedCommands.registerCommand("intakeOn", IntakeCommand(self.intake))
# NamedCommands.registerCommand("shoot", ShootCommand(self.shooter))
# Create autonomous chooser
self.chooser = wpilib.SendableChooser()
# Dynamically load all PathPlanner auto files
pathsPath = os.path.join(wpilib.getDeployDirectory(), "pathplanner", "autos")
for file in os.listdir(pathsPath):
if file.endswith('.auto'):
relevantName = file.split(".")[0] # Remove .auto extension
auton = PathPlannerAuto(relevantName)
# Add to both chooser and SmartDashboard
self.chooser.addOption(relevantName, auton)
wpilib.SmartDashboard.putData(f"autos/{relevantName}", auton)
# Simple autonomous fallback
self.simpleAuto = commands2.SequentialCommandGroup(
ResetDrive(self.drive),
DriveDistance(
-4 * kWheelCircumference, 0.2,
DriveDistance.Axis.X, self.drive,
),
)
# Add simple auto options
self.chooser.addOption("Do Nothing Auto", self.nothingAuto)
self.chooser.setDefaultOption("Simple Auto", self.simpleAuto)
# Put chooser on dashboard
wpilib.SmartDashboard.putData("Autonomous", self.chooser)
def getAutonomousCommand(self) -> commands2.Command:
return self.chooser.getSelected()
Named Commands Integration
Team 1757 uses named commands to trigger subsystem actions during autonomous paths:
# Register subsystem commands that can be called from PathPlanner
NamedCommands.registerCommand("resetDrive",
ResetDrive(self.drive, Pose2d(0, 0, 0))
)
NamedCommands.registerCommand("defenseState",
DefenseState(self.drive)
)
NamedCommands.registerCommand("waitTwoSeconds",
WaitCommand(2.0)
)
# In PathPlanner GUI, you can add event markers that trigger these commands
# at specific points along the path
Alliance Color Handling
PathPlanner automatically handles alliance color by mirroring paths when on red alliance. Team 1757 configures this in AutoBuilder:
# Lambda function returns True for red alliance, causing path mirroring
lambda: DriverStation.getAlliance() == DriverStation.Alliance.kRed
Robot Configuration
Team 1757 defines robot physical parameters for PathPlanner path generation:
# In PathPlanner GUI settings or robot config
# - Robot mass and MOI for trajectory generation
# - Module locations for swerve drive kinematics
# - Max velocities and accelerations
# - Wheel friction coefficients
For more information, see the PathPlanner documentation: https://github.com/mjansen4857/pathplanner/wiki
Geometry
RobotPy provides a variety of geometry classes and utilities that are essential for robot localization, path following, and swerve drive control. These classes handle coordinate transformations between different reference frames.
Translation2d: Represents a translation in 2D space (x, y).Rotation2d: Represents a rotation in 2D space (angle).Pose2d: Represents a full pose in 2D space, combining aTranslation2dand aRotation2d.Transform2d: Represents a transformation between two poses.ChassisSpeeds: Represents robot velocities (vx, vy, omega).SwerveModulePosition: Represents swerve module position (distance, angle).SwerveModuleState: Represents swerve module state (velocity, angle).
Team 1757 Geometry Applications
Team 1757 uses geometry classes extensively for swerve drive control, odometry, and field-relative driving.
graph TD
A[Field Coordinate System] --> B[Robot Coordinate System]
B --> C[Module Coordinate Systems]
D[Pose2d] --> E[Translation2d]
D --> F[Rotation2d]
G[ChassisSpeeds] --> H[SwerveModuleStates]
H --> I[Motor Commands]
J[Odometry] --> K[Pose Estimation]
K --> L[Path Following]
style A fill:#1976d2
style D fill:#4caf50
Example: Swerve Drive Odometry
Team 1757 uses odometry to track robot position by integrating swerve module positions and gyro readings:
from wpimath.geometry import Pose2d, Rotation2d, Translation2d
from wpimath.kinematics import SwerveDrive4Odometry, SwerveDrive4Kinematics
from wpimath.kinematics import SwerveModulePosition
class DriveSubsystem:
def __init__(self):
# Define swerve module positions relative to robot center
self.kinematics = SwerveDrive4Kinematics(
Translation2d(0.238, 0.264), # Front left
Translation2d(0.238, -0.264), # Front right
Translation2d(-0.238, 0.264), # Back left
Translation2d(-0.238, -0.264) # Back right
)
# Initialize odometry at origin
self.odometry = SwerveDrive4Odometry(
self.kinematics,
self.getRotation(), # Current gyro reading
self.getModulePositions(), # Current module positions
Pose2d() # Starting pose
)
def getModulePositions(self):
"""Get current swerve module positions"""
return (
self.frontLeftModule.getPosition(),
self.frontRightModule.getPosition(),
self.backLeftModule.getPosition(),
self.backRightModule.getPosition(),
)
def periodic(self):
"""Update odometry every robot loop"""
self.odometry.update(
self.getRotation(),
self.getModulePositions()
)
def getPose(self) -> Pose2d:
"""Get current robot pose from odometry"""
return self.odometry.getPose()
Example: Field-Relative to Robot-Relative Conversion
For field-relative driving, Team 1757 converts driver inputs from field coordinates to robot coordinates:
from wpimath.kinematics import ChassisSpeeds
from wpimath.geometry import Rotation2d
from wpilib import DriverStation
from math import pi
class AbsoluteRelativeDrive:
def execute(self):
# Get field-relative speeds from driver
forward = self.forward() # Field forward/backward
sideways = self.sideways() # Field left/right
rotation = self.rotation() # Rotation about field Z
# Alliance-aware field-relative conversion
if DriverStation.getAlliance() == DriverStation.Alliance.kRed:
# Red alliance faces opposite direction
chassisSpeeds = ChassisSpeeds.fromFieldRelativeSpeeds(
-forward, # Flip forward
-sideways, # Flip sideways
rotation,
self.drive.getRotation() # Current robot heading
)
else:
chassisSpeeds = ChassisSpeeds.fromFieldRelativeSpeeds(
forward,
sideways,
rotation,
self.drive.getRotation()
)
# Convert chassis speeds to module states
moduleStates = self.drive.kinematics.toSwerveModuleStates(chassisSpeeds)
self.drive.applyStates(moduleStates)
Example: Pose Estimation with Vision Fusion
Team 1757 uses pose estimation to fuse odometry with vision measurements for improved accuracy:
from wpimath.estimator import SwerveDrive4PoseEstimator
from wpimath.geometry import Pose2d, Rotation2d
from wpilib import Timer
from constants.math import kRadiansPerDegree
class RobotPoseEstimator:
def __init__(self, kinematics, gyroAngle, modulePositions, initialPose):
# Standard deviations for odometry (x, y, heading)
self.odometryStdDevs = (0.05, 0.05, 5 * kRadiansPerDegree)
# Standard deviations for vision (x, y, heading)
self.visionStdDevs = (0.1, 0.1, 10 * kRadiansPerDegree)
self.estimator = SwerveDrive4PoseEstimator(
kinematics,
gyroAngle,
modulePositions,
initialPose,
self.odometryStdDevs,
self.visionStdDevs
)
def addOdometryMeasurement(self, modulePositions, gyroAngle, timestamp):
"""Add odometry measurement"""
self.estimator.update(gyroAngle, modulePositions)
def addVisionMeasurement(self, visionPose: Pose2d, timestamp: float):
"""Add vision measurement with timestamp"""
# Only accept reasonable vision measurements
if self.isVisionMeasurementValid(visionPose):
self.estimator.addVisionMeasurement(visionPose, timestamp)
def isVisionMeasurementValid(self, visionPose: Pose2d) -> bool:
"""Validate vision measurement before using"""
# Check if pose is within field boundaries
if (abs(visionPose.X()) > 16.5 or # Field is ~16.5m long
abs(visionPose.Y()) > 8.2): # Field is ~8.2m wide
return False
# Check if pose is reasonable compared to current estimate
currentPose = self.estimator.getEstimatedPosition()
distance = currentPose.translation().distance(visionPose.translation())
# Reject measurements that are too far from current estimate
return distance < 2.0 # 2 meters maximum jump
@property
def estimatedPose(self) -> Pose2d:
return self.estimator.getEstimatedPosition()
Example: Distance and Angle Calculations
Common geometric calculations for autonomous routines and alignment:
from wpimath.geometry import Pose2d, Translation2d, Rotation2d
from math import atan2, sqrt
def calculate_distance_to_target(robotPose: Pose2d, targetPose: Pose2d) -> float:
"""Calculate distance between robot and target"""
return robotPose.translation().distance(targetPose.translation())
def calculate_angle_to_target(robotPose: Pose2d, targetTranslation: Translation2d) -> Rotation2d:
"""Calculate angle robot needs to face to point at target"""
dx = targetTranslation.X() - robotPose.X()
dy = targetTranslation.Y() - robotPose.Y()
return Rotation2d(atan2(dy, dx))
def is_robot_facing_target(robotPose: Pose2d, targetTranslation: Translation2d, tolerance: float) -> bool:
"""Check if robot is facing target within tolerance"""
targetAngle = calculate_angle_to_target(robotPose, targetTranslation)
angleDifference = abs(robotPose.rotation().radians() - targetAngle.radians())
return angleDifference < tolerance
# Usage in autonomous command
class AlignToTarget(Command):
def __init__(self, drive, targetPose: Pose2d):
self.drive = drive
self.targetPose = targetPose
def execute(self):
currentPose = self.drive.getPose()
# Calculate desired heading to face target
targetHeading = calculate_angle_to_target(currentPose, self.targetPose.translation())
# Use PID to rotate to target heading
rotationSpeed = self.rotationPID.calculate(
currentPose.rotation().radians(),
targetHeading.radians()
)
# Drive while rotating
self.drive.arcadeDriveWithFactors(0, 0, rotationSpeed,
DriveSubsystem.CoordinateMode.RobotRelative)
def isFinished(self) -> bool:
return is_robot_facing_target(
self.drive.getPose(),
self.targetPose.translation(),
0.1 # 0.1 radian tolerance
)
Example: Transform Operations
Using transforms to manipulate poses and plan robot movements:
from wpimath.geometry import Pose2d, Transform2d, Translation2d, Rotation2d
# Create a transform to move 1 meter forward
forward_transform = Transform2d(Translation2d(1.0, 0.0), Rotation2d())
# Apply transform to current pose to get target pose
current_pose = Pose2d(2.0, 3.0, Rotation2d.fromDegrees(45))
target_pose = current_pose + forward_transform
print(f"Current: {current_pose}")
print(f"Target: {target_pose}")
# Calculate transform between two poses
pose_a = Pose2d(1.0, 1.0, Rotation2d.fromDegrees(0))
pose_b = Pose2d(3.0, 2.0, Rotation2d.fromDegrees(90))
transform_a_to_b = pose_b - pose_a
# Verify: pose_a + transform should equal pose_b
verify_pose = pose_a + transform_a_to_b
print(f"Verification: {verify_pose} == {pose_b}")
Coordinate System Best Practices
Field Coordinate System
- Origin at blue alliance driver station wall
- X-axis points toward red alliance
- Y-axis points toward left side of field (from blue alliance perspective)
- Angles measured counter-clockwise from X-axis
Robot Coordinate System
- Origin at robot center
- X-axis points forward (robot front)
- Y-axis points left
- Rotation about Z-axis (vertical)
Alliance Awareness
Team 1757 handles alliance color by flipping field-relative coordinates for red alliance:
def get_alliance_relative_pose(field_pose: Pose2d) -> Pose2d:
"""Convert field pose to alliance-relative pose"""
if DriverStation.getAlliance() == DriverStation.Alliance.kRed:
# Flip X and Y, rotate 180 degrees
return Pose2d(
-field_pose.X(),
-field_pose.Y(),
field_pose.rotation() + Rotation2d(pi)
)
return field_pose
For more information, see the RobotPy geometry documentation: https://robotpy.readthedocs.io/en/stable/wpilib/wpilib.geometry.html
Vision Integration
Team 1757 uses vision systems extensively for robot localization, pose estimation, and autonomous alignment. The vision subsystem integrates multiple cameras with the drive subsystem's pose estimator to provide accurate field positioning.
Team 1757 Vision Architecture
Team 1757's vision system supports multiple camera types and provides a unified interface for pose estimation and field localization.
graph TD
A[VisionSubsystem] --> B[Camera 1 - Limelight BR]
A --> C[Camera 2 - Limelight FL]
B --> D[VisionSubsystemIOLimelight]
C --> E[VisionSubsystemIOLimelight]
D --> F[AprilTag Detection]
E --> F
F --> G[Robot Pose Calculation]
G --> H[Pose Validation]
H --> I[Drive Pose Estimator]
I --> J[Sensor Fusion]
J --> K[Final Robot Pose]
L[NetworkTables Logging] --> M[AdvantageScope]
style A fill:#1976d2
style I fill:#4caf50
Vision Subsystem Structure
Team 1757 uses an IO-based architecture that supports different camera types through a common interface:
from typing import Optional
from commands2 import Subsystem
from ntcore import NetworkTableInstance
from wpilib import RobotBase
from wpimath.geometry import Pose2d, Pose3d
from subsystems.vision.visionio import VisionSubsystemIO
from subsystems.vision.visioniolimelight import VisionSubsystemIOLimelight
from subsystems.vision.visioniosim import VisionSubsystemIOSim
class VisionSubsystem(Subsystem):
def __init__(self, drive: DriveSubsystem) -> None:
Subsystem.__init__(self)
self.setName(__class__.__name__)
self.drive = drive
# NetworkTables publishers for logging
self.setupNetworkTables()
# Initialize cameras based on environment
if RobotBase.isReal():
self.camera1 = VisionSubsystemIOLimelight(
"limelight-br", kRobotToCamera1Transform
)
self.camera2 = VisionSubsystemIOLimelight(
"limelight-fl", kRobotToCamera2Transform
)
else:
self.camera1 = VisionSubsystemIOSim("limelight1", kRobotToCamera1Transform)
self.camera2 = VisionSubsystemIOSim("limelight2", kRobotToCamera2Transform)
# Update camera positions
self.camera1.updateCameraPosition(kRobotToCamera1Transform)
self.camera2.updateCameraPosition(kRobotToCamera2Transform)
def setupNetworkTables(self):
nt = NetworkTableInstance.getDefault()
# Robot pose subscriber
self.poseReceiver = nt.getStructTopic(
kRobotPoseArrayKeys.valueKey, Pose2d
).subscribe(Pose2d())
# Vision pose publishers
self.vision1PosePublisher = nt.getStructTopic(
kRobotVisionPose1ArrayKeys.valueKey, Pose2d
).publish()
self.vision2PosePublisher = nt.getStructTopic(
kRobotVisionPose2ArrayKeys.valueKey, Pose2d
).publish()
# Validity publishers
self.visionPose1ValidPublisher = nt.getBooleanTopic(
kRobotVisionPose1ArrayKeys.validKey
).publish()
self.visionPose2ValidPublisher = nt.getBooleanTopic(
kRobotVisionPose2ArrayKeys.validKey
).publish()
# Camera pose publisher for 3D visualization
self.cameraPosePublisher = nt.getStructArrayTopic(
kCameraLocationPublisherKey, Pose3d
).publish()
Vision IO Interface
Team 1757 uses an abstract IO interface to support different camera types:
from typing import Optional
from wpimath.geometry import Rotation2d, Transform3d
from subsystems.drive.robotposeestimator import VisionObservation
class VisionSubsystemIO:
def updateCameraPosition(self, transform: Transform3d) -> None:
"""Update camera position relative to robot"""
raise NotImplementedError("Must be implemented by subclass")
def getRobotFieldPose(self) -> Optional[VisionObservation]:
"""Get robot field pose from vision system"""
raise NotImplementedError("Must be implemented by subclass")
def updateRobotYaw(self, yaw: Rotation2d) -> None:
"""Update robot orientation for vision processing"""
raise NotImplementedError("Must be implemented by subclass")
def setLights(self, lightVal: bool) -> None:
"""Control camera LEDs"""
raise NotImplementedError("Must be implemented by subclass")
Limelight Implementation
Team 1757's Limelight integration provides AprilTag-based localization:
from typing import Optional
from ntcore import NetworkTableInstance
from wpimath.geometry import Pose3d, Rotation2d, Rotation3d, Transform3d, Pose2d
from subsystems.drive.robotposeestimator import VisionObservation
from subsystems.vision.visionio import VisionSubsystemIO
class VisionSubsystemIOLimelight(VisionSubsystemIO):
def __init__(self, name: str, transform: Transform3d) -> None:
VisionSubsystemIO.__init__(self)
self.location = transform
self.cameraTable = NetworkTableInstance.getDefault().getTable(name)
# Limelight NetworkTables topics
self.validTarget = self.cameraTable.getIntegerTopic("tv").subscribe(0)
self.pipelineLatency = self.cameraTable.getIntegerTopic("tl").subscribe(0)
self.captureLatency = self.cameraTable.getIntegerTopic("cl").subscribe(0)
self.ledState = self.cameraTable.getDoubleTopic("ledMode").publish()
# Use blue alliance coordinate system
self.botpose = self.cameraTable.getDoubleArrayTopic(
"botpose_orb_wpiblue"
).subscribe([0, 0, 0, 0, 0, 0, 0, 0, 0, 0, 0])
# Camera configuration topics
self.camPoseSetter = self.cameraTable.getDoubleArrayTopic(
"camerapose_robotspace_set"
).publish()
self.robotOrientationSetter = self.cameraTable.getDoubleArrayTopic(
"robot_orientation_set"
).publish()
def getRobotFieldPose(self) -> Optional[VisionObservation]:
"""Get robot pose from Limelight AprilTag detection"""
if self.validTarget.get() == 0:
return None
botPose = self.botpose.get()
poseX, poseY, poseZ = botPose[0:3]
# Use current robot rotation from odometry
rotation = self.robotPoseGetter.get().rotation().radians()
# Create pose with field boundary clamping
pose = Pose3d(
clamp(poseX, 0, kFieldLength),
clamp(poseY, 0, kFieldWidth),
poseZ,
Rotation3d(0, 0, rotation),
)
# Calculate timestamp with latency compensation
tsValue = self.botpose.getAtomic()
timestamp = tsValue.time
adjustedTimestamp = (
timestamp / 1e6 - (0 if len(botPose) < 7 else botPose[6]) / 1e4
)
# Return vision observation with standard deviations
return VisionObservation(
pose.toPose2d(),
adjustedTimestamp,
[0.7, 0.7, 9999999] # [x_std, y_std, theta_std]
)
def updateCameraPosition(self, transform: Transform3d) -> None:
"""Send camera position to Limelight for pose calculation"""
self.camPoseSetter.set([
transform.X(),
-transform.Y(), # Flip Y for Limelight coordinate system
transform.Z(),
transform.rotation().X() / kRadiansPerDegree,
-transform.rotation().Y() / kRadiansPerDegree,
transform.rotation().Z() / kRadiansPerDegree,
])
def updateRobotYaw(self, yaw: Rotation2d) -> None:
"""Update robot orientation for Limelight"""
self.robotOrientationSetter.set([yaw.degrees(), 0, 0, 0, 0, 0])
def setLights(self, lightVal: bool) -> None:
"""Control Limelight LEDs"""
if lightVal:
self.ledState.set(3) # Force on
else:
self.ledState.set(1) # Use pipeline setting
Vision Processing Loop
Team 1757's vision processing integrates with the drive subsystem's pose estimator:
def periodic(self) -> None:
"""Called every robot loop to process vision data"""
# Update cameras with current robot orientation
yaw = self.poseReceiver.get().rotation()
self.camera1.updateRobotYaw(yaw)
self.camera2.updateRobotYaw(yaw)
# Control lights based on autonomous waypoint status
atPosition = self.atPositionIndicator.get()
self.camera1.setLights(atPosition)
self.camera2.setLights(atPosition)
# Process each camera
cameraPoses = [
VisionSubsystem.processCamera(
self.camera1,
self.vision1PosePublisher,
self.visionPose1ValidPublisher,
self.drive.estimator,
),
VisionSubsystem.processCamera(
self.camera2,
self.vision2PosePublisher,
self.visionPose2ValidPublisher,
self.drive.estimator,
),
]
# Publish camera poses for 3D visualization
validPoses = list(filter(lambda x: x is not None, cameraPoses))
self.cameraPosePublisher.set(validPoses)
@staticmethod
def processCamera(
camera: VisionSubsystemIO,
posePublisher: StructPublisher,
poseValidPublisher: BooleanPublisher,
driveEstimator: RobotPoseEstimator,
) -> Optional[Pose3d]:
"""Process vision data from a single camera"""
visionPose = camera.getRobotFieldPose()
cameraPose = None
if visionPose is not None:
# Calculate camera pose for visualization
cameraPose = pose3dFrom2d(visionPose.visionPose) + camera.location
# Publish pose data
posePublisher.set(visionPose.visionPose)
poseValidPublisher.set(True)
# Add to pose estimator for sensor fusion
driveEstimator.addVisionMeasurement(visionPose)
else:
poseValidPublisher.set(False)
return cameraPose
Vision Constants Organization
Team 1757 organizes vision-related constants for maintainability:
# constants/vision.py
from util.keyorganization import OptionalValueKeys
from wpimath.geometry import Transform3d, Translation3d, Rotation3d
# NetworkTables keys
kRobotVisionPose1ArrayKeys = OptionalValueKeys(
"/vision/robot_pose_1",
"/vision/robot_pose_1_valid"
)
kRobotVisionPose2ArrayKeys = OptionalValueKeys(
"/vision/robot_pose_2",
"/vision/robot_pose_2_valid"
)
kCameraLocationPublisherKey = "/vision/camera_poses"
# Camera transforms (robot-relative positions)
kRobotToCamera1Transform = Transform3d(
Translation3d(0.25, 0.3, 0.5), # x, y, z in meters
Rotation3d(0, -0.4, 0.785) # roll, pitch, yaw in radians
)
kRobotToCamera2Transform = Transform3d(
Translation3d(0.25, -0.3, 0.5), # x, y, z in meters
Rotation3d(0, -0.4, -0.785) # roll, pitch, yaw in radians
)
Pose Validation and Filtering
Team 1757 implements pose validation to ensure reliable vision measurements:
def isVisionMeasurementValid(self, visionPose: Pose2d, currentPose: Pose2d) -> bool:
"""Validate vision measurement before using in pose estimator"""
# Check field boundaries
if (abs(visionPose.X()) > 16.5 or # Field length
abs(visionPose.Y()) > 8.2): # Field width
return False
# Check distance from current estimate
distance = currentPose.translation().distance(visionPose.translation())
if distance > 2.0: # 2 meter maximum jump
return False
# Check if pose is reasonable (not NaN, etc.)
if (not math.isfinite(visionPose.X()) or
not math.isfinite(visionPose.Y())):
return False
return True
Key Benefits of Team 1757's Vision Architecture
- Modular Design: IO abstraction supports different camera types
- Multi-Camera Fusion: Combines data from multiple vision sources
- Robust Validation: Filters invalid measurements before pose estimation
- NetworkTables Integration: Comprehensive logging for debugging
- Simulation Support: Provides vision simulation for testing
- Alliance Awareness: Proper coordinate system handling
- Latency Compensation: Accounts for processing and capture delays
This architecture provides reliable vision-based localization that significantly improves autonomous accuracy and enables advanced features like dynamic path planning and real-time field awareness.
Controllers
Controllers are algorithms that automatically adjust system outputs to achieve desired behaviors. In robotics, they're essential for precise motion control, maintaining setpoints, and responding to disturbances. RobotPy provides several controller types, each suited for different applications.
Control Theory Fundamentals
flowchart LR
A[Reference/Setpoint] --> B[Controller]
B --> C[Plant/System]
C --> D[Output]
C --> E[Sensor]
E --> F[Feedback]
F --> G[Error Calculator]
A --> G
G --> B
subgraph "Closed Loop Control"
B
C
E
F
G
end
style A fill:#e1f5fe
style D fill:#e8f5e8
style G fill:#fff3e0
Key Concepts
- Plant: The system being controlled (motor, elevator, drivetrain)
- Setpoint: Desired output value (target position, velocity)
- Error: Difference between setpoint and actual output
- Feedback: Measured system output (encoder, gyro, vision)
- Control Signal: Controller output to the plant
Controller Types Comparison
| Controller | Complexity | Tuning Effort | Best Use Cases | Steady-State Error |
|---|---|---|---|---|
| Bang-Bang | Very Low | None | Binary states, simple mechanisms | High |
| PID | Medium | Moderate | Position/velocity control | Low (with I term) |
| PIDF | Medium-High | High | Systems with known dynamics | Very Low |
| Profiled PID | High | High | Smooth motion profiles | Very Low |
System Response Characteristics
xychart-beta
title "Step Response Comparison"
x-axis [0, 1, 2, 3, 4, 5, 6, 7, 8, 9, 10]
y-axis "Output" 0 --> 1.4
line "Well-Tuned PID" [0, 0.6, 0.95, 1.05, 1.02, 1.0, 0.99, 1.0, 1.0, 1.0, 1.0]
line "Oscillatory" [0, 0.8, 1.2, 0.9, 1.1, 0.95, 1.05, 0.98, 1.02, 0.99, 1.01]
line "Sluggish" [0, 0.2, 0.4, 0.6, 0.75, 0.85, 0.92, 0.96, 0.98, 0.99, 1.0]
Performance Metrics
- Rise Time: Time to reach 90% of setpoint
- Settling Time: Time to stay within ±5% of setpoint
- Overshoot: Peak value beyond setpoint
- Steady-State Error: Final error after settling
Controller Selection Guide
Bang-Bang Controller
- When to use: Binary operations, systems with hysteresis
- Examples: Compressors, simple intakes, binary mechanisms
- Advantages: Simple, robust, fast response
- Disadvantages: Oscillation, wear, inefficiency
PID Controller
- When to use: Continuous control, position/velocity regulation
- Examples: Arm positioning, shooter speed, drivetrain heading
- Advantages: Versatile, well-understood, handles disturbances
- Disadvantages: Requires tuning, can be sluggish
PIDF Controller
- When to use: Systems with known dynamics, gravity compensation
- Examples: Elevators, arms against gravity, flywheels
- Advantages: Fast response, reduced steady-state error
- Disadvantages: Requires system modeling, complex tuning
Tuning Process Overview
flowchart TD
A[Start with P-only] --> B[Increase P until oscillation]
B --> C[Reduce P by 50%]
C --> D[Add D to reduce overshoot]
D --> E[Add I to eliminate steady-state error]
E --> F[Add F for known disturbances]
F --> G[Fine-tune all parameters]
G --> H{Satisfactory?}
H -->|No| I[Adjust parameters]
I --> G
H -->|Yes| J[Document final gains]
style A fill:#e1f5fe
style J fill:#e8f5e8
Implementation in RobotPy
Basic Controller Usage Pattern
# Standard pattern for controller implementation
class ControlledSubsystem(commands2.SubsystemBase):
def __init__(self):
super().__init__()
self.motor = ctre.WPI_TalonFX(1)
self.encoder = self.motor.getSelectedSensorPosition
# Choose appropriate controller
self.controller = wpilib.PIDController(
kP=0.1, kI=0.0, kD=0.0
)
# Set constraints if needed
self.controller.setTolerance(0.05) # 5% tolerance
def periodic(self):
# Run controller every 20ms
if self.controller.getSetpoint() != 0:
output = self.controller.calculate(self.encoder())
self.motor.set(output)
def setSetpoint(self, setpoint):
self.controller.setSetpoint(setpoint)
def atSetpoint(self):
return self.controller.atSetpoint()
Advanced Topics
The following pages provide detailed coverage of each controller type:
- Bang-Bang: Simple on/off control with hysteresis
- PID Control: Proportional-Integral-Derivative control theory and tuning
- PIDF Control: Feedforward-enhanced PID for improved performance
- Ramsete: Nonlinear trajectory following for differential drive
- Higher-Order Controllers: Advanced techniques for complex systems
Competition Considerations
Robustness
- Test controllers under varying battery voltage
- Validate performance with different game piece loads
- Ensure graceful degradation when sensors fail
Tuning Strategy
- Start conservative for safety
- Tune on actual robot, not simulation
- Document all gains and their testing conditions
- Have backup parameter sets for different scenarios
PID Control
A PID (Proportional-Integral-Derivative) controller is a closed-loop control algorithm that computes a control signal from the error between a desired setpoint and the measured process variable. It's widely used in FRC for positioning mechanisms, regulating flywheel speed, and heading control.
How PID Works
flowchart TD
subgraph "PID Controller"
A[Setpoint r] --> E[Error Calculator]
Y[Measured Output y] --> E
E --> |e = r - y| G[Error Signal]
G --> P["Proportional\nKp × e"]
G --> I["Integral\nKi × ∫e dt"]
G --> D["Derivative\nKd × de/dt"]
P --> S["Σ"]
I --> S
D --> S
end
S --> |Control Signal u| M[Motor/Actuator]
M --> Plant[Physical System]
Plant --> |Feedback| Y
style A fill:#e1f5fe
style Y fill:#f3e5f5
style P fill:#e8f5e8
style I fill:#fff3e0
style D fill:#fce4ec
style S fill:#f1f8e9
PID Response Characteristics
xychart-beta
title "PID Component Contributions Over Time"
x-axis "Time" [0, 1, 2, 3, 4, 5, 6, 7, 8, 9, 10]
y-axis "Output" -0.5 --> 1.5
line "Setpoint" [0, 1, 1, 1, 1, 1, 1, 1, 1, 1, 1]
line "P Term" [0, 0.8, 0.3, 0.1, 0.05, 0.02, 0.01, 0.005, 0, 0, 0]
line "I Term" [0, 0.1, 0.25, 0.4, 0.5, 0.6, 0.65, 0.7, 0.72, 0.73, 0.74]
line "D Term" [0, 0.2, -0.1, -0.05, -0.02, -0.01, 0, 0, 0, 0, 0]
line "Total Output" [0, 1.1, 0.45, 0.45, 0.53, 0.61, 0.66, 0.705, 0.72, 0.73, 0.74]
- Proportional (Kp·e): Reacts to present error. Too high → oscillation; too low → sluggish.
- Integral (Ki·∫e): Eliminates steady-state error by accumulating past errors. Too high → windup and overshoot.
- Derivative (Kd·de/dt): Predicts future error to damp oscillations. Too high → noise amplification.
Tuning Strategy (Practical FRC Approach)
- Start with Kp only; increase until oscillations begin, then back off 30–50%.
- Add Kd to reduce overshoot and dampen oscillations.
- Add Ki slowly to remove steady-state error (watch for windup).
- Set output limits and integral range to prevent windup.
sequenceDiagram
participant Dev as Developer
participant Robot as Robot
Dev->>Robot: Set Kp = K, Ki = 0, Kd = 0
Robot-->>Dev: Observe Overshoot/Oscillation
Dev->>Robot: Reduce Kp, Add Kd
Robot-->>Dev: Observe Settling
Dev->>Robot: Add small Ki
Robot-->>Dev: Steady-State Error eliminated
Anti-Windup and Practical Considerations
- Set
integrator rangeto accumulate I only near the setpoint. - Clamp controller output to motor limits (e.g., -1 to 1).
- Filter measurement if sensor is noisy (moving average, low-pass).
- Use
atSetpoint()tolerance instead of exact equality.
RobotPy Example (Position Control)
import wpilib
import commands2
class Elevator(commands2.SubsystemBase):
def __init__(self):
super().__init__()
self.motor = wpilib.PWMSparkMax(0)
self.encoder = wpilib.Encoder(0, 1)
self.pid = wpilib.PIDController(kP=0.15, kI=0.0, kD=0.01)
self.pid.setTolerance(0.02) # 2 cm tolerance
self.pid.setIntegratorRange(-0.2, 0.2) # anti-windup
self.setpoint = 0.0
def periodic(self):
output = self.pid.calculate(self.encoder.getDistance(), self.setpoint)
# Clamp output to motor safe range
output = max(-0.8, min(0.8, output))
self.motor.set(output)
def goTo(self, height_m):
self.setpoint = height_m
def atGoal(self):
return self.pid.atSetpoint()
Common Symptoms and Fixes
| Symptom | Likely Cause | Fix |
|---|---|---|
| Oscillation | Kp too high, Kd too low | Reduce Kp, increase Kd |
| Slow response | Kp too low | Increase Kp |
| Steady-state error | Ki too low or zero | Add/increase Ki |
| Sudden jumps | Noisy sensor, Kd too high | Filter sensor, reduce Kd |
For more information, see the RobotPy PID controller documentation: PIDController
PIDF (PID + Feedforward)
PIDF adds a feedforward term (F) to standard PID control. Feedforward predicts the required output to achieve a desired setpoint based on a model of the system, while PID corrects residual error. This combination yields faster response and less steady-state error, especially for systems with known dynamics or steady disturbances (like gravity).
Control Structure
flowchart TD
subgraph "PIDF Controller"
A[Setpoint r] --> FF["Feedforward\nF(r, ṙ)"]
A --> E[Error Calculator]
Y[Measured Output y] --> E
E --> |e = r - y| G[Error Signal]
subgraph "PID Block"
G --> P["Proportional\nKp × e"]
G --> I["Integral\nKi × ∫e dt"]
G --> D["Derivative\nKd × de/dt"]
P --> SPID["ΣPID"]
I --> SPID
D --> SPID
end
FF --> S["Σ Total"]
SPID --> S
end
S --> |Control Signal u| M[Motor/Actuator]
M --> Plant[Physical System]
Plant --> |Feedback| Y
style A fill:#e1f5fe
style FF fill:#e8f5e8
style P fill:#fff3e0
style I fill:#fce4ec
style D fill:#f3e5f5
style S fill:#f1f8e9
PIDF vs PID Comparison
xychart-beta
title "PIDF vs PID Response Comparison"
x-axis "Time" [0, 0.5, 1, 1.5, 2, 2.5, 3, 3.5, 4, 4.5, 5]
y-axis "Output" 0 --> 1.2
line "Setpoint" [0, 0, 1, 1, 1, 1, 1, 1, 1, 1, 1]
line "PID Only" [0, 0, 0.2, 0.6, 0.9, 1.1, 1.05, 0.98, 1.02, 1.0, 1.0]
line "PIDF" [0, 0, 0.8, 1.0, 1.02, 1.0, 0.99, 1.0, 1.0, 1.0, 1.0]
- Feedforward (F) provides the bulk of the control effort based on system model
- PID fine-tunes and corrects for modeling errors and disturbances
- Result: Faster response, less overshoot, better tracking
Common Feedforward Models in FRC
Velocity Control (Flywheel)
- Model:
u = kS·sgn(v) + kV·v + kA·a- kS: static friction term
- kV: velocity gain (volts per m/s)
- kA: acceleration gain (volts per m/s²)
Position Control (Elevator with Gravity)
- Model:
u = kG + kV·v + kA·a- kG: voltage to hold position against gravity
xychart-beta
title "Feedforward + PID"
x-axis [0, 1, 2, 3, 4, 5]
y-axis "Output" 0 --> 1.2
bar "Feedforward" [0.0, 0.6, 0.7, 0.7, 0.7, 0.7]
line "PID Correction" [0.0, 0.05, 0.02, -0.01, 0.0, 0.0]
Implementing Feedforward in RobotPy
import wpilib
from wpimath.controller import PIDController
from wpimath.controller import SimpleMotorFeedforwardMeters
class Shooter(commands2.SubsystemBase):
def __init__(self):
super().__init__()
self.motor = wpilib.PWMSparkMax(2)
self.encoder = wpilib.Encoder(4, 5)
# PID on velocity (RPS)
self.pid = PIDController(0.1, 0.0, 0.001)
# Identify kS, kV, kA via characterization
self.ff = SimpleMotorFeedforwardMeters(kS=0.2, kV=1.5, kA=0.05)
self.target_rps = 0.0
def setSpeed(self, rps):
self.target_rps = rps
def periodic(self):
current_rps = self.encoder.getRate() # Ensure units match
# Feedforward for desired velocity (assume zero acceleration)
ff_volts = self.ff.calculate(self.target_rps, 0.0)
# PID correction based on measured velocity
pid_volts = self.pid.calculate(current_rps, self.target_rps)
volts = ff_volts + pid_volts
self.motor.setVoltage(volts)
Tuning Workflow
- Identify feedforward gains via system identification (SysId or manual characterization).
- Verify the system reaches approximate setpoints with FF alone.
- Add PID with small Kp to correct steady-state error.
- Add Kd to damp overshoot; add Ki if residual error remains.
Choosing Between PID and PIDF
| Scenario | PID | PIDF |
|---|---|---|
| Unknown system dynamics | ✓ | |
| Gravity compensation needed | ✓ | |
| High-speed response (flywheels) | ✓ | |
| Minimal tuning time | ✓ |
For references:
- WPIMath Feedforward classes
- SysId characterization tool
- PIDController API docs
Trapezoidal Profiled PID Controller
A Trapezoidal Profiled PID controller combines motion profiling with PID control to achieve smooth and constrained motion. Instead of commanding the controller directly to jump to a setpoint, a motion profile generates intermediate goals that respect velocity and acceleration limits.
Why Use a Profiled PID?
- Smooth motion with limited jerk
- Respects physical constraints (max velocity and acceleration)
- Reduces overshoot by planning motion upfront
- Ideal for mechanisms like elevators, arms, and turrets
Motion Profile Shape
xychart-beta
title "Trapezoidal Velocity Profile"
x-axis "Time" [0, 1, 2, 3, 4, 5, 6, 7]
y-axis "Velocity" 0 --> 1.2
line "Velocity" [0, 0.4, 0.8, 0.8, 0.8, 0.8, 0.4, 0.0]
xychart-beta
title "Corresponding Position Profile"
x-axis "Time" [0, 1, 2, 3, 4, 5, 6, 7]
y-axis "Position" 0 --> 4.0
line "Position" [0, 0.2, 0.8, 1.6, 2.4, 3.2, 3.8, 4.0]
Profile Phases:
- Acceleration phase: velocity increases linearly up to max
- Cruise phase: velocity constant at max
- Deceleration phase: velocity decreases linearly to zero
Control Structure
flowchart TD
subgraph "Profiled PID Controller"
A[Target Position r] --> P[Profile Generator]
P --> |Setpoint (pos, vel)| C[PID Controller]
Y[Measured pos/vel] --> C
end
C --> U[Control Output]
U --> Plant[Mechanism]
Plant --> |Feedback| Y
style A fill:#e1f5fe
style P fill:#e8f5e8
style C fill:#fff3e0
RobotPy Implementation
WPILib provides ProfiledPIDController and TrapezoidProfile.Constraints for profiled control.
from wpimath.controller import ProfiledPIDController
from wpimath.trajectory import TrapezoidProfile
# Constraints: max velocity (units/s), max acceleration (units/s^2)
constraints = TrapezoidProfile.Constraints(
maxVelocity=2.0, # meters per second
maxAcceleration=1.0 # meters per second^2
)
controller = ProfiledPIDController(
kP=2.0, kI=0.0, kD=0.2,
constraints=constraints
)
controller.setTolerance(0.02) # 2 cm tolerance
# Set the goal position
controller.setGoal(1.5) # meters
# In your periodic loop:
measurement = elevatorEncoder.getDistance()
output = controller.calculate(measurement)
# Optional: add feedforward based on desired velocity
setpoint = controller.getSetpoint() # TrapezoidProfile.State(pos, vel)
feedforward = kG + kV * setpoint.velocity
motor.setVoltage(output + feedforward)
Example: Elevator with Gravity Compensation
class Elevator(commands2.SubsystemBase):
def __init__(self):
super().__init__()
self.motor = wpilib.PWMSparkMax(3)
self.encoder = wpilib.Encoder(0, 1)
self.constraints = TrapezoidProfile.Constraints(1.5, 0.75)
self.pid = ProfiledPIDController(2.0, 0.0, 0.2, self.constraints)
self.pid.setTolerance(0.01) # 1 cm
# Feedforward terms (identify via characterization)
self.kG = 0.3 # gravity hold voltage
self.kV = 1.2 # velocity gain
self.goal = 0.0
def setHeight(self, meters: float):
self.goal = meters
self.pid.setGoal(meters)
def periodic(self):
position = self.encoder.getDistance()
output = self.pid.calculate(position)
# Add velocity feedforward for smoother motion
sp = self.pid.getSetpoint() # contains position and velocity
ff = self.kG + self.kV * sp.velocity
self.motor.setVoltage(output + ff)
def atGoal(self) -> bool:
return self.pid.atGoal()
Tuning Guidelines
- Start with motion constraints (max velocity and acceleration) that the mechanism can handle safely.
- Tune PID gains with moderate constraints to prevent oscillations.
- Add feedforward terms (kG, kV) to reduce PID effort.
- Increase constraints gradually as confidence grows.
Profiled vs Standard PID Response Comparison
xychart-beta
title "Response Comparison: Standard PID vs Profiled PID"
x-axis "Time" [0, 0.5, 1, 1.5, 2, 2.5, 3, 3.5, 4, 4.5, 5]
y-axis "Position" 0 --> 1.2
line "Setpoint" [0, 0, 1, 1, 1, 1, 1, 1, 1, 1, 1]
line "Standard PID" [0, 0, 0.3, 0.8, 1.1, 1.05, 0.98, 1.02, 0.995, 1.005, 1.0]
line "Profiled PID" [0, 0, 0.5, 0.8, 0.95, 1.0, 1.0, 1.0, 1.0, 1.0, 1.0]
Benefits of Profiled PID:
- Smoother acceleration and deceleration
- Reduced overshoot and oscillation
- Respects physical constraints
- More predictable motion timing
Team 1757 Example: Arm Subsystem
Here's how Team 1757 might implement a profiled PID for an arm mechanism:
import commands2
import wpilib
from wpimath.controller import ProfiledPIDController
from wpimath.trajectory import TrapezoidProfile
from wpimath.controller import ArmFeedforward
from constants.arm import (
kArmMotorId,
kArmEncoderChannels,
kArmPIDGains,
kArmConstraints,
kArmFeedforwardGains
)
class ArmSubsystem(commands2.SubsystemBase):
def __init__(self):
super().__init__()
self.setName(__class__.__name__)
# Hardware
self.motor = wpilib.PWMSparkMax(kArmMotorId)
self.encoder = wpilib.Encoder(*kArmEncoderChannels)
# Motion constraints (rad/s, rad/s^2)
constraints = TrapezoidProfile.Constraints(
kArmConstraints.maxVelocity,
kArmConstraints.maxAcceleration
)
# Profiled PID controller
self.pid = ProfiledPIDController(
kArmPIDGains.kP,
kArmPIDGains.kI,
kArmPIDGains.kD,
constraints
)
self.pid.setTolerance(0.05) # 0.05 radian tolerance
# Arm feedforward for gravity compensation
self.feedforward = ArmFeedforward(
kArmFeedforwardGains.kS, # Static friction
kArmFeedforwardGains.kG, # Gravity
kArmFeedforwardGains.kV, # Velocity
kArmFeedforwardGains.kA # Acceleration
)
self.goal_angle = 0.0
def setAngle(self, angle_radians: float):
"""Set target arm angle with profiled motion"""
self.goal_angle = angle_radians
self.pid.setGoal(angle_radians)
def periodic(self):
"""Called every robot loop"""
current_angle = self.encoder.getDistance()
# Get profiled setpoint (position and velocity)
setpoint = self.pid.getSetpoint()
# Calculate PID output
pid_output = self.pid.calculate(current_angle)
# Calculate feedforward based on desired position and velocity
ff_volts = self.feedforward.calculate(
setpoint.position, # Desired angle
setpoint.velocity # Desired angular velocity
)
# Combine PID and feedforward
total_volts = pid_output + ff_volts
# Apply to motor
self.motor.setVoltage(total_volts)
def atGoal(self) -> bool:
"""Check if arm has reached target position"""
return self.pid.atGoal()
def getCurrentAngle(self) -> float:
"""Get current arm angle in radians"""
return self.encoder.getDistance()
Advanced: Custom Profile Generation
For complex motions, you can generate custom profiles:
from wpimath.trajectory import TrapezoidProfile
# Create constraints
constraints = TrapezoidProfile.Constraints(2.0, 1.0)
# Create profile from current state to goal
initial_state = TrapezoidProfile.State(0.0, 0.0) # pos=0, vel=0
goal_state = TrapezoidProfile.State(1.5, 0.0) # pos=1.5, vel=0
profile = TrapezoidProfile(constraints, goal_state, initial_state)
# Sample profile at different times
for t in [0, 0.5, 1.0, 1.5, 2.0]:
state = profile.calculate(t)
print(f"t={t}: pos={state.position:.2f}, vel={state.velocity:.2f}")
When to Use Profiled PID vs. Standard PID
| Scenario | Standard PID | Profiled PID |
|---|---|---|
| Precise positioning w/ smooth motion | ✓ | |
| Slow, simple mechanisms | ✓ | |
| Velocity-only control (flywheels) | ✓ | |
| Elevator/Arm with constraints | ✓ | |
| High-precision positioning | ✓ | |
| Systems with backlash | ✓ | ✓ |
Common Applications in FRC
- Elevators: Smooth vertical motion with gravity compensation
- Arms: Rotational positioning with inertia considerations
- Turrets: Precise angular positioning for shooting
- Intakes: Controlled deployment/retraction
- Climbers: Sequential positioning for end-game
For more information, see WPILib's ProfiledPIDController and TrapezoidProfile documentation.
Bang-Bang Control
Bang-bang (on-off) control switches the actuator fully on or fully off based on the error sign. It's best for systems where precision is not critical or where the plant naturally smooths the control (e.g., with inertia).
Behavior
flowchart TD
A[Setpoint r] --> B[Error e = r - y]
Y[Measured Output y] --> B
B --> C{e > 0?}
C -- Yes --> D[Full Positive Output]
C -- No --> E[Full Negative/Off]
D --> Plant
E --> Plant
Plant --> Y
With Hysteresis (Recommended)
Hysteresis prevents rapid on/off chatter near the setpoint by defining a deadband region.
stateDiagram-v2
[*] --> Off
Off --> On: error > +threshold
On --> Off: error < -threshold
Pros and Cons
- Pros: Simple, fast to implement, robust to modeling errors
- Cons: Causes oscillation around setpoint, can induce wear, inefficient
RobotPy Examples
Simple On/Off
class Shooter(commands2.SubsystemBase):
def __init__(self):
super().__init__()
self.motor = wpilib.PWMSparkMax(3)
def shoot(self):
self.motor.set(1.0)
def stop(self):
self.motor.set(0.0)
Bang-Bang with Hysteresis for Velocity
class BangBangVelocity:
def __init__(self, setpoint_rps: float, threshold: float = 0.5):
self.setpoint = setpoint_rps
self.threshold = threshold
def calculate(self, measured_rps: float) -> float:
error = self.setpoint - measured_rps
if error > self.threshold:
return 1.0 # full power
elif error < -self.threshold:
return 0.0 # off or negative if bidirectional
else:
# within deadband, hold last output or choose strategy
return 0.0
When to Use Bang-Bang
- Binary mechanisms (solenoids are better but conceptually similar)
- Systems with high inertia (flywheels) as a fallback
- Temporary control when PID tuning is not yet available
For precision tasks, prefer PID or PIDF.
Ramsete
The Ramsete controller is a controller that is specifically designed for path following with a differential drivetrain. It is a nonlinear controller that is able to track a path with a high degree of accuracy, even in the presence of disturbances.
The Ramsete controller works by calculating the error between the robot's current pose and the desired pose on the path. It then uses this error to calculate the linear and angular velocities that will move the robot closer to the path.
WPILib provides a RamseteCommand that makes it easy to use the Ramsete controller.
Example: Following a Trajectory with RamseteCommand
This example shows how to create a trajectory and follow it using RamseteCommand.
import commands2
import wpilib.controller
import wpimath.kinematics
from wpimath.trajectory import TrajectoryGenerator, TrajectoryConfig
from wpimath.geometry import Pose2d, Rotation2d
# Assume you have a Drivetrain subsystem with the following:
# - getPose() -> Pose2d
# - getWheelSpeeds() -> DifferentialDriveWheelSpeeds
# - tankDriveVolts(left_volts, right_volts)
# - kinematics -> DifferentialDriveKinematics
# from subsystems.drivetrain import Drivetrain
class MyRobot(wpilib.TimedRobot):
def autonomousInit(self):
self.drivetrain = Drivetrain() # Your drivetrain subsystem
# 1. Create a trajectory to follow
config = TrajectoryConfig(maxVelocity=3, maxAcceleration=1.5)
config.setKinematics(self.drivetrain.kinematics)
trajectory = TrajectoryGenerator.generateTrajectory(
start=Pose2d(0, 0, Rotation2d.fromDegrees(0)),
interiorWaypoints=[],
end=Pose2d(2, 0, Rotation2d.fromDegrees(0)),
config=config
)
# 2. Create the RamseteCommand
ramsete_command = commands2.RamseteCommand(
trajectory, # The trajectory to follow
self.drivetrain.getPose, # A function to get the robot's pose
wpilib.controller.RamseteController(b=2, zeta=0.7), # The Ramsete controller
self.drivetrain.kinematics, # The drivetrain's kinematics
self.drivetrain.tankDriveVolts, # A method to control the motors by voltage
[self.drivetrain] # The drivetrain subsystem, for requirements
)
# 3. Schedule the command
# The command will run and automatically finish when the trajectory is done.
ramsete_command.schedule()
For more information, see the RobotPy Ramsete controller documentation: https://robotpy.readthedocs.io/en/stable/wpilib/wpilib.controller.RamseteController.html
Higher order controllers
Higher-order controllers are controllers that use more than just the error, the sum of the errors, and the rate of change of the error to calculate the output. These controllers can be used for more complex systems that cannot be controlled effectively with a simple PID or PIDF controller.
Some examples of higher-order controllers include:
- State-space controllers: These controllers use a mathematical model of the system to calculate the optimal output.
- Fuzzy logic controllers: These controllers use a set of rules to calculate the output, rather than a mathematical formula.
- Neural network controllers: These controllers use a neural network to learn the optimal control law for the system.
Higher-order controllers can be very powerful, but they can also be more difficult to design and tune than simple PID controllers.
Example: 4-Wheel Swerve Drive Holonomic Path Planning Controller
A holonomic path planning controller for a 4-wheel swerve drive is a good example of a higher-order controller. This type of controller is responsible for calculating the desired state of each of the four swerve modules (i.e., the angle and speed of each wheel) in order to follow a given trajectory.
Here is an example of a holonomic path planning controller for a 4-wheel swerve drive:
import wpilib
import wpilib.controller
import wpilib.kinematics
class SwerveController:
def __init__(self, kinematics, x_controller, y_controller, angle_controller):
self.kinematics = kinematics
self.x_controller = x_controller
self.y_controller = y_controller
self.angle_controller = angle_controller
def calculate(self, current_pose, desired_state):
# Calculate the feedforward from the desired state
ff = self.kinematics.toSwerveModuleStates(desired_state)
# Calculate the feedback from the PID controllers
x_feedback = self.x_controller.calculate(current_pose.X(), desired_state.pose.X())
y_feedback = self.y_controller.calculate(current_pose.Y(), desired_state.pose.Y())
angle_feedback = self.angle_controller.calculate(current_pose.rotation().radians(), desired_state.pose.rotation().radians())
# Combine the feedforward and feedback
chassis_speeds = wpilib.kinematics.ChassisSpeeds(x_feedback, y_feedback, angle_feedback)
# Convert the chassis speeds to swerve module states
swerve_module_states = self.kinematics.toSwerveModuleStates(chassis_speeds)
return swerve_module_states
For a complete example of a 4-wheel swerve drive holonomic path planning controller, see the swerve-bot example in the robotpy-examples repository on GitHub: https://github.com/robotpy/robotpy-examples/tree/main/swerve-bot
WPILIB
Vision Systems
Vision processing is a critical component in modern FRC robots, enabling autonomous targeting, field localization, and game piece detection. Team 1757 uses multiple vision solutions depending on the competition requirements and available hardware.
Vision System Architecture
graph TD
A[Field Vision] --> B[Target Detection]
A --> C[Robot Localization]
A --> D[Game Piece Recognition]
B --> E[Limelight]
B --> F[PhotonVision]
C --> G[AprilTags]
C --> H[Odometry Fusion]
D --> I[Color Detection]
D --> J[Shape Recognition]
E --> K[NetworkTables]
F --> K
G --> K
K --> L[Robot Code]
L --> M[Auto Alignment]
L --> N[Pose Estimation]
L --> O[Autonomous Navigation]
style E fill:#ff9800
style F fill:#4caf50
style G fill:#2196f3
style L fill:#9c27b0
Vision Solutions Overview
Hardware Platforms
| Solution | Hardware | Pros | Cons | Best Use Case |
|---|---|---|---|---|
| Limelight | Dedicated vision computer | Plug-and-play, optimized | Expensive, less flexible | Targeting, simple detection |
| PhotonVision | Raspberry Pi, Orange Pi | Cost-effective, flexible | Requires setup | Multi-camera, complex processing |
| Custom OpenCV | Any coprocessor | Maximum control | Development intensive | Specialized applications |
Communication Architecture
sequenceDiagram
participant R as Robot Code
participant N as NetworkTables
participant V as Vision System
participant C as Camera
C->>V: Raw Image Data
V->>V: Image Processing
V->>N: Vision Data (pose, targets)
N->>R: Subscribe to Vision Data
R->>R: Control Logic
R->>N: Command Data
N->>V: Robot State Info
Key Concepts
Target Detection
- Retroreflective tape: High-contrast targeting for game elements
- Color filtering: HSV color space filtering for game pieces
- Contour analysis: Shape and area filtering for target validation
- Multi-target tracking: Tracking multiple targets simultaneously
Robot Localization
- AprilTags: Fiducial markers providing precise 6DOF pose estimation
- Pose estimation: 3D position and orientation calculation
- Sensor fusion: Combining vision with odometry for robust localization
- Field mapping: Using known target positions for global positioning
Data Processing Pipeline
flowchart LR
A[Camera Input] --> B[Image Preprocessing]
B --> C[Feature Detection]
C --> D[Target Validation]
D --> E[Pose Calculation]
E --> F[NetworkTables Output]
B --> B1[Exposure Control]
B --> B2[Color Conversion]
C --> C1[Contour Finding]
C --> C2[AprilTag Detection]
D --> D1[Area Filtering]
D --> D2[Aspect Ratio Check]
E --> E1[solvePnP]
E --> E2[Transform to Field]
Integration with Robot Code
NetworkTables Communication
# Vision data subscription in robot code
from networktables import NetworkTables as nt
class VisionSubsystem(commands2.SubsystemBase):
def __init__(self):
super().__init__()
self.limelight = nt.getTable("limelight")
self.photonvision = nt.getTable("photonvision")
def get_target_data(self):
# Get targeting data from Limelight
tv = self.limelight.getNumber("tv", 0) # Valid target
tx = self.limelight.getNumber("tx", 0) # Horizontal offset
ty = self.limelight.getNumber("ty", 0) # Vertical offset
ta = self.limelight.getNumber("ta", 0) # Target area
return {"valid": tv, "x_offset": tx, "y_offset": ty, "area": ta}
def get_pose_estimate(self):
# Get robot pose from AprilTag detection
return self.photonvision.getNumberArray("robotPose", [0,0,0,0,0,0])
Auto-Alignment Commands
class AlignToTarget(commands2.CommandBase):
def __init__(self, drivetrain, vision):
super().__init__()
self.drivetrain = drivetrain
self.vision = vision
self.rotation_controller = PIDController(0.05, 0, 0.003)
def execute(self):
target_data = self.vision.get_target_data()
if target_data["valid"]:
rotation_speed = self.rotation_controller.calculate(
target_data["x_offset"], 0
)
self.drivetrain.arcade_drive(0, rotation_speed)
def isFinished(self):
target_data = self.vision.get_target_data()
return abs(target_data["x_offset"]) < 2.0 # Within 2 degrees
Performance Considerations
Latency Optimization
- Camera settings: Reduce exposure time, adjust resolution
- Processing pipeline: Optimize algorithms, reduce unnecessary calculations
- Network communication: Minimize data transmission, use efficient protocols
- Multi-threading: Parallel processing for image acquisition and analysis
Reliability Factors
- Lighting conditions: Account for varying field lighting
- Motion blur: Handle robot movement during image capture
- Occlusion handling: Multiple camera angles, redundant detection
- Fallback systems: Graceful degradation when vision is unavailable
Competition Strategy
Vision System Selection
- Game analysis: Determine vision requirements from game manual
- Field layout: Map AprilTag positions and target locations
- Alliance strategy: Coordinate with alliance partners on shared targets
- Backup plans: Implement vision-independent autonomous modes
Troubleshooting Guide
Common Issues
- No target detection: Check lighting, camera focus, thresholds
- Jittery targeting: Tune PID controllers, add filtering
- Network latency: Check NetworkTables connection, reduce data rate
- Inconsistent pose: Verify AprilTag positions, check camera calibration
Diagnostic Tools
- Camera stream: Monitor raw camera feed
- Processed overlay: Visualize detection results
- NetworkTables viewer: Monitor data transmission
- Field visualization: Plot robot pose and targets
AprilTags for Robot Localization
AprilTags are fiducial markers that provide precise 6DOF (6 Degrees of Freedom) pose estimation for robot localization in FRC. They are essentially 2D barcodes that can be detected by cameras and used to determine the robot's position and orientation on the field with high accuracy.
AprilTag Fundamentals
graph TD
A[AprilTag Detection] --> B[Corner Extraction]
B --> C[Homography Calculation]
C --> D[Pose Estimation]
D --> E[3D Position & Orientation]
A --> A1[Tag Family]
A --> A2[ID Detection]
A --> A3[Error Correction]
B --> B1[Sub-pixel Accuracy]
B --> B2[Corner Refinement]
C --> C1[Perspective Transform]
C --> C2[3x3 Matrix]
D --> D1[solvePnP Algorithm]
D --> D2[Camera Calibration]
E --> E1[X, Y, Z Position]
E --> E2[Roll, Pitch, Yaw]
style A fill:#2196f3
style D fill:#ff9800
style E fill:#4caf50
Tag Families and Selection
FRC Standard: 36h11
FRC uses the 36h11 tag family, which provides:
- 36: 6x6 bit data area
- h11: Hamming distance of 11 (error correction capability)
- ID Range: 1-30 for official field tags, 31+ for custom use
- Error Tolerance: Can correct up to 5-bit errors
# Tag family characteristics
class AprilTagFamily:
FAMILY_36H11 = {
"name": "tag36h11",
"total_tags": 587, # Total possible tags
"frc_range": range(1, 31), # Official FRC tags
"custom_range": range(31, 100), # Team-specific tags
"hamming_distance": 11,
"bit_size": 6,
"border_size": 1
}
Official FRC Field Layout (2024 Crescendo Example)
| Tag ID | Location | Alliance | Purpose |
|---|---|---|---|
| 1-2 | Source Side | Blue | Game piece pickup |
| 3-4 | Speaker | Blue | Scoring target |
| 5 | Amp | Blue | Scoring target |
| 6 | Amp | Red | Scoring target |
| 7-8 | Speaker | Red | Scoring target |
| 9-10 | Source Side | Red | Game piece pickup |
| 11-16 | Stage | Both | Climbing structure |
Detection Pipeline
Computer Vision Process
flowchart TD
A[Camera Frame] --> B[Grayscale Conversion]
B --> C[Gradient Calculation]
C --> D[Edge Detection]
D --> E[Quad Detection]
E --> F[Corner Refinement]
F --> G[Tag Decoding]
G --> H[Pose Calculation]
E --> E1[Four-sided Polygons]
E --> E2[Geometric Filtering]
F --> F1[Sub-pixel Precision]
F --> F2[Harris Corner Detector]
G --> G1[Bit Pattern Analysis]
G --> G2[Error Correction]
G --> G3[ID Assignment]
H --> H1[3D Transformation]
H --> H2[Camera Calibration Matrix]
Detection Parameters
class AprilTagDetector:
def __init__(self):
self.detector_params = {
"families": "tag36h11",
"nthreads": 4,
"quad_decimate": 2.0, # Reduce image resolution for speed
"quad_sigma": 0.0, # Gaussian blur (0 = disabled)
"decode_sharpening": 0.25, # Bit extraction sharpening
"refine_edges": True, # Sub-pixel corner refinement
"debug": False # Enable debug visualizations
}
def configure_for_performance(self, performance_mode="balanced"):
"""Configure detector for different performance requirements"""
if performance_mode == "speed":
self.detector_params.update({
"quad_decimate": 4.0,
"refine_edges": False,
"nthreads": 2
})
elif performance_mode == "accuracy":
self.detector_params.update({
"quad_decimate": 1.0,
"quad_sigma": 0.8,
"refine_edges": True,
"nthreads": 4
})
Pose Estimation Mathematics
Camera Model and Calibration
import numpy as np
from wpimath.geometry import Pose3d, Translation3d, Rotation3d
class CameraPoseEstimator:
def __init__(self, camera_matrix, distortion_coeffs, tag_size):
"""
camera_matrix: 3x3 intrinsic camera matrix
distortion_coeffs: 1x5 distortion coefficients
tag_size: physical size of AprilTag in meters
"""
self.camera_matrix = camera_matrix
self.distortion_coeffs = distortion_coeffs
self.tag_size = tag_size
# 3D object points for AprilTag corners (tag coordinate system)
# Origin at tag center, Z-axis pointing out of tag
half_size = tag_size / 2
self.object_points = np.array([
[-half_size, -half_size, 0], # Bottom-left
[ half_size, -half_size, 0], # Bottom-right
[ half_size, half_size, 0], # Top-right
[-half_size, half_size, 0] # Top-left
], dtype=np.float32)
def estimate_pose(self, image_points):
"""
Estimate 6DOF pose from detected tag corners
image_points: 4x2 array of corner pixel coordinates
"""
# Use OpenCV's solvePnP for pose estimation
success, rvec, tvec = cv2.solvePnP(
self.object_points,
image_points,
self.camera_matrix,
self.distortion_coeffs
)
if success:
# Convert to WPILib geometry
translation = Translation3d(tvec[0][0], tvec[1][0], tvec[2][0])
# Convert rotation vector to rotation matrix
rotation_matrix, _ = cv2.Rodrigues(rvec)
# Convert to WPILib Rotation3d
rotation = self.rotation_matrix_to_rotation3d(rotation_matrix)
return Pose3d(translation, rotation)
return None
def rotation_matrix_to_rotation3d(self, rotation_matrix):
"""Convert OpenCV rotation matrix to WPILib Rotation3d"""
# Extract Euler angles from rotation matrix
import math
sy = math.sqrt(rotation_matrix[0,0]**2 + rotation_matrix[1,0]**2)
if sy < 1e-6: # Gimbal lock case
x = math.atan2(-rotation_matrix[1,2], rotation_matrix[1,1])
y = math.atan2(-rotation_matrix[2,0], sy)
z = 0
else:
x = math.atan2(rotation_matrix[2,1], rotation_matrix[2,2])
y = math.atan2(-rotation_matrix[2,0], sy)
z = math.atan2(rotation_matrix[1,0], rotation_matrix[0,0])
return Rotation3d(x, y, z)
Pose Ambiguity Resolution
class PoseAmbiguityResolver:
def __init__(self):
self.pose_history = []
self.max_history = 10
def resolve_ambiguity(self, pose_estimates):
"""
AprilTag detection can produce multiple valid pose estimates.
Use various strategies to select the most likely pose.
"""
if len(pose_estimates) == 1:
return pose_estimates[0]
# Strategy 1: Choose pose with smaller reprojection error
best_pose = min(pose_estimates, key=lambda p: p.reprojection_error)
# Strategy 2: Temporal consistency with pose history
if self.pose_history:
consistent_pose = self.find_most_consistent_pose(
pose_estimates, self.pose_history[-1]
)
if consistent_pose:
best_pose = consistent_pose
# Strategy 3: Physical constraints (robot can't teleport)
best_pose = self.apply_physical_constraints(best_pose)
# Update history
self.pose_history.append(best_pose)
if len(self.pose_history) > self.max_history:
self.pose_history.pop(0)
return best_pose
def find_most_consistent_pose(self, candidates, previous_pose):
"""Find pose with minimum distance from previous pose"""
min_distance = float('inf')
best_candidate = None
for candidate in candidates:
distance = self.calculate_pose_distance(candidate.pose, previous_pose)
if distance < min_distance:
min_distance = distance
best_candidate = candidate
# Only accept if movement is reasonable (< 2 meters in 20ms)
if min_distance < 2.0: # meters
return best_candidate
return None
def calculate_pose_distance(self, pose1, pose2):
"""Calculate 3D distance between two poses"""
translation_distance = pose1.translation().distance(pose2.translation())
rotation_distance = abs(
pose1.rotation().getAngle() - pose2.rotation().getAngle()
)
# Weighted combination of translation and rotation differences
return translation_distance + rotation_distance * 0.5
Multi-Tag Localization
Bundle Adjustment
class MultiTagLocalizer:
def __init__(self, field_layout):
self.field_layout = field_layout # Known positions of all field tags
self.tag_observations = []
def add_tag_observation(self, tag_id, camera_to_tag_pose, timestamp):
"""Add a tag observation for bundle adjustment"""
if tag_id in self.field_layout:
self.tag_observations.append({
'tag_id': tag_id,
'camera_to_tag': camera_to_tag_pose,
'field_to_tag': self.field_layout[tag_id],
'timestamp': timestamp,
'weight': self.calculate_observation_weight(camera_to_tag_pose)
})
def estimate_robot_pose(self, camera_to_robot_transform):
"""Estimate robot pose using all recent tag observations"""
if len(self.tag_observations) < 1:
return None
# Filter recent observations (within last 100ms)
recent_obs = [obs for obs in self.tag_observations
if abs(obs['timestamp'] - time.time()) < 0.1]
if len(recent_obs) == 1:
# Single tag localization
return self.single_tag_localization(recent_obs[0], camera_to_robot_transform)
else:
# Multi-tag bundle adjustment
return self.bundle_adjustment(recent_obs, camera_to_robot_transform)
def bundle_adjustment(self, observations, camera_to_robot_transform):
"""Use multiple tag observations for robust pose estimation"""
robot_poses = []
weights = []
for obs in observations:
# Calculate robot pose from this tag observation
field_to_tag = obs['field_to_tag']
camera_to_tag = obs['camera_to_tag']
# Transform chain: field -> tag -> camera -> robot
field_to_camera = field_to_tag.transformBy(camera_to_tag.inverse())
field_to_robot = field_to_camera.transformBy(camera_to_robot_transform)
robot_poses.append(field_to_robot)
weights.append(obs['weight'])
# Weighted average of all pose estimates
return self.weighted_pose_average(robot_poses, weights)
def calculate_observation_weight(self, camera_to_tag_pose):
"""Calculate reliability weight based on tag distance and angle"""
distance = camera_to_tag_pose.translation().norm()
# Weight decreases with distance (farther = less accurate)
distance_weight = 1.0 / (1.0 + distance**2)
# Weight decreases with extreme viewing angles
tag_normal = np.array([0, 0, 1]) # Tag faces +Z direction
camera_direction = camera_to_tag_pose.translation().tolist()
camera_direction = np.array(camera_direction) / np.linalg.norm(camera_direction)
angle_weight = abs(np.dot(tag_normal, -camera_direction))
return distance_weight * angle_weight
Field Coordinate System
FRC Field Layout Integration
import json
from wpimath.geometry import Pose3d, Translation3d, Rotation3d
class FieldLayout:
def __init__(self, layout_file=None):
"""Load official FRC field layout from JSON file"""
self.tags = {}
if layout_file:
self.load_from_json(layout_file)
else:
self.load_default_layout() # 2024 Crescendo as example
def load_from_json(self, filename):
"""Load field layout from WPILib JSON format"""
with open(filename, 'r') as f:
data = json.load(f)
field_length = data['field']['length']
field_width = data['field']['width']
for tag_data in data['tags']:
tag_id = tag_data['ID']
pose_data = tag_data['pose']
translation = Translation3d(
pose_data['translation']['x'],
pose_data['translation']['y'],
pose_data['translation']['z']
)
rotation = Rotation3d(
pose_data['rotation']['quaternion']['X'],
pose_data['rotation']['quaternion']['Y'],
pose_data['rotation']['quaternion']['Z'],
pose_data['rotation']['quaternion']['W']
)
self.tags[tag_id] = Pose3d(translation, rotation)
def get_tag_pose(self, tag_id):
"""Get field-relative pose of specified tag"""
return self.tags.get(tag_id)
def get_alliance_tags(self, alliance_color):
"""Get tags relevant to specified alliance"""
if alliance_color.lower() == 'blue':
return {tag_id: pose for tag_id, pose in self.tags.items()
if tag_id in [1, 2, 3, 4, 5, 14, 15, 16]}
else: # Red alliance
return {tag_id: pose for tag_id, pose in self.tags.items()
if tag_id in [6, 7, 8, 9, 10, 11, 12, 13]}
Coordinate System Transformations
graph TD
A[Field Coordinate System] --> B[Robot Coordinate System]
A --> C[Camera Coordinate System]
A --> D[AprilTag Coordinate System]
B --> B1["Origin: Field Corner"]
B --> B2["X: Downfield"]
B --> B3["Y: Left"]
B --> B4["Z: Up"]
C --> C1["Origin: Camera Center"]
C --> C2["X: Right"]
C --> C3["Y: Down"]
C --> C4["Z: Forward"]
D --> D1["Origin: Tag Center"]
D --> D2["X: Tag Right"]
D --> D3["Y: Tag Down"]
D --> D4["Z: Out of Tag"]
style A fill:#e1f5fe
style B fill:#f3e5f5
style C fill:#e8f5e8
style D fill:#fff3e0
Performance Optimization
Detection Speed vs Accuracy Trade-offs
class AprilTagOptimizer:
def __init__(self):
self.performance_profiles = {
"competition": {
"quad_decimate": 2.0,
"quad_sigma": 0.0,
"refine_edges": True,
"nthreads": 4,
"max_hamming": 2 # Allow some errors for reliability
},
"practice": {
"quad_decimate": 1.5,
"quad_sigma": 0.8,
"refine_edges": True,
"nthreads": 4,
"max_hamming": 0 # Perfect detection only
},
"debugging": {
"quad_decimate": 1.0,
"quad_sigma": 0.0,
"refine_edges": True,
"nthreads": 1,
"debug": True
}
}
def optimize_for_distance(self, estimated_distance):
"""Adjust detection parameters based on expected tag distance"""
if estimated_distance > 5.0: # Far tags
return {
"quad_decimate": 1.0, # Higher resolution needed
"refine_edges": True,
"quad_sigma": 0.8 # Some blur to reduce noise
}
elif estimated_distance > 2.0: # Medium distance
return {
"quad_decimate": 2.0,
"refine_edges": True,
"quad_sigma": 0.0
}
else: # Close tags
return {
"quad_decimate": 3.0, # Can sacrifice resolution for speed
"refine_edges": False,
"quad_sigma": 0.0
}
Troubleshooting and Validation
Common Detection Issues
- Poor Lighting Conditions
def validate_lighting(self, image): """Check if lighting is adequate for tag detection""" mean_brightness = np.mean(image) brightness_std = np.std(image) if mean_brightness < 50: return "Too dark - increase lighting" elif mean_brightness > 200: return "Too bright - reduce exposure or add polarizing filter" elif brightness_std < 30: return "Low contrast - check lighting uniformity" else: return "Lighting OK"- Motion Blur
def detect_motion_blur(self, image): """Detect motion blur that could affect tag detection""" laplacian_var = cv2.Laplacian(image, cv2.CV_64F).var() if laplacian_var < 100: return "Possible motion blur detected" else: return "Image sharpness OK"- Tag Size and Distance Validation
def validate_detection(self, tag_detection, expected_tag_size): """Validate tag detection against expected parameters""" # Check tag size consistency detected_corners = tag_detection.corners detected_size = self.calculate_tag_size_pixels(detected_corners) # Estimate distance from tag size estimated_distance = (self.camera_focal_length * expected_tag_size) / detected_size if estimated_distance > 10.0: return "Warning: Tag very far - low accuracy expected" elif estimated_distance < 0.3: return "Warning: Tag very close - may be outside camera FOV soon" else: return f"Distance estimate: {estimated_distance:.2f}m"Calibration Verification
class CalibrationValidator: def __init__(self, known_tag_positions): self.known_positions = known_tag_positions def validate_camera_calibration(self, detections): """Verify camera calibration accuracy using known tag positions""" position_errors = [] for detection in detections: tag_id = detection.tag_id if tag_id in self.known_positions: # Calculate position from detection estimated_pos = self.calculate_tag_position(detection) known_pos = self.known_positions[tag_id] error = estimated_pos.distance(known_pos) position_errors.append(error) if position_errors: mean_error = np.mean(position_errors) max_error = np.max(position_errors) print(f"Calibration validation:") print(f" Mean position error: {mean_error:.3f}m") print(f" Max position error: {max_error:.3f}m") if mean_error > 0.1: # 10cm average error print(" WARNING: High position errors - recalibrate camera") else: print(" Calibration appears accurate")Competition Implementation
Robust Localization System
class CompetitionAprilTagSystem: def __init__(self, field_layout, camera_configs): self.field_layout = field_layout self.cameras = {} self.pose_estimator = None self.last_valid_poses = {} # Initialize cameras for name, config in camera_configs.items(): self.cameras[name] = AprilTagCamera(name, config) def get_robot_pose(self): """Get most reliable robot pose estimate""" all_observations = [] # Collect observations from all cameras for camera in self.cameras.values(): detections = camera.get_latest_detections() for detection in detections: if self.validate_detection(detection): all_observations.append(detection) if not all_observations: return None # Use multi-tag bundle adjustment for best accuracy if len(all_observations) >= 2: return self.multi_tag_localization(all_observations) else: return self.single_tag_localization(all_observations[0]) def validate_detection(self, detection): """Validate detection quality and consistency""" # Check detection quality metrics if detection.decision_margin < 50: # Low confidence return False if detection.hamming_distance > 2: # Too many bit errors return False # Check for reasonable pose estimate pose = detection.pose_estimate if pose.translation().norm() > 15: # Unreasonably far return False # Check temporal consistency tag_id = detection.tag_id if tag_id in self.last_valid_poses: last_pose = self.last_valid_poses[tag_id] current_pose = pose movement = last_pose.translation().distance(current_pose.translation()) time_diff = detection.timestamp - last_pose.timestamp # Robot can't move faster than 5 m/s if movement / time_diff > 5.0: return False # Update pose history self.last_valid_poses[tag_id] = { 'pose': pose, 'timestamp': detection.timestamp } return TrueAprilTags provide the foundation for accurate robot localization in FRC, enabling autonomous navigation and precise game piece manipulation. Proper implementation requires careful attention to camera calibration, detection parameters, and pose estimation algorithms.
Limelight Vision System
The Limelight is a plug-and-play smart camera designed specifically for FRC robots. It provides high-performance vision processing with minimal setup, making it ideal for targeting applications and game piece detection.
Hardware Overview
graph TD A[Limelight Unit] --> B[Built-in Camera] A --> C[ARM Processor] A --> D[Ethernet Connection] A --> E[LED Ring] B --> F[Global Shutter] B --> G[Variable Focus] C --> H[OpenCV Processing] C --> I[Custom Pipelines] D --> J[NetworkTables] D --> K[Web Interface] E --> L[Illumination Control] E --> M[Strobe Sync] style A fill:#ff9800 style C fill:#4caf50 style D fill:#2196f3Initial Setup
Network Configuration
- Connect to Limelight: Use Ethernet cable or WiFi
- Access Web Interface: Navigate to
http://limelight.local:5801 - Network Settings: Configure for robot network (10.TE.AM.11)
- Firmware Update: Ensure latest firmware is installed
Camera Calibration
# Camera intrinsics for distance calculation # These values are specific to each Limelight unit CAMERA_HEIGHT = 0.5 # meters from ground TARGET_HEIGHT = 2.5 # meters - typical FRC target height CAMERA_ANGLE = 15 # degrees - mounting angleVision Pipeline Configuration
Pipeline Setup Process
flowchart TD A[Raw Image] --> B[Color Filtering] B --> C[Contour Detection] C --> D[Shape Filtering] D --> E[Target Grouping] E --> F[Pose Estimation] F --> G[NetworkTables Output] B --> B1[HSV Thresholding] B --> B2[Erosion/Dilation] C --> C1[Find Contours] C --> C2[Hierarchy Analysis] D --> D1[Area Filter] D --> D2[Aspect Ratio] D --> D3[Convexity] E --> E1[Dual Target] E --> E2[Target Pairing] F --> F1[solvePnP] F --> F2[3D Coordinates]HSV Color Filtering
- Hue: Target color range (retroreflective green: 60-100)
- Saturation: Color intensity (150-255)
- Value: Brightness threshold (200-255)
- Exposure: Manual control (0-128, typically 1-10 for retroreflective)
Contour Filtering Parameters
Parameter Typical Range Purpose Area 0.01-100% Remove small noise Width/Height 0.1-10.0 Target aspect ratio Solidity 75-100% Shape completeness Max Vertices 4-1000 Polygon complexity Robot Integration
NetworkTables Data Structure
import networktables as nt from wpilib import SmartDashboard class LimelightVision: def __init__(self): self.table = nt.NetworkTables.getTable("limelight") def get_values(self): """ Get all Limelight values in a single call for efficiency """ return { "tv": self.table.getNumber("tv", 0), # Valid target (0 or 1) "tx": self.table.getNumber("tx", 0), # Horizontal offset (-27 to 27 degrees) "ty": self.table.getNumber("ty", 0), # Vertical offset (-20.5 to 20.5 degrees) "ta": self.table.getNumber("ta", 0), # Target area (0 to 100% of image) "ts": self.table.getNumber("ts", 0), # Target skew/rotation (-90 to 0 degrees) "tl": self.table.getNumber("tl", 0), # Latency (ms) "tshort": self.table.getNumber("tshort", 0), # Shorter side length "tlong": self.table.getNumber("tlong", 0), # Longer side length "thoriz": self.table.getNumber("thoriz", 0), # Horizontal side length "tvert": self.table.getNumber("tvert", 0), # Vertical side length } def set_pipeline(self, pipeline_number): """Switch between vision pipelines (0-9)""" self.table.putNumber("pipeline", pipeline_number) def set_led_mode(self, mode): """ Control LED state: 0: Use pipeline default 1: Force off 2: Force blink 3: Force on """ self.table.putNumber("ledMode", mode) def set_camera_mode(self, mode): """ Control camera mode: 0: Vision processing 1: Driver camera (exposure and color balance optimized) """ self.table.putNumber("camMode", mode)Distance Calculation
import math class DistanceCalculator: def __init__(self, camera_height, target_height, camera_angle): self.camera_height = camera_height # meters self.target_height = target_height # meters self.camera_angle = math.radians(camera_angle) # convert to radians def calculate_distance(self, ty): """ Calculate distance to target using trigonometry ty: vertical offset from Limelight in degrees """ ty_radians = math.radians(ty) angle_to_target = self.camera_angle + ty_radians distance = (self.target_height - self.camera_height) / math.tan(angle_to_target) return abs(distance) def calculate_angle_offset(self, tx): """ Convert horizontal pixel offset to real-world angle tx: horizontal offset from Limelight in degrees """ return tx # Limelight already provides this in degreesAdvanced Targeting Commands
class AdvancedLimelightAlign(commands2.CommandBase): def __init__(self, drivetrain, limelight, target_distance=2.0): super().__init__() self.drivetrain = drivetrain self.limelight = limelight self.target_distance = target_distance # PID controllers for alignment self.rotation_pid = PIDController(0.05, 0.01, 0.003) self.distance_pid = PIDController(0.8, 0.1, 0.05) # Tolerance values self.rotation_tolerance = 2.0 # degrees self.distance_tolerance = 0.1 # meters self.addRequirements(drivetrain) def initialize(self): self.limelight.set_pipeline(0) # Use targeting pipeline self.limelight.set_led_mode(3) # Turn on LEDs def execute(self): values = self.limelight.get_values() if values["tv"] == 1: # Valid target detected # Calculate desired outputs rotation_speed = self.rotation_pid.calculate(values["tx"], 0) # Distance-based forward speed current_distance = self.limelight.calculate_distance(values["ty"]) forward_speed = self.distance_pid.calculate( current_distance, self.target_distance ) # Apply speed limits and deadbands rotation_speed = max(-0.5, min(0.5, rotation_speed)) forward_speed = max(-0.3, min(0.3, forward_speed) self.drivetrain.arcade_drive(forward_speed, rotation_speed) # Log data for debugging SmartDashboard.putNumber("LL Distance", current_distance) SmartDashboard.putNumber("LL TX", values["tx"]) SmartDashboard.putNumber("LL TY", values["ty"]) else: # No target - stop robot self.drivetrain.arcade_drive(0, 0) def isFinished(self): values = self.limelight.get_values() if values["tv"] != 1: return False # Check if aligned within tolerances angle_aligned = abs(values["tx"]) < self.rotation_tolerance distance_aligned = abs( self.limelight.calculate_distance(values["ty"]) - self.target_distance ) < self.distance_tolerance return angle_aligned and distance_aligned def end(self, interrupted): self.limelight.set_led_mode(1) # Turn off LEDs self.drivetrain.arcade_drive(0, 0)Multi-Pipeline Strategy
Pipeline Organization
- Pipeline 0: Retroreflective targeting (competition)
- Pipeline 1: AprilTag detection (pose estimation)
- Pipeline 2: Game piece detection (color-based)
- Pipeline 3: Driver camera mode
class VisionPipelineManager: TARGETING = 0 APRILTAGS = 1 GAME_PIECES = 2 DRIVER_CAM = 3 def __init__(self, limelight): self.limelight = limelight self.current_pipeline = self.TARGETING def switch_to_targeting(self): if self.current_pipeline != self.TARGETING: self.limelight.set_pipeline(self.TARGETING) self.limelight.set_led_mode(3) # LEDs on self.current_pipeline = self.TARGETING def switch_to_driver_cam(self): if self.current_pipeline != self.DRIVER_CAM: self.limelight.set_pipeline(self.DRIVER_CAM) self.limelight.set_camera_mode(1) # Driver mode self.limelight.set_led_mode(1) # LEDs off self.current_pipeline = self.DRIVER_CAMPerformance Optimization
Reducing Latency
- Lower resolution: 320x240 for targeting, 160x120 for tracking
- Reduce exposure: Minimum needed for target detection
- Optimize thresholds: Precise HSV ranges reduce processing
- Single pipeline: Avoid frequent pipeline switching
Power Management
- LED control: Turn off when not needed
- Pipeline efficiency: Simpler pipelines consume less power
- Camera mode: Switch to driver mode during teleop
Troubleshooting
Common Issues
-
No target detection:
- Check LED functionality
- Verify HSV thresholds
- Confirm retroreflective tape condition
- Test exposure settings
-
Inconsistent targeting:
- Tune contour filtering parameters
- Check for reflections or false positives
- Verify stable robot positioning
- Consider dual-target algorithms
-
High latency:
- Reduce image resolution
- Simplify pipeline processing
- Check network congestion
- Optimize robot code polling rate
Diagnostic Tools
class LimelightDiagnostics: def __init__(self, limelight): self.limelight = limelight def log_vision_data(self): values = self.limelight.get_values() SmartDashboard.putBoolean("LL Has Target", values["tv"] == 1) SmartDashboard.putNumber("LL Latency", values["tl"]) SmartDashboard.putNumber("LL Area", values["ta"]) # Performance metrics if values["tl"] > 50: print("WARNING: High Limelight latency detected") if values["tv"] == 1 and values["ta"] < 0.5: print("WARNING: Target very small, may be unreliable")Competition Checklist
Pre-Match
- Verify Limelight IP address (10.TE.AM.11)
- Test all vision pipelines
- Confirm LED functionality
- Check camera focus and cleanliness
- Validate NetworkTables connection
- Test targeting commands in autonomous
During Competition
- Monitor vision latency on dashboard
- Watch for false positive detections
- Verify LED synchronization with camera
- Check for retroreflective tape damage
- Validate distance calculations
For detailed setup instructions and advanced features, refer to the official Limelight documentation.
PhotonVision
PhotonVision is an open-source vision processing solution designed for FRC robots. It runs on coprocessors like Raspberry Pi or Orange Pi and provides flexible, cost-effective vision processing with advanced features like AprilTag detection and multi-camera support.
System Architecture
graph TD A[Coprocessor] --> B[PhotonVision Software] A --> C[USB Cameras] A --> D[Network Connection] B --> E[Web Interface] B --> F[Vision Processing] B --> G[Camera Management] F --> H[AprilTag Detection] F --> I[Retroreflective Targeting] F --> J[Color Object Detection] D --> K[NetworkTables] D --> L[Robot Communication] C --> M[USB Camera 1] C --> N[USB Camera 2] C --> O[USB Camera N] style A fill:#4caf50 style B fill:#2196f3 style F fill:#ff9800Hardware Setup
Recommended Hardware
Component Specification Purpose Coprocessor Raspberry Pi 4B (4GB+) Main processing unit Storage 32GB+ MicroSD (Class 10) OS and data storage Cameras USB 3.0 with global shutter Image capture Network Gigabit Ethernet preferred Robot communication Power 5V 3A supply Stable power delivery Installation Process
# Download and flash PhotonVision image # Available at: https://github.com/PhotonVision/photon-pi-gen/releases # Or install on existing Raspberry Pi OS wget -qO - https://github.com/PhotonVision/photon-pi-gen/releases/download/v2023.4.2/photon-pi-gen-v2023.4.2.img.xz sudo dd if=photon-pi-gen-v2023.4.2.img of=/dev/sdX bs=4M status=progressNetwork Configuration
# Configure static IP on robot network # Edit /etc/dhcpcd.conf interface eth0 static ip_address=10.TE.AM.12/24 static routers=10.TE.AM.1 static domain_name_servers=8.8.8.8 # Access web interface at http://10.TE.AM.12:5800Vision Pipeline Configuration
AprilTag Pipeline Setup
flowchart TD A[Camera Input] --> B[AprilTag Detection] B --> C[Pose Estimation] C --> D[Field Coordinate Transform] D --> E[Robot Pose Output] B --> B1[Tag Family Selection] B --> B2[Decimate Factor] B --> B3[Blur Sigma] B --> B4[Threads] C --> C1[Camera Calibration] C --> C2[Tag Size] C --> C3[solvePnP Algorithm] D --> D1[Field Layout] D --> D2[Robot to Camera Transform] E --> E1[NetworkTables] E --> E2[Robot Pose Array]Camera Calibration
# Camera calibration is essential for accurate pose estimation # Use the calibration tool in PhotonVision web interface import numpy as np class CameraCalibration: def __init__(self): # Example calibration parameters (must be measured for each camera) self.camera_matrix = np.array([ [700.0, 0.0, 320.0], [0.0, 700.0, 240.0], [0.0, 0.0, 1.0] ]) self.distortion_coeffs = np.array([0.1, -0.2, 0.0, 0.0, 0.0]) def get_fov(self): """Calculate field of view from camera matrix""" fx, fy = self.camera_matrix[0, 0], self.camera_matrix[1, 1] width, height = 640, 480 fov_x = 2 * np.arctan(width / (2 * fx)) fov_y = 2 * np.arctan(height / (2 * fy)) return np.degrees(fov_x), np.degrees(fov_y)Pipeline Configuration Parameters
AprilTag Settings
- Tag Family: 36h11 (FRC standard)
- Decimate: 2.0 (balance speed vs accuracy)
- Blur: 0.0 (start with no blur)
- Threads: 4 (match processor cores)
- Debug: Enabled for tuning
Retroreflective Settings
- HSV Range: Tune for target color
- Contour Filtering: Area, aspect ratio, solidity
- Multi-target: Group nearby targets
- 3D Mode: Enable for distance calculation
Robot Integration
PhotonVision Python Library
# Install: pip install photonlibpy from photonlibpy import PhotonCamera, PhotonUtils from photonlibpy.targeting import PhotonPipelineResult from wpimath.geometry import Pose3d, Transform3d, Translation3d, Rotation3d from wpimath.units import meters, degrees import math class PhotonVisionSubsystem(commands2.SubsystemBase): def __init__(self): super().__init__() # Initialize cameras self.apriltag_camera = PhotonCamera("apriltags") # Camera name in PhotonVision self.targeting_camera = PhotonCamera("targeting") # Robot to camera transform (adjust for your robot) self.robot_to_camera = Transform3d( Translation3d(0.5, 0.0, 0.5), # 0.5m forward, 0.5m up Rotation3d(0, math.radians(-20), 0) # 20 degrees down ) # Field layout for AprilTag positioning self.field_layout = None # Load from FRC field layout JSON def get_apriltag_pose(self): """Get robot pose from AprilTag detection""" result = self.apriltag_camera.getLatestResult() if result.hasTargets(): # Get the best target (closest/most reliable) target = result.getBestTarget() if self.field_layout and target.getFiducialId() > 0: # Calculate robot pose using field layout tag_pose = self.field_layout.getTagPose(target.getFiducialId()) if tag_pose: camera_to_target = target.getBestCameraToTarget() camera_pose = tag_pose.transformBy(camera_to_target.inverse()) robot_pose = camera_pose.transformBy(self.robot_to_camera.inverse()) return robot_pose return None def get_targeting_data(self): """Get targeting information for game pieces or goals""" result = self.targeting_camera.getLatestResult() if result.hasTargets(): target = result.getBestTarget() return { "valid": True, "yaw": target.getYaw(), "pitch": target.getPitch(), "area": target.getArea(), "skew": target.getSkew(), "latency": result.getLatencyMillis(), "timestamp": result.getTimestampSeconds() } return {"valid": False} def calculate_distance_to_target(self, target_height=2.5, camera_height=0.5, camera_angle=20): """Calculate distance using target pitch angle""" targeting_data = self.get_targeting_data() if targeting_data["valid"]: return PhotonUtils.calculateDistanceToTargetMeters( camera_height, target_height, math.radians(camera_angle), math.radians(targeting_data["pitch"]) ) return NoneAdvanced Pose Estimation
from wpimath.estimator import SwerveDrivePoseEstimator from wpimath.geometry import Pose2d class VisionPoseEstimator: def __init__(self, drivetrain, photon_vision): self.drivetrain = drivetrain self.photon_vision = photon_vision # Create pose estimator (example for swerve drive) self.pose_estimator = SwerveDrivePoseEstimator( drivetrain.kinematics, drivetrain.get_rotation(), drivetrain.get_module_positions(), Pose2d(), # Initial pose ) # Vision measurement standard deviations self.vision_measurement_std_devs = [0.5, 0.5, 0.5] # x, y, rotation in meters/radians def update(self): """Update pose estimator with odometry and vision measurements""" # Update with odometry self.pose_estimator.update( self.drivetrain.get_rotation(), self.drivetrain.get_module_positions() ) # Add vision measurements vision_pose = self.photon_vision.get_apriltag_pose() if vision_pose: # Convert Pose3d to Pose2d for 2D pose estimator pose_2d = vision_pose.toPose2d() # Add vision measurement with timestamp self.pose_estimator.addVisionMeasurement( pose_2d, self.photon_vision.get_last_timestamp(), self.vision_measurement_std_devs ) def get_estimated_pose(self): """Get current best estimate of robot pose""" return self.pose_estimator.getEstimatedPosition()Multi-Camera Management
class MultiCameraVision: def __init__(self): self.cameras = { "front": PhotonCamera("front_camera"), "back": PhotonCamera("back_camera"), "left": PhotonCamera("left_camera"), "right": PhotonCamera("right_camera") } # Camera transforms relative to robot center self.camera_transforms = { "front": Transform3d(Translation3d(0.3, 0.0, 0.5), Rotation3d()), "back": Transform3d(Translation3d(-0.3, 0.0, 0.5), Rotation3d(0, 0, math.pi)), "left": Transform3d(Translation3d(0.0, 0.3, 0.5), Rotation3d(0, 0, math.pi/2)), "right": Transform3d(Translation3d(0.0, -0.3, 0.5), Rotation3d(0, 0, -math.pi/2)) } def get_best_apriltag_measurement(self): """Get the most reliable AprilTag measurement from all cameras""" best_measurement = None best_confidence = 0 for camera_name, camera in self.cameras.items(): result = camera.getLatestResult() if result.hasTargets(): target = result.getBestTarget() # Calculate confidence based on area and ambiguity confidence = target.getArea() * (1 - target.getPoseAmbiguity()) if confidence > best_confidence: best_confidence = confidence best_measurement = { "camera": camera_name, "target": target, "transform": self.camera_transforms[camera_name], "timestamp": result.getTimestampSeconds() } return best_measurementPerformance Optimization
Processing Pipeline Tuning
class PerformanceMonitor: def __init__(self, camera): self.camera = camera self.latency_history = [] self.fps_history = [] def monitor_performance(self): """Monitor and log performance metrics""" result = self.camera.getLatestResult() if result: latency = result.getLatencyMillis() self.latency_history.append(latency) # Calculate FPS from timestamp differences current_time = result.getTimestampSeconds() if hasattr(self, 'last_timestamp'): fps = 1.0 / (current_time - self.last_timestamp) self.fps_history.append(fps) self.last_timestamp = current_time # Keep only recent history if len(self.latency_history) > 100: self.latency_history.pop(0) if len(self.fps_history) > 100: self.fps_history.pop(0) def get_average_latency(self): return sum(self.latency_history) / len(self.latency_history) if self.latency_history else 0 def get_average_fps(self): return sum(self.fps_history) / len(self.fps_history) if self.fps_history else 0Resource Management
- CPU Usage: Monitor with
htop, target <80% usage - Memory: Ensure sufficient RAM, use swap if needed
- Network Bandwidth: Optimize data transmission
- USB Bandwidth: Distribute cameras across USB buses
- Storage: Use high-speed SD cards, monitor wear
Troubleshooting
Common Issues
-
High Latency:
# Check system load htop # Monitor network latency ping 10.TE.AM.2 # RoboRIO # Check USB bus utilization lsusb -v -
Poor AprilTag Detection:
- Verify tag family (36h11 for FRC)
- Check camera focus and exposure
- Validate tag size configuration
- Ensure adequate lighting
-
NetworkTables Connection Issues:
# Test NetworkTables connection from networktables import NetworkTables NetworkTables.initialize(server='10.TE.AM.2') table = NetworkTables.getTable('photonvision') # Check connection status print(f"Connected: {NetworkTables.isConnected()}")Diagnostic Commands
# Check PhotonVision service status sudo systemctl status photonvision # View logs sudo journalctl -u photonvision -f # Check camera connectivity v4l2-ctl --list-devices # Monitor system resources top -p $(pgrep -f photonvision) # Test camera capture v4l2-ctl --device=/dev/video0 --stream-mmap --stream-count=10Competition Configuration
Pre-Competition Checklist
- Update PhotonVision to latest stable version
- Calibrate all cameras with field lighting
- Test AprilTag detection at various distances
- Verify network configuration (10.TE.AM.12)
- Backup configuration files
- Test failover to pure odometry
Field Setup
class FieldConfiguration: def __init__(self): # Load official field layout from WPILib from wpilib import DriverStation self.field_layout = DriverStation.getAlliance() # Get alliance color self.apriltag_positions = self.load_apriltag_layout() def configure_for_alliance(self, alliance_color): """Configure vision processing based on alliance color""" if alliance_color == DriverStation.Alliance.kRed: # Configure for red alliance specific targets self.primary_targets = [3, 4, 5] # Red alliance tags else: # Configure for blue alliance specific targets self.primary_targets = [6, 7, 8] # Blue alliance tagsFor comprehensive documentation and advanced features, visit the PhotonVision documentation.
RoboRIO
The RoboRIO is the central control computer for FRC robots. It runs your RobotPy code, interfaces with hardware, and connects to the field network.
I/O and Buses
graph TD A[RoboRIO] --> B[CAN] A --> C[PWM] A --> D[DIO] A --> E[Analog] A --> F[USB] A --> G[Ethernet] B --> B1[Motor Controllers] B --> B2[Sensors] C --> C1[Servos] D --> D1[Limit Switches] D --> D2[Quadrature Encoders] E --> E1[Pressure Sensor] F --> F1[Cameras] G --> G1[Radio]Deployment and Runtime
- Code entry point:
robot.pywithwpilib.run(MyRobot) - Typical control loop: 50Hz periodic methods (TimedRobot, CommandScheduler)
- Use
mdbook-replhere only for learning; real robot code deploys via pyfrc or VS Code WPILib tools
Networking
- mDNS names:
roborio-XXXX-frc.local - Static IP convention:
10.TE.AM.2 - NetworkTables: primary telemetry channel to dashboards and coprocessors
Best Practices
- Keep CAN IDs unique and documented
- Use brownout-friendly current limits on motor controllers
- Log critical telemetry for post-match analysis
Contributors:
CTRE
Cross The Road Electronics (CTRE) provides FRC-focused motor controllers and sensors with advanced on-controller features. Their Phoenix framework integrates tightly with WPILib/RobotPy and the CAN bus ecosystem.
System Architecture
graph TD A[RoboRIO] --> B[CAN Bus] B --> C[Talon FX (Falcon 500)] B --> D[Talon SRX] B --> E[Victor SPX] B --> F[CANcoder] A --> G[PWM] A --> H[DIO] A --> I[Analog] subgraph Optional J[CANivore CAN FD] end J -. USB .- A J --> B C --> C1[Onboard PID] C --> C2[Motion Magic] F --> F1[Absolute Position] style J fill:#ff5722 style C fill:#4caf50Phoenix Tools
- Phoenix Tuner: device configuration, firmware, diagnostics
- Signal logging: capture telemetry for tuning
- Self-test snapshot: quick device health check
Common Devices
- Talon FX: integrated encoder, onboard control, Motion Magic
- CANivore: secondary CAN FD network for high-bandwidth systems
- CANcoder: absolute encoder for mechanisms (see ctre/cancoder.md)
Integration Tips
- Use consistent CAN IDs and naming in Tuner
- Prefer on-controller control (PID/Motion Magic) to reduce loop latency
- If bus utilization is high, consider moving high-rate devices to CANivore
Contributors:
Talon FX
The Talon FX is a high-performance brushless motor controller from CTRE. It is designed to be used with the Falcon 500 motor, and it provides a number of advanced features, including:
- Integrated encoder: The Talon FX has a built-in encoder that provides high-resolution feedback on the motor's position and velocity.
- On-board PID: The Talon FX can run PID loops on-board, which can help to improve the performance and reduce the latency of your control loops.
- Motion Magic: Motion Magic is a feature that allows you to control the motor's position using a trapezoidal motion profile. This can be used to create smooth and accurate movements.
Example: Simple Position Control
This example shows how to configure a Talon FX and use its on-board PID controller to move to a specific position.
import ctre import wpilib class MyRobot(wpilib.TimedRobot): def robotInit(self): self.talon = ctre.WPI_TalonFX(1) self.joystick = wpilib.Joystick(0) # --- Configure the Talon FX --- self.talon.configFactoryDefault() # Start with a clean slate # Configure the PID gains for the position loop (slot 0) self.talon.config_kP(0, 0.1) self.talon.config_kI(0, 0.0) self.talon.config_kD(0, 0.0) # Configure the sensor. The integrated sensor is the default. self.talon.configSelectedFeedbackSensor(ctre.FeedbackDevice.IntegratedSensor, 0, 0) def teleopPeriodic(self): # When the A button is pressed on the joystick, move to position 10000 if self.joystick.getAButtonPressed(): target_position = 10000 # Sensor units self.talon.set(ctre.TalonFXControlMode.Position, target_position) # To simply drive the motor with a joystick: speed = self.joystick.getY() self.talon.set(ctre.TalonFXControlMode.PercentOutput, speed)
Contributors:
CANivore
The CANivore is a USB-to-CAN-FD adapter that adds a second, high-bandwidth CAN network to your robot. Typical use cases include swerve drive modules, high-rate sensor networks, and offloading bandwidth from the RoboRIO CAN bus.
Why CANivore
- Increased bandwidth (CAN FD) for high-frequency control loops
- Isolate critical devices from main bus traffic
- Improved robustness via bus segmentation
Wiring and Naming
- Connect CANivore via USB to the RoboRIO
- Daisy-chain CAN FD devices to the CANivore port
- Name the CANivore in Phoenix Tuner (e.g., "canivore") and use that name in code
Usage in RobotPy
import ctre # The name must match Phoenix Tuner device name for the CANivore CANIVORE_BUS_NAME = "canivore" # Device on the CANivore bus talon_on_canivore = ctre.WPI_TalonFX(1, canbus=CANIVORE_BUS_NAME) # Device on the default RoboRIO CAN bus talon_on_rio = ctre.WPI_TalonFX(2) # No canbus specifiedDiagnostics
- Use Phoenix Tuner to verify device presence on the CANivore bus
- Check bus utilization and error counters
- Keep firmware versions consistent across all CTRE devices
Contributors:
CANcoder
Contributors:
- Tag Size and Distance Validation
- Motion Blur